B003YL4KS0 EBOK (18 page)
Authors: Lorraine Massey,Michele Bender

Chemical straightening treatments were extremely popular about six or seven years ago when bone-straight hair was all the rage. Called Japanese straightening, thermal reconditioning, or Brazilian Keratin Treatment, among other names, these treatments use extremely strong chemicals and a special flat iron to alter the internal structure of the hair so that its curly bonds are changed to straight ones. It sounds simple, but it’s not. First of all, these treatments are time consuming, taking six to eight hours the first time you get it done and four to six hours to get your roots touched up. It also costs from $300 to $1,000 per treatment. But the worst part is that the treatments’ harsh chemicals can weaken the hair, causing split ends and breakage at the roots. This breakage leaves a halo of floating strands on top of your head—not a good look.

Chemical straightening is permanent, so the only way to return to your curly roots is to wait for your hair to grow out, and that can take months
or even years. (Some salons claim that their Brazilian straightening treatment is not permanent but wears off over the course of a few months. However, that’s not always the case.) Plus, the results that you’ve paid so much time and money for aren’t always pretty. I often hear chemically straightened girls, even those who like their smoother strands, complain that they can wear only one hairstyle that is pin-straight and flat against the head. Still, many are willing to be stuck with that look rather than the curly hair they don’t know how to manage. Often, you can’t color hair if you straighten it with one of these treatments, because the combination of chemicals can break your strands. Unfortunately, salons that tout these treatments and their unrealistic expectations don’t prepare you for the fallout.
Worse yet, these treatments may not be good for your health. An article in
Allure
magazine, “Scared Straight,” cautioned readers about the dangers of the popular Brazilian straightening treatment, and described the frightening lengths women will go to for sleek hair. The details in the article gave me chills: Two women and their hairstylist wear $700 military-grade rubber gas masks to keep from smelling the chemicals’ potent, unhealthy fumes. One of the known ingredients in some straightening is formaldehyde, which has been classified as a human carcinogen by the International Agency for Research on Cancer, part of the World Health Organization. Many salons took the Brazilian straightening treatment off their menus soon after this story ran or say they use a formaldehyde-free version of it, but it’s hard to know exactly what they’re putting on your hair, so you are straightening at your own risk.

Healthy new curls sprout beneath the straightened hair.
Now, if you’re a curly girl who has been having her hair chemically straightened but wants to return to her curly roots, welcome back! Don’t worry, your curls will be forgiving no matter how badly you’ve treated them. I’ll be honest, though, growing out chemically straightened hair isn’t easy. But when you’re ready, you are ready! And it
is
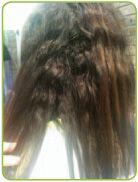
worth it. Now, your hair may not feel or look right when you first start to grow it out. As the healthy, new curls sprout, they act like little springs and push out the straightened hair. The result is two personalities of hair on your head: the regrowth of your natural, curly texture
at the top and your chemically straightened hair at the bottom. You can cut your hair starting where the new curls end and the straight hair begins, but most closeted curly girls won’t do this. Or you can wait for your hair to grow and for your curls to take over. How long this takes depends on the rate your hair grows and your curls’ spring factor. It will take time, patience, and absolute willpower. But you can do it! While your curls grow in, here are a few things you can do:
•
Toss out every bottle of shampoo. As you know by now, most shampoos contain harsh detergents that further dry out hair that’s parched and damaged from chemical treatments, and it never rinses out completely. Though conditioner can soften and smooth hair, even the most superior product won’t be able to repair overwashed and exhausted hair cuticle.

•
Start hydrating your hair with daily conditioning treatments ASAP. Your poor hair needs superhydration to repair itself from the straightening chemicals and to make sure the new curly growth is its healthiest. If you see a halo of frizz as your curls grow in, it just means that your hair hasn’t been hydrated enough. Keep it at bay by using conditioner, conditioner, and more conditioner.
•
Say good-bye to your brush. The act of brushing or combing the hair interferes with your curls’ formation, causing dispersed curls—otherwise known as frizz! Even when your hair is more straight than curly, you should get out of the brushing habit. Instead, use your fingers to comb through the hair—and then
only
while it’s wet and drenched with conditioner.
•
Get your hair trimmed often. Most curly girls don’t want to cut off all their straight hair, but you do need regular trims to “oxygenize” the hair. This means you refresh and aerate the hair so it can take in more oxygen and moisture, which helps those curly strands grow in faster.
•
Experiment with ways to style your hair while it’s growing out. Use leave-in conditioner and slick your hair back in a classic knot at the back of the head or off to the side. Try some of the updos in
chapter 15
,
page 157
; wear bandannas or hats. Just make sure you don’t pull your hair back too tightly or you’ll cause your hairline to recede. And always use ponytail holders without clasps that can cut through the hair.
•
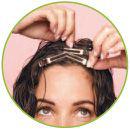
You can use clips to curl the straightened hair to match your curl pattern (see Making Waves sidebar, right, for details). But never use curling irons and, even worse, never perm the straight ends to match your curly roots, because the hair can break off. Setbacks set you back!
•
Eat a healthy diet that helps hair grow (see
chapter 3
,
page 29
, for tips).
•
Don’t be tempted to blow-fry or flat iron your roots to match your straight ends. Remember that straightening your curls is temporary—lasting only until your next shower or the next time it rains. Loving your curls and living with them is permanent! Also, those new roots are healthy, unprocessed hair and will eventually be your happy ends, so baby them. You want to nurture your curls, because soon you’ll have gorgeous, healthy hair without much effort.
•
To stay motivated, visualize how your curls will look in a few months.
CURL CONFESSIONMaria Barrios
teacherI went to the salon for a basic blow-out, but the stylist put a permanent relaxer on my curls without telling me! The shampoo, conditioning, and blow-out had taken a long time, but I thought that was because my hair was so thick. It wasn’t until I washed my hair that I realized it wasn’t curly anymore. My mother, who’s a hairdresser, took one look and knew immediately what had happened. Still, I couldn’t believe that a hair stylist would relax someone’s hair without discussing it first!
Then, when I went to get highlights, my hair broke off. First my curls had been straightened and now they were falling out! I was devastated. My hair had been one of my best attributes. I had to dye it pitch black (which looked bad with my very pale skin) so that the damage was less noticeable. For the next year and a half, I took really good care of my hair so that the curls growing in would be in good condition. Now it’s almost grown out, but I’ll never trust just anyone with my hair again!
MAKING WAVESIf your hair is naturally straight or if you are growing out straightened hair and have two hair types on your head, this method will help merge your two hair personalities into one.
1.
Use the cleansing routine for wavy and s’wavy hair (see
chapter 5
,
page 52
).2.
Tilt your head forward and cup the hair loosely in a paper towel, microfiber towel, or an old cotton T-shirt. Scrunch-squeeze as much water out of your hair as possible.3.
With your head still tilted, evenly distribute a palmful of gel throughout your hair with both hands, using the same scrunch-squeeze moation you did with the towel. You will start to see some wave formation in your hair.4.
Keeping your head tilted, use a blow-dryer (preferably an ionic one) with a diffuser on a low to medium heat setting until your hair is almost dry.
5.
Then stand upright and wrap sections of your hair tightly around your fingers, starting at the knuckle and going toward the fingertip. For tighter curls, use your pinky, and for slightly bigger waves, use two or three fingers. With different sections of hair, choose different widths, which will make the waves appear more natural.6.
Spray a clip with spray gel, and place the clip in the curl perpendicular to the scalp. This adds lift and softens a strong part. Old-fashioned hairnets work wonders in keeping hair in a holding pattern while you’ve got clips in your hair.7.
Leave clips in longer if your hair is quite straight or you want more defined waves; leave them in for a shorter time for looser waves. Gently remove the clips by holding the curl with one hand and opening the clip with the other.
8.
Lean over and tilt your head forward, place your splayed fingers lightly on your scalp, and gently shuffle the hair at the roots. Stand upright and lift the hands away from your scalp without raking your fingers through your hair.9.
Once hair is dry, loosen the gel cast by gently scrunching upward with your fingers in the same way you applied the gel. Then mist with spray gel (see
page 80
for recipe).10.
For the Rita Hayworth look, hold your head upright and gently finger comb through your hair to fuse the waves together.


