Read Microsoft Visual C# 2005 Express Edition: Build a Program Now! Online
Authors: Patrice Pelland
Tags: #General, #Computers, #C♯ (Computer program language), #Programming Languages, #C#, #Microsoft .NET Framework, #Computer Books: Languages, #Computer Graphics, #Application software, #C# (Computer program language), #Programming, #Microsoft Visual C# .NET, #Microsoft Visual C♯ .NET, #Electronic books, #Game Programming & Design, #Computing: Professional & Programming, #C (Computer program language), #Computers - Languages, #Programming Languages - C#, #Programming & scripting languages: general
Microsoft Visual C# 2005 Express Edition: Build a Program Now! (21 page)

2 either go to the Project menu and select
Add
Windows Form . . .
or go to the Solution Explorer,
right-click the project name (in this case, MyOwnBrowser)
select
Add
, and then select
Windows Form
. The Add
New Item dialog box will appear and ask which type of
form you want to add.
Select Windows Form and name the file Splash.cs.
3 Look at Figure 6-1 for the Add New Item dialog
to see what it should look like.
82
Microsoft Visual C# 2005 Express Edition: Build a Program Now!
C06622132.indd 82
C06622132.indd 82
10/24/05 3:37:12 PM
10/24/05 3:37:12 PM
A splash screen has particular properties since you’re not suppose to interact with it, it is purely infor4 mational and should not appear in the task bar, should not be resizable and more. Now make sure you select your new form in the
Properties window and set those par
Control Name
Control Type
Property
Value
ticular form properties using the
table to the right.
Splash Form
FormBorderStyle
None
The image for the background is
Splash Form
ShownInTaskbar
False
located in the Images folder under
Splash Form
StartPosition CenterScreen
Chapter 6 where you’ve installed your
companion content. (If you installed
Splash Form
Size:Width 450
the companion content at the default
Size:Height
375
location, then it should be at the following location on your hard drive: Splash Form
BackgroundImage
www.jpg
MyDocuments\Microsoft Press\VCS
2005 Express\)
Splash
Form
BackgroundImageLayout
Stretch
lblApplicationTitle Label
Text
Application
Title
Often, it’s difficult to select a par-
lblApplicationTitle Label
BackColor
Web:Transparent
ticular control. To see all controls
in the currently displayed form,
lblApplicationTitle Label
Font
Microsoft
Sans
Serif,
you can select the drop-down list
20pt
at the top of the Properties win-
dow. Figure 6-2 shows the drop-
down list for the Splash Screen
lblApplicationTitle Label
ForeColor
Web:White
form. To select any particular
control, highlight it on the list and
lblVersion Label Text
Version
it will be automatically selected on
the design surface.
lblVersion Label BackColor
Web:Transparent
lblVersion Label Font
Microsoft
Sans
Serif,
12pt
lblCopyright Label ForeColor
Web:White
lblCopyright Label Text
Copyright
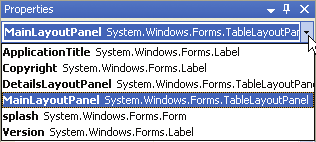
Figure 6-2
Finding all the controls on a
lblCopyright Label BackColor
Web:Transparent
selected form
lblCopyright Label Font
Microsoft
Sans
Serif,
8.25pt
lblCopyright Label ForeColor
Web:White
Chapter 6: Modify Your Web Browser Now!
83
C06622132.indd 83
C06622132.indd 83
10/24/05 3:37:12 PM
10/24/05 3:37:12 PM

Add three label controls to the form and name them
lblApplicationTitle
,
lblVersion
, and 5
When a procedure directive tells
lblCopyright
. Use the Properties window to set the properties specified in the previous table.
you to add a control and then
name it XYZ, it means that you
need to add the control onto the
Look at Figure 6-3 to see where the three labels are located and place them there in the designer. The 6
design surface, then go to the
text in the image is for reference only; the application title, version, and copyright information are all
Properties window and change the
obtained dynamically. This means the form will get the values from a variable or a setting somewhere in your
(Name) property of the control
project. In fact, at run time those three pieces of information are obtained when the splash screen is loaded
to XYZ.
by looking up application settings stored in the Project Designer Application pane. Now you’ll have to hook up the splash screen to the application and to do this 7 you have to modify the browser form constructor. Open the code for the browser form (not the splash screen form) and modify the constructor so that it looks like the following:
public partial class Browser : Form
{
Splash splashScreen = new Splash();
public Browser()
{
InitializeComponent();
splashScreen.Show();
Application.DoEvents();
}
The previous step will display the splash screen but you need to close it and 8 make it disappear whenever the other form is ready to be displayed. The last
Figure 6-3
event before the form is displayed is the Activated event. So you need to select the Browser form in Design
Splash screen with the background
View and then go in the Properties window. Then click on the Events button (yellow lightning) at the top of
and the labels location
the Properties window and double-click the Activated event. The Browser_Activated event handler is displayed in Code View. Add the following code: private void Browser_Activated(object sender, EventArgs e)
{
Thread.Sleep(3000);
splashScreen.Close();
}
Place your cursor within the “Thread” text. You should see a familiar yellow and red smart tag. This 9 smart tag is there to let you know that the Thread class is in the System.Threading namespace and that you don’t have it in your using directives on top of the file. Move your mouse over the smart tag, click the down arrow and then select
using System.Threading;
to add it to your list of using directives.
84
Microsoft Visual C# 2005 Express Edition: Build a Program Now!
C06622132.indd 84
C06622132.indd 84
10/24/05 3:37:13 PM
10/24/05 3:37:13 PM
TO VIEW THE APPLICATION TITLE, VERSION, AND COPYRIGHT PR0PERTIES
1 Select
MyOwnBrowser
from the Solution Explorer, right-click, and choose
Properties
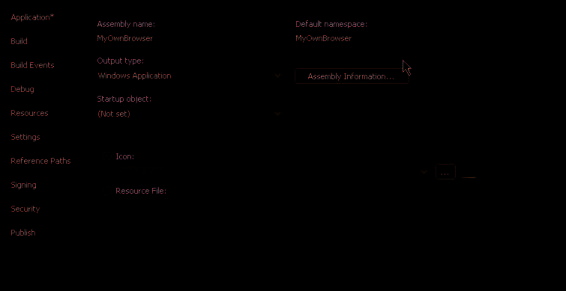
. The Project Designer page opens. The Project Designer has a series of information tabs (as shown in Figure 6-4). You’ll work mainly in the first tab for now, which is the Application pane. You'll configure several elements in this pane. All the elements you'll modify will affect how the application looks.
Figure 6-4
Project Designer page
To change the application icon, select the Icon option, and then click the Ellipsis button (...). Find the
2 Chapter 6 directory where you’ve installed the book’s sample files and look for the
globe.ico
file in
You’re not changing the icon of
the Images folder. (If you installed the companion content at the default location, then it should be at the
the main form when doing this
following location on your hard drive: My Documents\Microsoft Press\VCS 2005 Express\. )
application icon change. In order
to do this, you need to change the
form icon’s property by assigning
You’ve changed the icon of your application assembly or, in other words, you’ve changed the icon of the
a bitmap image. You’re going to
executable binary (.exe) file itself. If you build the application and look on your hard drive where the applica
change the main form icon in the
tion is compiled (as you learned in a previous chapter, all your projects are by default located at My
last section of this chapter.
Documents\Visual Studio 2005\Projects\MyOwnBrowser\MyOwnBrowser\bin\Debug or \bin\release), you’ll find that your application, MyOwnBrowser.exe, has the globe icon that you’ve just selected instead of a default icon.
Chapter 6: Modify Your Web Browser Now!
85
C06622132.indd 85
C06622132.indd 85
10/24/05 3:37:14 PM
10/24/05 3:37:14 PM
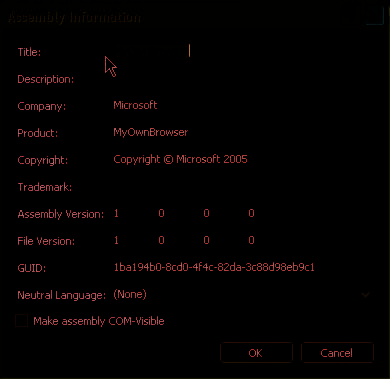
Click the
Assembly Information. . .
button. You should see a dialog box that looks like 3 the one in Figure 6-5.
Change the Copyright information: replace the word
Microsoft
with your name and 4 keep the rest of the information as it is. (If it's not already filled with your information, change it to match your name or company info.)
Insert spaces between the words
MyOwnBrowser
in
5 the Title text box. (This string is used to display the
The assembly version informa-
tion that you see here is also what
application title on the splash screen.) Insert two spaces to
the application will display in the
get the following title:
My Own Browser
.
splash screen you’re creating.
You’ll see the source code that will
display the information on the
Click
OK
to close the Assembly Information dialog
splash screen later in the chapter.
6 box.
Figure 6-5
Now that you have all your assembly data entered in the Project Designer application pane you need to get
Assembly Information dialog box
it onto your splash screen form and in the correct labels. You need to do this in the splash screen constructor to obtain the information from where it was entered. The idea here is to make the splash screen generic enough that you could reuse it in another project. I’ve used the same methods that are found in the about box template as you’ll see in a minute. Open Splash.cs in Code View and modify the code so that it looks like the following. (If you don’t want to type all of this code, you can copy it from the completed application in the Chapter6 folder.)
