Yoga for a Healthy Lower Back (14 page)
Read Yoga for a Healthy Lower Back Online
Authors: Liz Owen

Reclining Hip Twist
Stretch | Supta Padangusthasana III Variation
Lie on your back. Take a moment to feel the alignment of your body. Feel the centers of your forehead, nose, navel, and pelvic floor all aligned. Feel your legs and arms elongating equally away from your centerline. Bringing yourself into your natural alignment before starting a pose ensures that your body is organized around its center, and your mind may respond to that organization by becoming focused and calm.
With an exhalation, bend your right knee and place your foot on the floor. Lift your hips, shift them a few inches to the right, and place them
back down on the floor. Bring your right knee into your chest and hold it with both hands. Take a few breaths here and feel your right hip and your lower back releasing with each exhalation. Move your knee gently around in circles, first clockwise and then counterclockwise, to help loosen your hip and groin. Then hold your knee with your left hand and reach your right arm out to the right.
With your next exhalation, draw your right knee over to the left. Roll onto your outer left hip as much as possible while maintaining comfort in your right shoulder. Exhaling, turn your torso to your right to release your right shoulder down any amount possible, and deepen the twist by taking your right knee farther toward the floor. Repeat this step for two or three breaths, balancing the actions so that your leg and torso turn equally around your centerline (
fig. 2.21
).
In the beginning, your right knee does not need to release all the way to the floor by your left hip. If it doesn't, support it on a block to ease tension along your outer thigh or your sacral joint. Your right shoulder does not need to be completely grounded either, but it should be comfortably descending toward the floor. If it isn't, experiment with taking your right arm on the floor over your headâthis can be comfortable for the shoulder and give you a nice stretch all along your right side. You should feel a stretch all through your outer right hip and thigh as the twisting action of your trunk elongates the muscles of the back and releases tightness in the lower back.
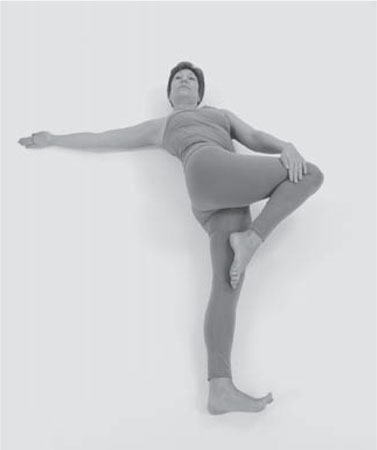
FIG. 2.21
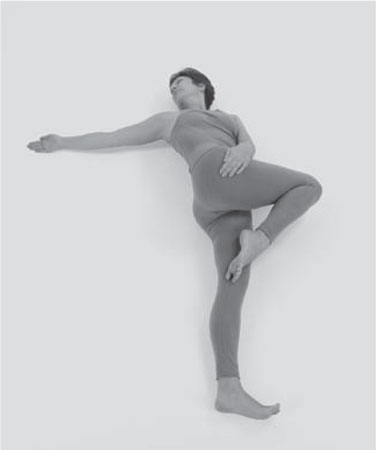
FIG. 2.22
The challenge in this pose is to keep from distorting the alignment of your sacral joints. To keep your sacral joints in a stable position, it is best if your right outer hip faces up toward the ceiling so your sacral joints are perpendicular to the floor, rather than leaning at an angle. As much as is comfortable, draw your outer right hip away from your waist and toward your left foot so that your hips stay in balance with each other and you create length between your right hip and ribs.
If you are comfortable in this pose, go farther into the twist (
fig. 2.22
). Keeping your right leg over to the left, take your left hand onto your outer right hip and, as you exhale, move your right hip farther to the left. This variation should be done very slowly, as it intensifies the elongation of the lower back muscles and gives a deep stretch to the hips and spine. Hold the pose for fifteen to twenty seconds, then slowly bring your right knee back to starting position and rest on your back. Bring your left knee into your chest and hold both knees, curling yourself up into a small ball to massage your lower back. Hold for two or three breaths. Then take your right leg down onto the floor and repeat the pose to the left.
Seated Bound Angle Pose
Stretch | Baddha Konasana
Place a bolster or a folded blanket across your mat. Have a yoga strap nearby. Sit squarely on your bolster, bend your knees, take them out to the sides, and bring the soles of your feet together near your sit bones. Does this feel familiar? Your legs are in the same position as they were in the restorative Reclining Bound Angle Pose we practiced in
chapter 2
. Adjust the height of your hips so that your knees are level with your groins. The alignment of your hips and knees is important in order to bring your hips and spine into an upright position and to help your thighs elongate.
If your hips are tight and your knees are higher than your groins, use your belt to give your lower back some extra support. Create a large loop with your belt. Take it over your head and down to your hips. Then place the belt around your thighs and shins, and loop it under your feet. Arrange the belt so the buckle isn't under your feet, and so you can tighten it easily by drawing the loose end toward your body. Adjust the length of your belt so you can feel it supporting your hips, but not so that it overarches your lower back.
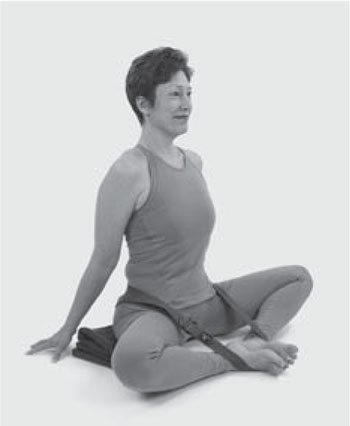
FIG. 2.23
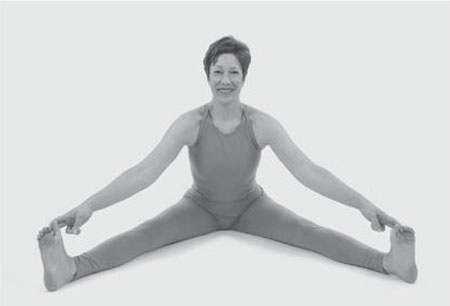
FIG. 2.24
Check in with your lower back to make sure it is comfortable. If it feels at all vulnerable, come into the pose with your back supported by a wall. Place a folded towel or blanket at your lower back for extra support and comfort against the wall.
Now check in with your inner thighs. Are they enjoying a comfortable stretch without feeling strained? If you're using a belt around your hips and legs, adjust the amount of stretch in your thighs by adjusting its length. If you loosen your belt, your feet will move away from your hips and your thighs will stretch less, and vice versa. After you have adjusted your belt for the perfect stretch in your thighs, place folded blankets or blocks under your thighs to quiet any sensations that arise as your body opens.
Place your hands behind you on your support. Bend your elbows slightly and draw them in toward your side ribs, then slowly restraighten them. As you do this, feel your side and front ribs opening forward and lifting up. This action broadens your chest and opens your heart area. Wait here a few moments, breathing deeply into your heart and feeling it expand and open. Draw your shoulder blades down your back and press the tips of the blades forward, visualizing them as hands that offer support to your upper torso (
fig. 2.23
).
Visualize your hips and legs like broad lines of energy that expand outward from the center of your hips like the petals of a flower. Remember the image of your hips as a garden, yours to nourish and tend? As you sit quietly in this pose, enjoy your body, in its flower shape, as the reward of a beautiful bloom that opens up from the heart of your spine and radiates outward, offering its beauty, softness, and vitality back to your hips, lower back, and, in fact, your life.
Note: If you have a knee or sacral condition that's irritated by Bound
Angle Pose, try sitting upright with your legs straight and spread about four feet apart from each other (
fig. 2.24
). This is called Wide-Legged Seated Pose, and it offers a similar stretch to the hip and inner thigh muscles but with less pressure on the knees and less compression of the sacral joints.
Triangle Pose
Stretch and Strengthen | Utthita Trikonasana
Start in Mountain Pose and then step your feet four to five feet apart. Turn your left toes in slightly and your right leg out to ninety degrees. Your right knee should face straight over your right foot. Place your hands on your hips and feel your hips open and broaden. Press your feet down into the floor and lift strongly up through both your legs and trunk so that your body is stable and engaged.
Stretch your arms out to the sides as you inhale, and as you exhale, press your hips to your left and reach your right arm and trunk over to your right. This is a strong reach, so you should feel the right side of your trunk lengthening away from your hips. Now place your right hand on your right shin (
fig. 2.25
).
If your body is flexible, place your hand on a block at the outside of your right foot or on the floor; but if your inner thigh is feeling an intense stretch, support your hand on a chair. Lift your left arm up toward the sky. You have created a triangle shape in your body, with your feet as the base and your left hand as the apex.
Revisit your hips and adjust them if you need to, bringing them once again into neutral hip position, although just like in
Noble Warrior Pose
, it's okay for your left hip to be slightly forward of your right hip. Your tailbone should reach down toward your left foot and your lower abdomen and frontal hip bones should lift up toward your trunk. As you inhale, elongate your trunk to the right as much as possible, and as you exhale, turn your trunk up toward the ceiling.
Hold Triangle Pose for fifteen to thirty seconds, depending on your energy level. To come out of the pose, press your left foot down, lift your left arm up, and bring your trunk up to a vertical position. Bring your feet to a parallel position and then practice the pose to your left.
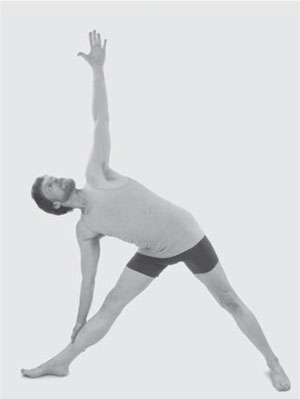
FIG. 2.25
TIPS FOR A COMFORTABLE TRIANGLE POSE
If you experience discomfort in the pose, here are some suggestions to help:
â¢Â  Come into the pose with your right knee bent and place your right hand, with palm open, against your right inner leg. Press your hand into your leg to help your right knee stay aligned with your right ankle, and scoop your right buttock and your tailbone forward. Slowly straighten your right leg, letting your hand glide higher up your leg as you go. Straighten your leg fully only when your lower back tells you it's happy.
â¢Â  Before you bend to the right, deepen your right groin to the left by pressing your fingertips into your groin, and then lifting your whole pelvis up and over your right leg. This helps your hip bones and sacral joints stay in alignment so your sacral joints don't shift too much or, worse, shear against each other.
â¢Â  If none of these adjustments is allowing you to come fully into the pose, try this supported version: Practice Triangle Pose with your back body supported at a wall in order to keep your hips, shoulders, and head in alignment with your spine. Support your right hand on a chair, and keep your left hand on your left hip.
