Vegetable Gardening (92 page)

To harden off your transplants, follow these steps:
1. A week or two before you intend to set plants out in your garden, stop fertilizing and reduce the amount of water you give them.
Give plants just enough water so they don't wilt.
2.
Take your plants outside for a short time.
Give the plants a half hour of filtered sunlight — setting them under an arbor or open-branched tree — during the warmest part of the day. If the weather is windy, put the plants in a spot where they're sheltered, or construct a windbreak out of pieces of wood.
3. Gradually increase the amount of time that the plants spend outside and the intensity of the light that they're exposed to.
You want to increase the amount of time your plants are outside so that by day seven, they're out all day. Move them into progressively sunnier locations during the week so they get used to their future condition in the ground. However, make sure that you bring the plants in every night.
Another option is to move your plants to a cold frame (see Chapter 21), and then you can open the cold frame more each day and close it at night. Plants that are raised in a cold frame from the time that they're young seedlings will need much less hardening off.
 Don't overharden your plants. Certain crops, such as cabbage and broccoli, can quickly
bolt
(flower before they're supposed to) if seedlings older than 3 weeks are repeatedly exposed to temperatures lower than 40 degrees for a couple of weeks.
Making the big move to the ground
Before transplanting your homegrown seedlings or nursery-bought transplants, you need to prepare your soil and sculpt beds or rows (as described in Chapter 14), and your garden must be ready to plant. If you're worried about keeping the rows straight, use string and stakes as described in the later section "Row planting."
Choose a calm, cloudy day to transplant, if possible. Late afternoon is a good time because plants can recover from the shock of transplanting without sitting in the midday heat and sun. Your garden soil should be moist, but not soggy. If the weather has been dry, water the planting area the day before you plant. Moisten the soil in your flats or pots so it holds together around the plants' roots when you remove the plants from their containers.
 When setting out plants in biodegradable peat pots, make slits down the sides of the pots or gently tear the sides to enable the roots to push through. Also, tear off the lip (top) of the pot so it doesn't stick up above the soil surface and pull moisture out of the soil. If you're using premade growing blocks encased in netting, cut off the netting before planting.
To transplant seedlings, follow these steps:
1. Use a hoe, spade, or trowel to make a small hole in your garden for each seedling.
The hole should be deep enough so the transplant is at the same depth in the ground as it was in the pot (except for tomatoes). Make the hole twice as wide as the root ball.
2. Unpot a seedling (unless it's in a peat pot) by turning its pot upside down and cupping the seedling with your hand.
Be sure to keep the root mass and soil intact. If the seedling doesn't come out easily, gently tap on the edge of the pot or gently press on the bottom of each cell of the flat with your fingers. Whatever you do, don't yank out a plant by its stem.
3. Check the root ball's condition.
If the roots are wound around the outside of the pot, work them loose with your fingers so they can grow out into the soil. Unwind larger roots and break smaller ones (this won't hurt them) so they all point outward. Try to keep as much of the original soil intact as possible.
4. Mix a diluted liquid fertilizer into the soil of the planting hole to help the plants get off to a fast start.
Reduce the recommended strength on the fertilizer container by half. For example, if it says apply 1 tablespoon per gallon of water, use only 1/2 tablespoon. (See Chapter 15 for more on fertilizers.)
5. Put each prepared seedling into the holes that you made.
6. After firming the soil around the roots with your hands, form a shallow soil basin around the base of the transplant.
The soil basin serves as a moat around the seedling to hold water. When you water or it rains, the moisture stays in the moat and drains to where the roots are located. Chapter 15 provides more information on soil basins.
7. Depending on the conditions, water the bed that day or the next.
If the weather has been dry or if the soil is sandy, you may want to water the entire bed; if it's rainy or the soil is already very wet, wait until tomorrow to water.
8. Keep the bed moist while the seedlings get established and begin to grow strongly.
In extreme hot, dry weather, provide temporary shade for transplants with paper tents or wooden shingles pushed into the ground on the south or west side of the plants.
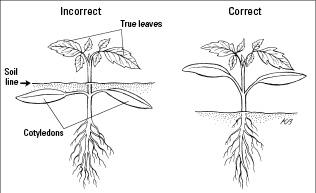
Figure 13-3:
Plant vegetable seedlings at the correct depth.
 If you don't get an ideal transplanting day and the weather is hot and sunny, shade the plants until the sun goes down. And don't be alarmed if your plants look a little droopy after you set them out; they'll soon recover. Cabbage seedlings can droop and look almost dead, for example, and be up and growing in a day or two.
Sowing Seeds Directly in Your Garden
Unless you live in an area where summers are really short, some vegetables are better off sown directly in a garden rather than as transplants. Large-seeded, fast-growing vegetables — such as corn, melons, squash, beans, and peas — usually languish if they're grown in containers for even a day or two too long. Plants sown directly in the ground usually surpass these seedlings if both are planted at the same time. (Even if you live in a short-season area, you can help speed new plants along. See Chapter 21 for information on extending your growing season.)
In the following sections, I describe different methods for planting seeds right into your garden and show you how to thin seedlings carefully.
Deciding on a seed-planting method
You can plant seeds in a variety of patterns: single rows, wide rows, beds, raised beds, or hills. The method you choose depends on your climate, your tools, and your taste. You can find out more about these planting methods in Chapter 3. Whichever method you choose, here are a few basic principles to keep in mind when planting seeds:
 Make sure that the soil has dried out sufficiently before you work it, and be sure that the soil is warm enough for the seeds that you want to plant.
Pea seeds, for example, germinate in soil as cool as 40 degrees, and you can plant them as soon as you can work the soil in spring. Squash seeds, on the other hand, need warmth. If your soil temperature is much below 65 degrees, the seeds are likely to rot in the ground before they sprout. (See the appendix for a list of appropriate soil temperatures for different kinds of seeds.) The best way to determine the temperature of your soil is to use a soil thermometer, which you can buy at a garden store. Chapter 14 provides more information on preparing your soil for sowing.