Vegetable Gardening (39 page)

Applying a space-saving planting technique
 Don't have room in your garden but want to grow potatoes? Instead of planting in rows, try growing potatoes vertically in potato towers (see Figure 6-3). Here's how:
1. Place a 3-foot-diameter heavy wire cage over cultivated soil.
2. Add a 2- to 3-inch layer of soil to the bottom of the cage, and line the sides of the cage with hay. Plant four seed potatoes in the bottom of the cage and cover them with soil.
3. As the potato plants grow, continue adding soil over them and adding hay around the inside of the cage until you reach the top of the tower. Keep the soil well watered.
4. In the fall, open the cage and watch your tubers roll out!
Digging up the fruits (er, vegetables) of your labor
Harvesting potatoes is like going on an archeological dig. After a potato plant dies, use a metal garden fork and dig up the area 1 foot away from the row so you don't spear the tubers. You'll be amazed at the number of tubers you find — on average, 10 to 20 per plant. Dry the potatoes for an hour or so in the shade, and then store them in a dark, airy, 60-degree area for
curing
(the process of letting the skin toughen so the vegetables store better). After 2 weeks, move the potatoes to a shed or room that's 40 to 50 degrees to store for up to 9 months (depending on the variety). Always eat any damaged tubers first, because they'll be the first to rot in storage.
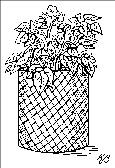
Figure 6-3:
You can grow potatoes in towers if you don't have much room in your garden.
New potatoes are just young potatoes, and with their soft skin and texture, they make a great summer treat. If you can't wait until the main harvest is ready, steal a few new potatoes the second time you hill. Just reach into the soil and feel for small, round tubers. Taking a few won't kill the plant, and you'll still get some larger spuds later on.
The sweetest of tubers: Planting sweet potatoes
Sweet potatoes (
Ipomoea batatas
) are a root crop with a reputation for being grown only in the South. However, if you choose the right varieties, you can grow sweet potatoes just about anywhere — even in cold climates like Minnesota. Sweet potatoes are easy to grow and store well indoors in winter. The orange- or yellow-fleshed tubers can be baked, mashed, or sliced and deep fried for a nutritious and delicious snack. Some short-season varieties (90 days) to grow are ‘Beauregard', ‘Centennial', and ‘Georgia Jet'. Other varieties that mature 1 to 2 weeks later are ‘Bush Porto Rico', Jewel', and ‘Vardaman'.
To grow sweet potatoes, you don't plant seeds. Instead, you buy small plants called
slips.
Slips are available at local nurseries or garden centers in spring or through the mail. You can start your own at home, but it's better to purchase certified disease-free slips from commercial growers to avoid disease. Sweet potatoes love the heat, so wait until the soil temperature is at least 60 degrees before planting. The vines of your sweet potatoes will create a dense, mat-like groundcover, making this an attractive and edible plant to grow.
To plant and grow your sweet tubers follow these steps:
1. Create raised beds at least 6 inches tall and amend the soil with compost.
2. Plant the slips up to their bottom leaves, 1 foot apart in the raised beds.
3. Side-dress the plants once, a month after planting.
When side-dressing, use an organic fertilizer, such as 5-5-5, or a mix of blood and bone meal fertilizer. And be sure to keep your plants well weeded and watered. Keep the soil on the slightly acidic pH side to avoid some diseases. (Check out Chapter 15 for details on side-dressing and fertilizing.)
4. Before the first frost, or about 100 days after planting, dig under the plants and check for roots.
Pull plants that have formed good-sized roots and cure (dry) these in a warm (80-degree) room for 2 weeks. The curing process not only helps the skin toughen, but also converts starches to sugars, giving sweet potatoes their characteristic taste.
After curing, eat the tubers or store them in a humid, 55-degree basement (or in any other cool area of your house) all winter.
Keeping Your Root Crops Healthy and Pest-Free
Many of the same pests and diseases that you find on other vegetable crops — such as aphids, flea beetles, thrips, mosaic virus, and nematodes — also occur on root crops. Other potentially damaging root crop pests are animals — such as rabbits, mice, and chipmunks — that enjoy the underground snacks out of sight of predators. I lost most of my potato crop one year due to an overpopulation of hungry chipmunks looking for food. (I discuss insect and animal pests as well as common diseases in more detail in Chapter 17.)
Check with your local Cooperative Extension Service office or the folks at your local nursery or garden store to find out what specific diseases and insects may be problems in your area. Then, as with any vegetable, you can plant varieties that are resistant to those diseases and insects.
 Besides the usual suspects that attack vegetable gardens, a few pests and diseases specifically harm root crops. Here are descriptions of them as well as the appropriate controls:
 Blight:
This fungal disease can wreak havoc on potatoes. Late blight, in particular, is the infamous disease that destroyed potatoes in Ireland in the 1840s, causing the Irish potato famine. This disease thrives in cool, humid weather, and infection starts in the form of water-soaked black spots on the leaves.
Unfortunately, once blight starts, you can't treat it; the plants can die, and any tuber that they produce also may be infected and inedible. To avoid this disease, mulch, rotate crops, pull up any
volunteer
potatoes that sprout from old tubers in the ground, and plant certified disease-free seed potatoes.
Carrot rust fly:
If your carrots' roots have holes bored into them, they may be infected with carrot rust flies. The adult flies lay their eggs on the soil near carrot plants, and then when the young larvae hatch, they tunnel into the soil to feed on the carrot roots. If your carrots have these holes in them, you can eat the carrots as long as the disease hasn't started rotting the root.