The Resume.Com Guide to Writing Unbeatable Resumes (8 page)
Read The Resume.Com Guide to Writing Unbeatable Resumes Online
Authors: Warren Simons,Rose Curtis

Fonts without serifs increase the chances that another computer will be able to read your information without any formatting inconsistencies. Not only do fonts without serifs improve the odds that a person will be able to read your document, but as we will discuss in
Chapter 8
, many employers have implemented computer scanning software to eliminate candidates whose resumes do not contain certain key words.
Computer scanning software reads your resume by using a technique called optical character recognition, and complicated fonts such as
Script
can prove unreadable to these programs, immediately eliminating a candidate from consideration.
Use a font with serifs when sending your resume by mail or fax or for job fairs. For e-mail applications, you can easily create a resume without serifs, as we’ll discuss in
Chapter 8
.
Step-by-Step Guide to Writing Your Resume
In
Chapter 5
we reviewed the basic formatting tools of your Microsoft Word word-processing program, including saving your document, the best fonts to use, and the maximum margins you should set to create a highly readable resume. In this chapter we will discuss the essential elements of the resume, beginning with a discussion of catching and eliminating common resume errors.
Every section of your resume should be written from the
first-person point of view
, or what we call the silent “I,” as was discussed in
Chapter 1
. You should never use the third-person point of view, which only deemphasizes your accomplishments. The following example demonstrates the difference between writing with the silent “I” and using the third person:

Using the first person, or silent “I,” you are essentially saying, “I drive over 300 tons of widgets each quarter.” Conversely, when you use the third-person point of view, you’re subconsciously attributing the accomplishment to someone else: “He drives over 300 tons of widgets each quarter.”
Would you ever give someone else credit for your work? No. That’s why using the silent “I” is an integral component of all successful professional resumes.
A
thesaurus
is another tool that is very helpful when you create a resume. One of the most common mistakes in amateur resumes is to begin multiple sentences with the same word.
Avoid repeating the same word over and over in your bullets.
Bob’s Building Company, Millburn, NJ
1993 – Present
Communications Director
■
Experience in marketing, public relations, and promotions.
■
Experience producing and promoting events that dramatically increase sales.
■
Skilled in developing promotional materials and writing copy for print advertising, television, and radio.
■
Excellent relationship-building skills.
■
Skilled media spokesperson. Effective at generating positive publicity.
Although you don’t have to be a word guru to use appropriate synonyms, it pays to invest in a good thesaurus or at least use the thesaurus that is built into most MS Word programs. There are additional sites online that can be accessed by simply typing the word “thesaurus” into any search engine.
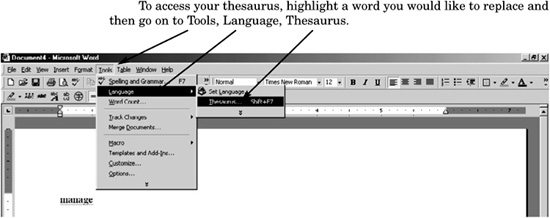
Your computer’s thesaurus will list words that are close in meaning to the word you have highlighted. Although synonyms by definition have similar meanings, the shades of difference in each word can change your intended message. For example, although a common synonym for “manage” is “supervise,” these words have different meanings:
Manage:
v.
man·aged, man·ag·ing, man·ag·es
v., v.t.
1. To direct or control the use of; handle:
manage a complex machine tool.
Supervise:
v.t
. su·per·vised, su·per·vis·ing, su·per·vis·es
1. To have the charge and direction of; superintend.
As this example shows, although using the thesaurus is a good way to find alternative words, consult a dictionary to ensure that the word you’re using is indeed what you mean to say.
Spell check
is also an integral part of writing a resume.
Typos are a terrible mistake that hirers won’t overlook.
There’s no better way to make you seem unprofessional. Spell check is an instantaneous and easy part of your writing. To spell check your document, go to Tools and select Spelling and Grammar.
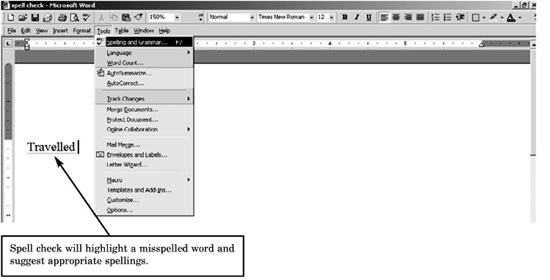
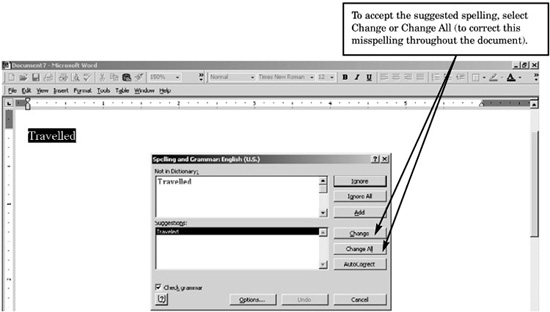
Not only will your computer alert you to potential spelling mistakes, it also will make grammar and punctuation suggestions. You should spell check all materials before sending them to an employer. Your correspondence is a reflection of yourself, and you want to demonstrate the best of your abilities.
One caveat about spell check: Although it is an excellent tool, spell check doesn’t pick up all errors. Homonyms (two words that sound the same but are
spelled differently, such as “sea” and “see”), proper nouns, and abbreviations may pass unsuspected through spell check. Additionally, spell check may highlight a correct spelling (such as a company name) as incorrect.
A good example of something that would not be picked up by the spell-check radar would be “boosted moral” when you meant to say “boosted morale.” Another common mistake is “Database Manger” when the correct term is “Database Manager.” This is why it is always important to read and reread documents before submitting them even if you’ve spell checked the document. Try having a close friend, relative, or associate read your documents for clarity and correct spelling. The same rule applies for writing and editing: No matter how many times you’ve read what you’ve written, another set of eyes can help pick up small errors.
Follow these simple tips to avoid fatal errors in your resume. Now let’s begin building your brand-new resume with Step 1: Your Contact Information, also known as the header.

The header provides the first visual impression of a resume. You need to pack a strong punch in this section, as it is your first chance to make a lasting impression.
1.
Type your name on the first line, and right below this information enter your street address, city, state, Zip Code, home phone number, and e-mail address.
Example:
John Doe
248 W. 35th Street, 12A New York, NY 10001 (800) 737-8637, [email protected]
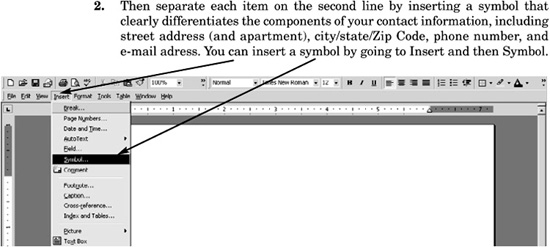
Always choose a conservative symbol, such as blocks or circles.
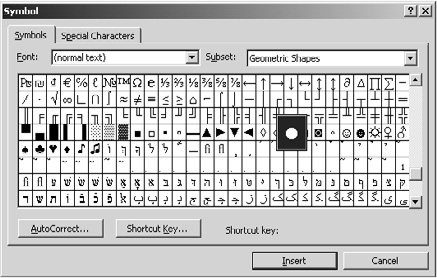
After you’ve selected a symbol, place the cursor after each item on your contact information (e.g., after the street address and before the city) and click Insert.
Example:
John Doe
248 W. 35
th
Street, 12A • New York, NY 10001 • (800) 737-8637 • [email protected]

