So, You Want to Live in a Yurt? (5 page)
Read So, You Want to Live in a Yurt? Online
Authors: Erin Kelly

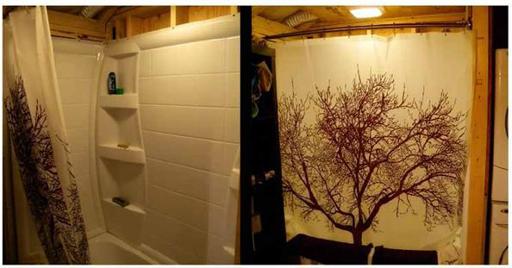
Did you know that shower kits have right or left hand drains? Well, a week before we were supposed to move in, the plumber informed us our shower kit had the drain on the wrong side.
Sigh
.
It was an issue because the drain pipe would come out under the deck OUTSIDE of that insulated house. Which was a big issue. So we rushed home and called Home Depot customer service to see if the shower kit came with the opposite drain option (most of them do).
It did, but unfortunately, it was an internet only item and would take up to 10 days to get to us. Did I mention we had to have the place inspected
AND
move in within the week?
PANIC!!!
Luckily, Mike called our local Home Depot (not national customer service) and the customer rep told him they had a kit in stock with the drain option we needed. He picked up the old kit, drove it to Home Depot and traded it out. And yes, that makes the whole experience sound
MUCH
easier than it was. It was almost stroke inducing at that point in the process. And it gets better. Since we had to take whatever was available due to time constraints, we ended up with a shower kit that has design flaws. As in, the water pours out of it when we take showers. Our contractor recommended a shower door (which we
HATE)
, our plumber just shrugged his shoulders and said it’s due to a design flaw in the kit.
Still searching for a solution on that one, but the shower kit fiasco was a
HUGE
problem during the yurt process. And continues to be.

Oh, and the recommended dryer vent kit that was an add on for our washer/dryer wouldn’t work for the configuration the plumber was using, so that went back too!
*Read the fine print when ordering appliances.
- Truth
. And that’s not said because of the shower. The drain issue was one of those unforeseeable problems. But the bathroom pedestal sink? The image showed a complete sink with basin, stand and faucet. It came with just the basin.
Another $120 for the faucet and stand, plus time for it to be delivered. The toilet? Again, shown as complete. Even the reviews talked about the toilet seat. But nope, it didn’t come with a toilet seat. The kitchen sink didn’t come with drains. The shower kit didn’t come with any fittings. These things add up, so read the fine print! Our plumber recommended looking for the words
“complete”
or
“complete kit”
and don’t go off of the pictures.
* Things will always, ALWAYS take longer than they should.
- Truth
. That applies to return phone calls to urgent messages (remember, it’s only
really
urgent to you), orders that were supposed to come in (it’s your deadline, not theirs), building estimates (especially if they haven’t worked on a yurt before and/or they really want to make you happy by promising you’ll be in by October), and so on.
Take a deep breath, try not to paint yourself into tight corners, and try to enjoy the process. Months from now, when the bills are paid, the problems are figured out and you’re cozy in your yurt - this time will seem like a dream, and you’ll laugh at the things that are making you want to rip your hair out now.
If installing a wood stove, check where the output pipe comes out (top or back) before you cut your stove insert into the wall.
- Truth
. We didn’t know, and cut higher into the wall where we’d always seen stove inserts. Turns out, our stove has an output from the back, so we conceivably could have run the pipe directly back through the wall. It would be less visually intrusive. Downside to that would be the loss of heat. The more pipe runs inside, the more heat is distributed.
BUT, we wouldn’t have had to go buy $300 more of triple wall pipe AND there wouldn’t be two elbows of pipe inside the yurt. Those elbows can cause smoke to back up and fill the yurt with smoke if the stove isn’t tended correctly. VERY inconvenient. At this point it only causes issues during really windy days, if the wood isn’t seasoned enough, or if the pipe isn’t hot enough to draw properly. All workeable, but more high maintenance! Either way - think this through so you know how much pipe, and how many elbow joints to get!
*Try to work with contractors who think “outside of the box” or do so yourself.
- Truth
. The most direct path for the septic vent pipe was to run it under the bathroom, and then up alongside the deck. But as our contractor said, “you don’t want to be smelling that when you’re out grilling your dinner!” And I’m glad he thought of that, because we were overwhelmed, and would have said yes to pretty much anything at that point. Instead, our plumber ran it all the way under the deck, to the other side, and then up through the chimney scaffolding. It might have cost a bit more, but oh so worth it. You don’t even see it, and you definitely never smell it.
I didn’t realize how lucky we were, until I heard a horror story about a vent pipe being by a yurt entrance. So that is what you smelled entering and leaving the yurt. Talk about a warm welcome.
Ugh!
*Penny wise, pound foolish. And thoroughly vet any contractor’s qualifications.
- Truth
. This wasn’t an issue for us, but we do know of at least one horror story. We were lucky enough to find a contractor that came with excellent referrals. Our plumber was also recommended to us personally. I consider us VERY lucky to have worked with those guys, I called them our “dream team”.
But, a yurt owner near us wasn’t so lucky. She used a contractor she had worked with previously on a different type of job, and he said he was able to build the yurt deck. He wasn’t qualified, and made quite the mess of it. She’s still dealing with the fall out, and the word on the street is she’ll have to take the yurt down and start over on the deck.
That is the stuff nightmares are made of. So do your homework, and trust
NO ONE
. Just kidding, (
but not really
).
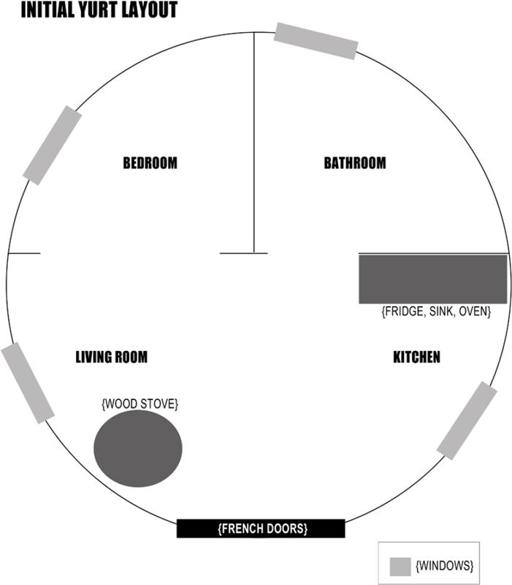
THE LAYOUT OF OUR YURT
YurtFAQs.com
Imagine a pizza…that’s your yurt. Now take out “pizza slices” for your bathroom, bedroom, etc. Have them meet in the center.
You’ll need a hard copy of your layout, with notes on where the wood stove (if having), kitchen appliances (if having), bathroom appliances (if having), windows/door(s) and interior walls will be. Our yurt company needed it first, so they could plan out the lattice distances.
Next up, the building inspectors office needed it for the building permit. And then our contractors loved us for having it early on for planning.
We went through a couple of different “this is what we want” layouts, before settling on our current. Keep in mind that you CAN change as you go, with SOME of the items. Obviously, the windows were going where they were going due to the lattice distances. But the orientation of your door can change (ours did), right up until your yurt raising day. (Make sure to check with your chosen yurt company on that, I’m assuming that goes for pretty much any yurt company design…but better safe than sorry!)
Then once the yurt was raised, we went in and laid down painters tape with our layout. Based on this, we made some smaller adjustments. Originally our bathroom had a window, but we decided to keep that window in the bedroom so the bathroom wouldn’t be ginormous (yes, that IS a word, and if not, it should be!).
I would highly recommend using the painters tape, based on your appliance dimensions, because it REALLY helps you visually picture how everything will fit. It also came in handy for our plumber/electrician and builder, once they started putting up walls, adding outlets, etc.
(See next page for our original “final” layout, and then the final FINAL layout)


Remember, as always, to stay flexible….and to stick with your gut. Even if everyone else has a different opinion. Definitely CONSIDER their ideas, but if you’re still feeling strongly about your concept, go with it. You’re the one living in this yurt, so you want to be happy with the layout.
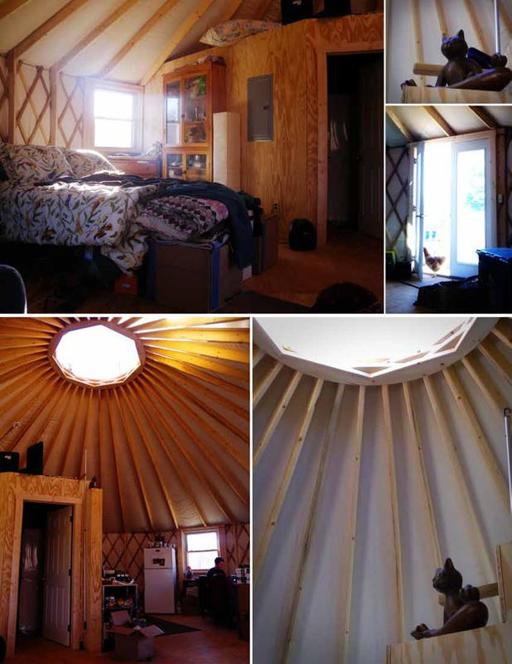
We chose 7 ft walls, rather than 10 ft, for our 30 ft yurt because we liked the cozy, openness of the shorter walls. If we had kids, we probably would have gone with the 10 ft and lofted a second floor. But as it is, we have plenty of space, and we’ve kept the open feel of the yurt intact.
Our ultimate goal is to make a little “chill zone” up on top of the bathroom ceiling. Our contractor built it strong enough, and with a little ladder, some comfy big pillows, yoga chairs and a cushy rug…I have a feeling it will be a favorite place to hang out. Currently it’s just storage.


