Sew Birthday Fun (2 page)
Authors: Mandy Shaw

If you overlap adjoining pieces of appliqué you will have only one edge to sew instead of two. For example, on the cupcake (Pennants) the case is tucked beneath the icing, so only the sides and the bottom edge of the cupcake case need to be sewn to secure it in place.
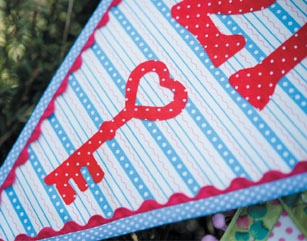
It is not always necessary to stitch a fusible appliqué down, for example if the work is not going to be laundered or if it will not be subject to a lot of wear. A quick make decorative pennant, such as the 21st birthday pennant, does not always require the appliqué to be stitched in place.
It’s amazing how a little embroidery can lift a design to make it even more interesting. I have included my favourite stitches here, with working instructions for both left- and right-handed sewers. If you are looking to refresh your embroidery skills, the
Birthday Party Stitchery
uses several of the stitches.
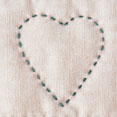
When transferring an embroidery design onto a cream background, you should be able to see through the fabric to trace off the design with a fine pencil. Alternatively, use a window as a ‘light box’ – tape the design to the window, tape your fabric on top and trace off using a pencil, fade away pen or other suitable marker.
- Thread your needle – never use more than a short arm’s length of thread at one time as it will be more prone to knotting, and more vulnerable to fraying and splitting.
- Start the embroideries with a small knot on the wrong side of the work. To avoid the knot being seen from the front of the work, do keep it small.
- When rejoining a thread, use your needle to weave the new thread into the previous stitches.
- When you have finished your embroidery, weave the thread into the previous sewn work.
- Do not leave long strands hanging on the back as these may show through on the front.
- It is a matter of personal preference as to whether or not you use an embroidery hoop to keep your fabric taut while stitching. I prefer not to as it gets in my way.
A filling stitch used to create a smooth surface decoration.
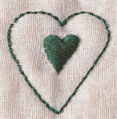
(black dot indicates start point)
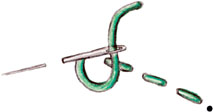
Work from right to left and take the stitches across from side to side, keeping them even and close; avoid stacking the stitches on top of each other or the effect will be unattractively lumpy. The stitches can be worked in a slanting direction or straight across the design.
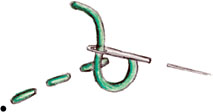
(black dot indicates start point)

Work from left to right and take the stitches across from side to side, keeping them even and close; avoid stacking the stitches on top of each other or the effect will be unattractively lumpy. The stitches can be worked in a slanting direction or straight across the design.
Run the needle in and out of the fabric for a simple but versatile line stitch.
(black dot indicates start point)
Work from right to left. Bring the needle up through the fabric, make a stitch, and bring the needle down through the fabric again. Repeat, making sure the stitches and the spaces between the stitches are the same size.
(black dot indicates start point)
Work from left to right. Bring the needle up through the fabric, make a stitch, and bring the needle down through the fabric again. Repeat, making sure the stitches and the spaces between the stitches are the same size.
To work seed stitch sew running stitches at different angles.
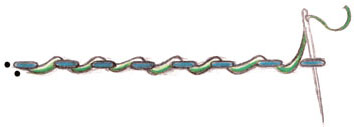
Whip a second thread through a line of running stitch for a decorative variation on this simple stitch.
(black dots indicates start points)
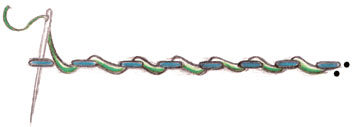
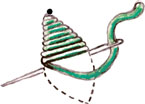
Start by sewing the motif with a running stitch. For the best effect, keep the running stitches small. Working from right to left, pull the thread up from behind at the start point and slip the needle over and under one of the running stitches. Continue to whip the thread over in this way until all the running stitches are covered.
(black dots indicates start points)