Programming Python (100 page)

Finally, a bit of fun
to close out this chapter. Our last example, PyToe,
implements an artificially intelligent tic-tac-toe (sometimes called
“naughts and crosses”) game-
playing
program in Python. Most readers are probably familiar with this simple
game, so I won’t dwell on its details. In short, players take turns
marking board positions, in an attempt to occupy an entire row, column, or
diagonal. The first player to fill such a pattern wins.
In PyToe, board positions are marked with mouse clicks, and one of
the players is a Python program. The game board itself is displayed with a
simple tkinter GUI; by default, PyToe builds a 3 × 3 game board (the
standard tic-tac-toe setup), but it can be configured to build and play an
arbitrary
N
×
N
game.
When it comes time for the computer to select a move, artificial
intelligence (AI) algorithms are used to score potential moves and search
a tree of candidate moves and countermoves. This is a fairly simple
problem as gaming programs go, and the heuristics used to pick moves are
not perfect. Still, PyToe is usually smart enough to spot wins a few moves
in advance of the user.
PyToe’s GUI is
implemented as a frame of expandable packed labels, with
mouse-click bindings on the labels to catch user moves. The label’s text
is configured with the player’s mark after each move, computer or user.
TheGuiMakerclass we coded earlier
in the prior chapter (
Example 10-3
) is also reused here
again to add a simple menu bar at the top (but no toolbar is drawn at
the bottom, because PyToe leaves its format descriptor empty). By
default, the user’s mark is “X” and PyToe’s is “O.”
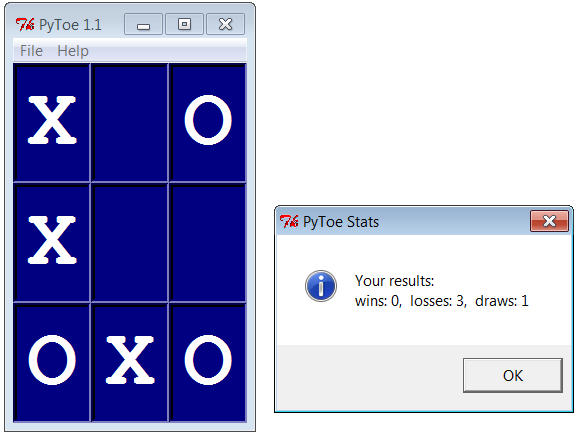
Figure 11-25
shows PyToe run from
PyGadgets with its status pop-up dialog, on the verge of beating me one
of two ways.

Figure 11-25. PyToe thinking its way to a win
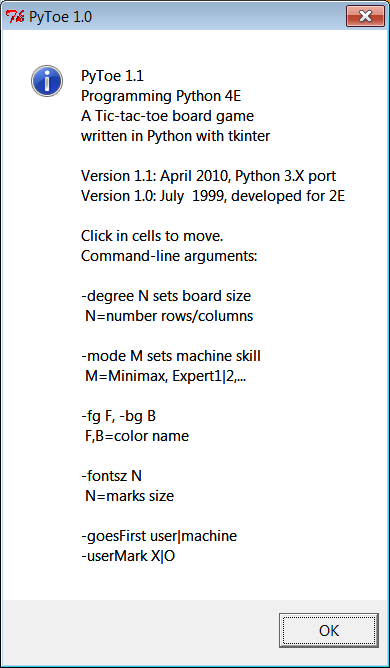
Figure 11-26
shows
PyToe’s help pop-up dialog, which lists its command-line configuration
options. You can specify colors and font sizes for board labels, the
player who moves first, the mark of the user (“X” or “O”), the board
size (to override the 3 × 3 default), and the move selection strategy
for the computer (e.g., “Minimax” performs a move tree search to spot
wins and losses, and “Expert1” and “Expert2” use static scoring
heuristics functions).

Figure 11-26. PyToe help pop up with options info
The AI gaming techniques used in PyToe are CPU intensive, and some
computer move selection schemes take longer than others, but their speed
varies mostly with the speed of your computer. Move selection delays are
fractions of a second long on my machine for a 3 × 3 game board, for all
“-mode” move-selection strategy options.
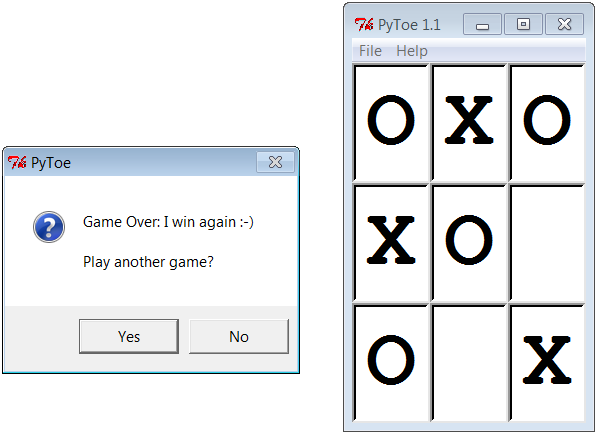
Figure 11-27
shows an alternative
PyToe configuration (shown running its top-level script directly with no
arguments), just after it beat me. Despite the scenes captured for this
book, under some move selection options, I do still win once in a while.
In larger boards and more complex games, PyToe’s move selection
algorithms become even more useful.

Figure 11-27. An alternative layout
PyToe is a big
system that assumes some AI background knowledge and
doesn’t really demonstrate anything new in terms of GUIs. Moreover, it
was written for Python 2.X over a decade ago, and though ported to 3.X
for this edition, some of it might be better recoded from scratch today.
Partly because of that, but mostly because I have a page limit for this
book, I’m going to refer you to the book’s examples distribution package
for its source code instead of listing it here. Please see these two
files in the examples distribution for PyToe implementation
details:
- PP4E\Ai\TicTacToe\tictactoe.py
A top-level wrapper script
- PP4E\Ai\TicTacToe\tictactoe_lists.py
The meat of the implementation
If you do look, though, probably the best hint I can give you is
that the data structure used to represent board state is the crux of the
matter. That is, if you understand the way boards are modeled, the rest
of the code comes naturally.
For instance, the lists-based variant uses a list-of-lists to
represent the board’s state, along with a simple dictionary of entry
widgets for the GUI indexed by board coordinates. Clearing the board
after a game is simply a matter of clearing the underlying data
structures, as shown in this code excerpt from the examples named
earlier:
def clearBoard(self):
for row, col in self.label.keys():
self.board[row][col] = Empty
self.label[(row, col)].config(text=' ')
Similarly, picking a move, at least in random mode, is simply a
matter of picking a nonempty slot in the board array and storing the
machine’s mark there and in the GUI (degreeis the board’s size):
def machineMove(self):
row, col = self.pickMove()
self.board[row][col] = self.machineMark
self.label[(row, col)].config(text=self.machineMark)
def pickMove(self):
empties = []
for row in self.degree:
for col in self.degree:
if self.board[row][col] == Empty:
empties.append((row, col))
return random.choice(empties)
Finally, checking for an end-of-game state boils down to
inspecting rows, columns, and diagonals in the two-dimensional
list-of-lists board in this scheme:
def checkDraw(self, board=None):
board = board or self.board
for row in board:
if Empty in row:
return 0
return 1 # none empty: draw or win
def checkWin(self, mark, board=None):
board = board or self.board
for row in board:
if row.count(mark) == self.degree:     # check across
return 1
for col in range(self.degree):
for row in board:                      # check down
if row[col] != mark:
break
else:
return 1
for row in range(self.degree):             # check diag1
col = row                              # row == col
if board[row][col] != mark: break
else:
return 1
for row in range(self.degree):             # check diag2
col = (self.degree-1) - row            # row+col = degree-1
if board[row][col] != mark: break
else:
return 1
def checkFinish(self):
if self.checkWin(self.userMark):
outcome = "You've won!"
elif self.checkWin(self.machineMark):
outcome = 'I win again :-)'
elif self.checkDraw():
outcome = 'Looks like a draw'
Other move-selection code mostly just performs other kinds of
analysis on the board data structure or generates new board states to
search a tree of moves and
countermoves
.
You’ll also find relatives of these files in the same directory
that implements alternative search and move-scoring schemes, different
board representations, and so on. For additional background on game
scoring and searches in general, consult an AI text. It’s fun stuff, but
it’s too specialized to cover well in this
book.
This concludes the GUI section of this book, but this is not an end
to the book’s GUI coverage. If you want to learn more about
GUIs, be sure to see the tkinter examples that appear later
in this book and are described at the start of this chapter. PyMailGUI,
PyCalc, and the mostly external PyForm and PyTree provide additional GUI
case
studies
. In the next section of
this book, we’ll also learn how to build user interfaces that run in web
browsers—a very different concept, but another option for interface
design.
Keep in mind, too, that even if you don’t see a GUI example in this
book that looks very close to one you need to program, you’ve already met
all the building blocks. Constructing larger GUIs for your application is
really just a matter of laying out hierarchical composites of the widgets
presented in this part of the text.
For instance, a complex display might be composed as a collection of
radio buttons, listboxes, scales, text fields, menus, and so on—all
arranged in frames or grids to achieve the desired appearance. Pop-up
top-level windows, as well as independently run GUI programs linked with
Inter-Process Communication (IPC) mechanisms, such as pipes, signals, and
sockets, can further supplement a complex graphical interface.
Moreover, you can implement larger GUI components as Python classes
and attach or extend them anywhere you need a similar interface device;
see PyEdit’s role in PyView and PyMailGUI for a prime example. With a
little creativity, tkinter’s widget set and Python support a virtually
unlimited number of layouts.
Beyond this book, see the
tkinter documentation overview in
Chapter 7
, the books department at Python’s
website at
http://www.python.org
, and the Web at
large. Finally, if you catch the tkinter bug, I want to again recommend
downloading and experimenting with the packages introduced in
Chapter 7
—especially Pmw, PIL, Tix, and ttk
(Tix and ttk are a standard part of Python today). Such extensions add
additional tools to the tkinter arsenal that can make your GUIs more
sophisticated, with minimal coding.
This part of the book explores Python’s role as a language for
programming Internet-based applications, and its library tools that
support this role. Along the way, system and GUI tools presented earlier
in the book are put to use as well. Because this is a popular Python
domain, chapters here cover all fronts:
- Chapter 12
This chapter introduces Internet concepts and options,
presents Python low-level network tools such as sockets, and covers
client and server basics.- Chapter 13
This chapter shows you how your scripts can use Python to
access common client-side network protocols like FTP, email, HTTP,
and more.- Chapter 14
This chapter uses the client-side email tools covered in the
prior chapter, as well as the GUI techniques of the prior part, to
implement a full-featured email client.- Chapter 15
This chapter introduces the basics of Python server-side
Common Gateway Interface (CGI) scripts—a kind of program used to
implement interactive websites.- Chapter 16
This chapter demonstrates Python website techniques by
implementing a web-based email tool on a server, in part to compare
and contrast with
Chapter 14
’s nonweb
approach.
Although they are outside this book’s scope,
Chapter 12
also provides brief overviews of more
advanced Python Internet tools best covered in follow-up resources, such
as Jython, Django, App Engine, Zope, PSP, pyjamas, and HTMLgen. Here,
you’ll learn the fundamentals needed to use such tools when you’re ready
to step up.
Along the way, we’ll also put general programming concepts such as
object-oriented programming (OOP) and code refactoring and reuse to work
here. As we’ll see, Python, GUIs, and networking are a powerful
combination
.
