Passionate About Pizza: Making Great Homemade Pizza (34 page)
Read Passionate About Pizza: Making Great Homemade Pizza Online
Authors: Curtis Ide
Tags: #Baking, #Cookbook, #Dough, #Pizza

Shaping & Assembly
–
Use a rolling pin to roll out both layers of this pizza crust. First, roll out the larger of the two pieces of dough to form a sixteen-inch circle. Place the dough circle on a prepared pizza peel, pizza screen, or pizza pan. It is okay if the dough flops over the edge of the pizza peel (or screen or pan); you are going to fold up the edge to seal the two layers together. If the dough comes out too big, you can cut it to size with a knife or scissors.
Roll out the second dough ball to form a sixteen-inch circle that is the same size as the first piece of dough. Let the second rolled out dough piece sit while you put the fillings into the pizza. By rolling out both layers before assembling the pizza, you will be ready to quickly finish the assembly and get the pizza cooking!
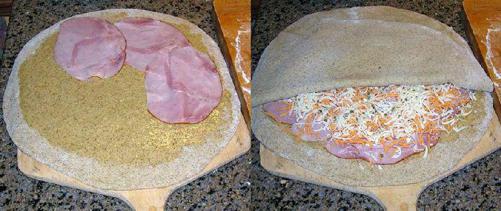
Spread one or two tablespoons of olive oil over the bottom dough up to one inch from the edge. Lay the sliced ham over the pizza up to one inch from the edge. It may take more than one layer so stack it up! If you use too small an amount of fillings in between the layers of dough, the finished pizza can seem too doughy. Spread the Mozzarella and cheddar cheeses evenly over the ham to one inch from the edge and sprinkle with Romano cheese and herbs, if desired.
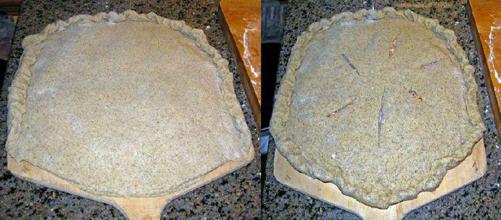
Place the top layer of dough over the fillings and roll up the edges of the two layers together (from the bottom up and towards the center of the pizza) along the entire edge of the dough. If you want, you can brush the entire top surface of the pizza with olive oil (including the edge); you can use a pastry brush or your fingers. With a sharp knife, make a few two-inch long slits through the top layer of dough to allow air, steam, and gas to escape. On the other hand, if you want the crust to bubble up and make a dome, do not make the slits. Of course, it will not quite be a pizza at that point but it will look interesting!
If the two layers of dough do not stick together well you can brush the edge of the bottom piece of dough with some water just before you put the top dough onto the bottom piece. This will help the dough meld and stick together.
Baking
– Bake at 500˚ for eleven to thirteen minutes; the actual baking time may vary from eight to fourteen minutes depending on the oven, but be careful not to bake too long. You want to bake the pizza so that the crust is nicely browned and crunchy-chewy, but not overdone. In addition, the fillings heat through; the cheese may be bubbling slightly through the slits in the top crust of the pizza. This ensures that the fillings reach the right temperature.
Serving
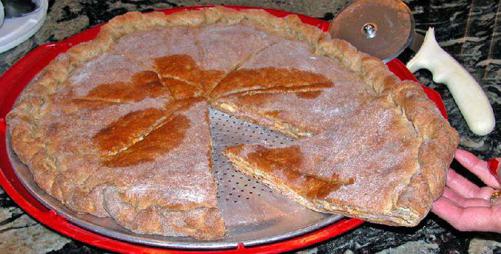
– After removing the pizza from the oven, let it stand for a few minutes on a trivet until the cheese stops bubbling and the pizza cools slightly. This allows the fillings and cheese to set prior to cutting. Cut the pizza into manageable size slices and serve while still warm.
If you have one, serve the pizza on a perforated pan. The holes in the pan let steam and sauce out so that the bottom crust does not become soggy.
Variations
Dough
– 1 1/2 Recipe Basic Pizza Dough, 1 1/2 Recipe California-style Sourdough Dough, 1 1/2 Recipe Half Wheat Dough, 1 1/2 Recipe Rye Dough
Sauce
– Normally, you do not use sauce for this pizza. If you do use sauce, make sure that it has low moisture content.
Fillings
– You can add sliced pepperoncini peppers along with the ham. Sprinkle caraway or sesame seeds on top. You can use any filling that you would normally put on a pizza or in a grilled sandwich.
Assembly and Baking
– You can assemble and bake this pizza on a pizza peel or a pizza screen. If you prefer it, you can attach the top and bottom crust without a making a dough roll. To do so, wet the edge of the lower crust slightly with water before placing the top crust then press the two layers together with your fingers until they stick together.
Serving
– Serve with honey-mustard or Dijon mustard sauce.
Italian-style Pizza
The tradition for Italian-style pizza is as old as pizza itself. Italian-style Pizza is pizza that bakes in an oven where the temperature is very high. Typically, the heat source is burning wood. Many specialty pizzerias use wood-fired ovens to bake their pizzas in an effort to recreate classic Italian-style pizza. The ultimate pizza in some people’s view is the Neapolitan-style pizza. According to most historians, this style of pizza originated in Naples, Italy. As such, it is the grandfather of all pizza. The VPN Association protects Neapolitan-style pizza much as the French protect vintages of wine. They certify that pizza is
Vera Pizza Napoletana
only if the appropriate ingredients, preparation techniques, and approved pizza ovens are used. The pizza recipe shown here is not quite authentic enough to be true
Vera Pizza Napoletana
. However, it captures the essential spirit and it tastes great!
Neapolitan-style pizzerias bake their pizza in a wood-fired oven at very high temperatures of 700-800 degrees Fahrenheit. In order to cook at these temperatures they specially formulate the dough with flour that will not scorch and they add no sugar to the dough that might burn. The high heat produces a light, airy crust with a unique feel and taste that Neapolitan-style pizza aficionados seek with almost reverential passion.
I list this pizza last of the thin-style pizzas because it requires considerable skill and special equipment not available to most home pizza makers to make it successfully. The dough is stickier, the flour used is specially formulated pizza flour, and the pizza oven must reach temperatures near 800 degrees Fahrenheit. Baking a pizza at that heat is not for the faint of heart. On the other hand, those who seek the experience and who are able to make it successfully derive great satisfaction. If this strikes your fancy and your passion drives you towards the goal, go for it!
What is listed here is a jumping-off point for the serious pizza maker. Using what you learn from this book is a good foundation for the experimentation and learning process, you will follow to become successful and consistent making pizza in a wood-fired oven. Remember to use a system!
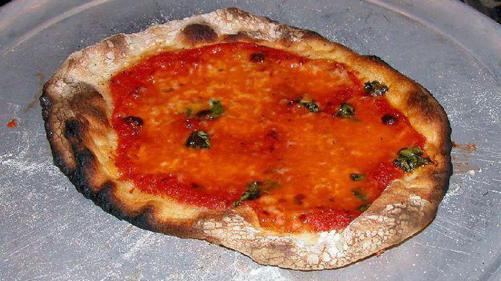
Neapolitan Margherita Pizza
Makes four eight to ten inch pizzas.
fresh Mozzarella cheese, preferably di Bufala (from water buffalo milk)
Fresh basil leaves
1 recipe Neapolitan-style Dough (see recipe
page 108
)
1 recipe Neapolitan-style Sauce (see recipe
page 122
)
olive oil, fruity flavored
course grained sea salt
fresh ground black pepper
Caputo® flour (for shaping)
Toppings
–
Cut the Mozzarella cheese into 3/16 inch slices. Wash the basil and dry it well. Separate the leaves from the stem and tear the leaves (do not cut) into shreds.
Rising
–
Separate the dough into four pieces before letting it rise. You make this dough with a small amount of yeast. As a result, it will take somewhat longer than normal to rise. It may not double in size even after waiting two hours. You can use the dough even if it has not doubled but it may make smaller bubbles in the finished pizza.
There is no need to punch down this dough; in fact, you must handle this dough as little as possible so that it will contain the large bubbles when baked. You also do not need to let it rest as it already rested as it rose. Because you separated the dough before rising, you can shape each pizza into a pizza directly without additional handling.
Shaping
–
Shape individual pizzas with this dough by hand stretching and assemble the pizza on a pizza peel.
The dough will be very wet even after rising. Proceed to very gently hand stretch the dough, as you would handle very soft dough. To make the classic Neapolitan pizza, stretch and shape the dough all the way to the edge. The edge will puff up somewhat while baking without the need to create a well-defined rim during shaping.
Depending on the consistency of your dough, you may or may not need to press the dough to flatten it. Try initially stretching the floured disk with your hands and fingers underneath the dough. If this results in dough that is not thinning out enough then you can press it a little. You can make this dough very, very thin and it will remain elastic due to the special properties of the Caputo® flour. In fact, if you stretch it thin enough the dough will become transparent before it rips or tears (this is called the windowpane test).
Since you will be baking pizzas at a very high temperature you should shape, assemble, and bake one first, then repeat the process for the remaining pizzas. In other words, you will be making Neapolitan-style pizza one at a time. You should leave each piece of dough resting in its container until you are ready to shape it.