Oracle RMAN 11g Backup and Recovery (131 page)
Read Oracle RMAN 11g Backup and Recovery Online
Authors: Robert Freeman

Performing the Flashback Table Operation from SQL
With row movement enabled, you can move forward with normal operations on the table. Then, when a user-induced corruption occurs in the table, you can use SQL at the command line to perform the Flashback Table operation:


Chapter 15: Surviving User Errors: Flashback Technologies
385
flashback table matt.woodscrew to timestamp
to timestamp('2009-06-29 13:30:00','YYYY-MM-DD HH24:MI:SS')
Alternatively, you can use the SCN if you have been able to determine the SCN (through investigation via Flashback Query, for example):
flashback table matt.woodscrew to scn 751652;
Like Flashback Query, the performance of a Flashback Table operation depends on the amount of data that has to be rewound, and how far back you are rewinding. The more data that has to be undone, the longer the operation will take. But this will always be faster than trying to perform a point-in-time recovery of the table by other methods: you can try TSPITR, or you can try to restore the tablespaces to a different instance and then export the table from the clone instance and import back into production. Nothing can come close to Flashback Table in terms of performance.
Flashback Table with Oracle Enterprise Manager
The added strength of OEM for Flashback Table is the ability to first explore the table via Flashback Versions Query to determine exactly what time you want to flashback to. If you already know the exact time for flashback, using SQL at the command line would be just as simple as using the Flashback Table Wizard in OEM. OEM does, however, provide a way to determine what dependencies are at play, as described in the following RMAN Workshop.
Enabling Row Movement and Flashback Table
It is critical that you foresee possible Flashback Table candidates and enable row movement as soon as possible. You cannot enable row movement and then flashback the table to a point prior to enabling row movement. Such an operation will result in the following error: ORA-08189: cannot flashback the table because row movement is not enabled.
In other words, you cannot wait until you need to flashback a table, and then enable row movement as part of the flashback operation.
RMAN Workshop:
Explore Flashback Table
Workshop Notes
In this workshop, we will “accidentally” delete all the rows from the WOODSCREW table, and then flashback the entire table to the point in time right before the delete transaction took place.
Step 1.
View the data in WOODSCREW. Because of previous exercises, it might be worthwhile to truncate the table and then to reinsert the records manually using the original population script (as shown earlier in the “Explore Flashback Versions Query” RMAN Workshop). Make sure you have all eight rows. Also, make sure you enable row movement prior to inserting the fault: alter table woodscrew enable row movement;
386
Part III: Using RMAN Effectively
Step 2.
Insert the fault. We will delete all the rows in the table by using a SQL*Plus DELETE
statement. Afterward, select View Data from the Actions drop-down list in OEM to view the empty table.
delete from woodscrew;
commit;
Step 3.
From the OEM database home page, go to Schema | Tables, select the schema that owns the WOODSCREW table, and then choose the WOODSCREW table. From the Actions drop-down list, choose Flashback Table, and then click Go. This takes you into a Perform Object Level Recovery: Point-in-Time Wizard, which first asks you to specify the point in time to recover to. We will pretend not to know when the delete took place, so choose to evaluate row changes and transactions—the first choice. Click Next.
Step 4.
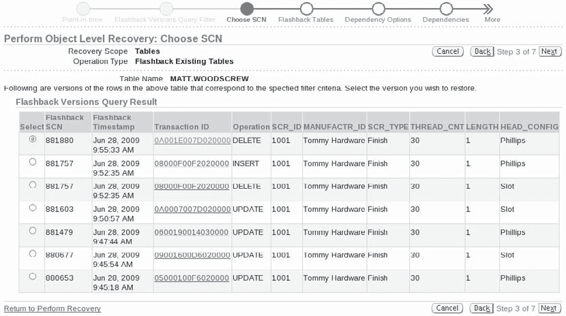
You will now see a familiar screen for the RMAN Workshops in this chapter—the Flashback Versions Query interface. Here, we have to set our columns (MOVE ALL) and a WHERE
clause to narrow down our search. Because the delete affected all rows, we can choose a single row to review here. We will use the same row as in previous workshops:
where scr id 1001 and manufactr id 'Tommy Hardware'
Now we can see the information about the DELETE operation that whacked our poor WOODSCREW table.
Step 5.
You can click the Transaction ID to review the entire delete. However, of more importance to us is the Flashback SCN column, which shows us the SCN to set to undo the DELETE operation. With the appropriate DELETE transaction checked from the list, simply click Next to automatically choose the flashback SCN specified on this screen.

Chapter 15: Surviving User Errors: Flashback Technologies
387
Step 6.
In Step 4 of 7 in the Flashback Table Wizard, Oracle allows you to specify any logically related objects that should be rewound to the same SCN as this table. Oracle automatically honors all constraints that exist for the table, but you may have logically related tables that should be flashed back. If so, this is your opportunity to specify them. In our example, we do not have any related tables, so click Next.
Step 7.
Voilà! We are magically transported to Step 7 of 7, where we see the summary of the action that will take place. Of most use here are the Show Row Changes and Show SQL buttons, which will show, respectively, what rows will be changed and what SQL will be executed by OEM on your behalf. Click Submit. If there is any problem, or if you just feel better about it, you can cut the OEM-generated SQL into a SQL*Plus session to run the Flashback Table operation: FLASHBACK TABLE MATT.WOODSCREW TO SCN 804109;
Flashback Transaction
There’s always more than one way to organize a hunt for bad data in the database. Flashback Transaction allows you to look at all changes made by a specific transaction, or all transactions in a certain timeframe. Then you can go in and undo an error at the transaction level, instead of rolling back the entire table. This focused level of flashback allows you to keep all other changes that have occurred since the error—that is, you are removing the smallest possible error and leaving the good data. You can also flashback a subset of the transaction, instead of undoing the entire transaction as an atomic unit.
Unlike Flashback Versions Query, Flashback Transaction does not use the undo segment to understand what needs to be done to back out of an error. It utilizes the Redo instead and takes advantage of the LogMiner capabilities to dig out the transaction change vectors and then determine the best way to roll back the changes.
Again, the best way to use Flashback Transaction is through OEM. Save yourself the grief and log into the OEM Console for the database, and use the same set of operations described in the RMAN Workshop “Explore Flashback Versions Query” to get yourself back to the WOODSCREW
table, where you can see one of the available actions is Flashback Transaction.
Before you can utilize Flashback Transaction, you will need to have turned on supplemental log data for the table in question. As with enabling row movement for Flashback Table, if you don’t turn on supplemental log data before you need Flashback Transaction, it’s too late. The undo segment won’t have the necessary information required to perform the flashback. From within OEM, if you try to utilize Flashback Transaction, you will see an error informing you of the actions you need to take.
388
Part III: Using RMAN Effectively
Flashback Transaction Query is compelling because it allows you to review a bad transaction in its entirety, even though the window into the error may be only a single row. For instance, if we found that a row of our WOODSCREW table had been deleted, we could look up that row in Flashback Versions Query. Then, we could get the Transaction ID for the delete operation and see how many other rows were deleted at the same time. This provides a look at the full scope of the problem.
RMAN Workshop:
Utilize Flashback Transaction from
Enterprise Manager
Workshop Notes
This workshop will introduce a fault and then utilize Flashback Transaction to undo the fault. The same WOODSCREW table is used as in previous workshops in this chapter.
Step 1.
Enable supplemental log data for the WOODSCREW table:
SQL> alter database add supplemental log data;
SQL> alter database add supplemental log data (primary key) columns;
Step 2.
Introduce a fault into the WOODSCREW table:
SQL> delete from woodscrew where scr id '1001';
commit;
Step 3.
Someone querying for a one-inch finish woodscrew manufactured by Tommy notices that the screw has been deleted from the database, even though these are still offered by the company to customers. What happened? We turn to the OEM Database Home | Schema | Tables page. Choose the owner of the WOODSCREW table and click Go.
Step 4.
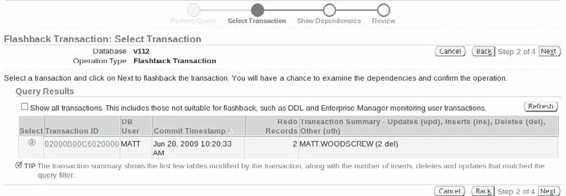
Select the WOODSCREW table, choose Flashback Transaction from the Actions list, and click Go. Select a time range from the Query Time Range that matches when the possible deletion may have taken place. Click Go and watch as OEM briefly mines the logfiles for information on all transactions for the table in question. Then, the available transactions for flashback are displayed.