Nelson: Britannia's God of War (17 page)
Read Nelson: Britannia's God of War Online
Authors: Andrew Lambert

During the campaign of 1796 Jervis and Nelson built a strong mutual respect and understanding. This was remarkable, given that Nelson spent relatively little time under Jervis’s direct command. The key to their relationship was trust, allied to the sheer professionalism that Jervis insisted on; the result, for Nelson, was an ‘unequalled’ fleet, drilled and disciplined beyond anything the Royal or indeed any other Navy had ever seen. It was the tool that Nelson’s genius required if it was to unfold its full potential, to exploit those sublime qualities of vision, judgement and daring that he had developed under Hood’s tutelage.
CHAPTER VI
1
Thorne, R. G.
History
of
Parliament
1790
–1820.
Members
G
–
P
, pp. 305–6
2
Jervis to Spencer 18.7.1796; Corbett, J. (ed.),
The
Spencer
Papers
vol. II (henceforth Sp. II) p. 37
3
Jervis to Spencer 18.5.1796; Sp. II p. 23
4
Jervis to Spencer 29.12.1796; Sp. II p. 84
5
Nelson to Wife 14.12.1796; Naish pp. 310–11
6
Jervis to Spencer 29.7.1796; Sp. II p. 43
7
Jervis to Spencer 8.1796; Sp. II p. 48
8
Jervis to Spencer 11.11.1796; Sp. II p. 72
9
Jervis to Spencer 22.5.1797; Sp. II p. 403
10
Berckman,
Nelson’s
Dear
Lord;
A
Portrait
of
St
Vincent
,
p. 196
11
See BL Add. 34, 918 f. 50 for an example.
12
Arthur,
The
Remaking
of
the
English
Navy
by
Admiral
St
Vincent,
1986
provides a useful treatment of the Ear’s contribution.
13
For Cornwallis see Lambert in Lefevre and Harding.
14
Minto
II
pp. 278–81, 345–51
15
Nelson to Wife 23.8.1796; Naish pp. 301–2. This may explain the initially cold relationship between the two men in the spring of 1801.
16
Nelson to Wife 6 and 14.1.1796; Naish pp. 233–4
17
Nelson to Wife 20.1.796; Naish pp. 281–2
18
Jervis to Spencer 24.1.1796
Spencer
Papers
II pp. 10–12
19
Spencer to Nelson 15.1.1796; Naish pp. 333–4
20
Nelson to Wife 27.1.1796; Naish p. 282
21
Nelson to Wife 12.2.1796; Naish p. 283
22
Nelson to Wife 28.1.1796; Naish pp. 284–5
23
Nelson to Trevor 2.3.1796; to Locker 4.3.1796; to Elliot 10.3.1796; to Hamilton 11.3.1796; to Jervis 16.3.1796; Nicolas pp. 128–38. Nelson to Wife 11.3.1796; Naish pp. 285–6
24
Chandler, D.
The
Campaigns
of
Napoleon
, pp. 41, 47
25
Ibid. p. 47
26
Sherwig, p. 76
27
Jervis to Spencer 28.3.1796; Sp. II p. 21
28
Nelson to Wife 24.4.1796; Naish pp. 290–1
29
Nelson to Wife 1 and 9.4.1796, Jervis to Elliot 5.4.1796; Naish pp. 287–8, 338–9. Nelson to Drake 6 and 11.4.1796;, to Jervis 8, 9 and 13.4.1796; Nicolas II pp. 142–52. Nelson to Spencer 11.4.1796; Nicolas VII p. xlvii.
30
Spencer to Nelson 26.5.1796; Naish p. 335
31
Nelson to Wife 19.4.1796; Naish p. 289
32
Nelson to Jervis 25.4.1796; Nicolas II pp. 161–2
33
Nelson to Jervis 26.4.1796; Nicolas II pp. 162–3
34
Nelson to Jervis 1, 8, 15, 18.5.1796; Nelson to Elliot 16.5.1796; Nicolas II pp. 164–73
35
Nelson to Jervis 14.5.1796; Nicolas VII p. lxix
36
Jervis to Nelson 11 and 22.5.1796; Naish pp. 336–7
37
Nelson to Jervis 23.5.1796; Nicolas II p. 174
38
Nelson to Wife 20 and 27.5.1796; Naish pp. 292–5
39
Cockburn was one of Hood’s protégés, and Nelson’s dispatch was carefully shaped to secure his place in Jervis’s affections.
40
Nelson to Jervis 4.6.1796; Nicolas VII p. lxxix
41
Nelson to Colonel Graham 19.6.1796; Nicolas VII pp. lxxxiii–iv
42
Nelson to Jervis 20.6.1796; Nicolas VII p. lxxxv
43
Jervis to Nelson 1.6.1796; Nicolas II pp. 335–6. Nelson to Jervis 4 and 9.6.1796; Nicolas VII p. lxxix–lxxxii. Nelson to Wife 13.6.1796; Naish pp. 295–6
44
Nelson to Jervis 28.6.1796; Nicolas II pp. 194–5
45
Nelson to Wife 21.6.1796; Naish p. 296
46
Nelson to Jervis 23, 24 and 28.6.1796; Nicolas II pp. 189–95
47
Jervis to Nelson 29.6.1796; Brenton I pp. 176–7
48
Nelson to Elliot 2.7.1796; Nicolas II pp. 198–200. Elliot to Nelson 6.7.1796; Naish p. 341
49
Nelson to Neutral Consuls at Leghorn 7.7.1796; Nicolas II p. 206. Nelson to Wife 7.7.1796; Naish pp. 296–7
50
Nelson to Jervis 9 and 10.7.1796; Nicolas II pp. 207–9
51
Jervis to Nelson 13 and 14.7.1796, Jervis to Elliot 14.7.1796; Naish pp. 337–9
52
Elliot to Nelson 17.7.1796; Naish pp. 341–2
53
Nelson to Wife 21–3.7.1796; Naish pp. 297–8
54
Nelson to Clarence 20.7.1796; Nicolas II pp. 218–9
55
Nelson to Jervis 23.7.1796; Nicolas VII p. xlii
56
Jervis to Elliot 25.7.1796; Naish p. 339. Jervis to Spencer 18 and 27.7.1796; Spencer II pp. 37 and 42
57
Nelson to Elliot 5.8.1796; Elliot to Nelson 6.8.1796; Naish pp. 341–2. Nelson to Elliot 10 and 11.8.1796; Nicolas II pp. 238–40
58
Jervis to Nelson 31.7.1796; Brenton I pp. 192–3. Nelson to Jervis 15.8.1796; Nicolas VII p. xlix
59
Jervis to Spencer 11.8.1796; Spencer II pp. 46–7. Jervis to Elliot 12.8.1796; Naish p. 339.
60
Nelson to Father 19.8.1796; Nicolas II pp. 244–5
61
Nelson to Elliot 25.8.1796; Nicolas II. pp. 253–5
62
Nelson to Clarence 19.8.1796; Nicolas II pp. 245–6
63
Elliot to Nelson 30.8.1796; Naish pp. 344–5
64
Nelson to Wife 10.9.1796; Naish p. 303
65
Nelson to William Wyndham 3.9.1796; Nicolas VII pp. cvii–cx. Nelson to Jervis 11, 14 and 19.9.1796; Nelson to Elliot 21.9.1796; Nicolas II pp. 262–74
66
Jervis to Spencer 27.9.1796 enclosing Nelson –Jervis 15.9.1796; Spencer II PP. 54–7
67
White,
1797:
Nelson’s
Year
of
Destiny
, pp. 16–17
68
Jervis to Spencer 15.9.1796; Spencer II pp. 52–4
69
Jervis to Nelson 25.9.1796; Naish p. 338
70
Jervis to Elliot 26.9.1796; Naish p. 340
71
Nelson to Jervis 26 and 28.9.1796; Nicolas II pp. 282–5
72
Nelson to Jervis 19.10.1796; Nicolas II pp. 291–4
73
Jervis to Nelson 13.10.1796; Naish p. 338
74
Rose, p. 77
75
Jervis to Elliot 17.10.1796; Naish p. 340
76
Nelson to Jervis 15 and 17.10.1796; Nicolas II pp. 288–9
77
Nelson to Wife 13 and 24.10.1796; Naish pp. 30–6
78
Jervis to Spencer 2.10.1796; Spencer II p. 58
79
Jervis to Spencer 23.10.1796; Spencer II pp. 61–4
80
Nelson to Locker 5.11.1796; Nicolas II pp. 298–9
81
Nelson to Collingwood 20.11.1796; Nelson Suckling 29.11.1796; Nicolas II pp. 304–7. Nelson to Wife 22.11.1796; Naish pp. 308–9
82
Nelson to Collingwood 1.12.1796; Nicolas II p. 307. Nelson to Wife 1, 9 and 12.12.1796; Naish pp. 309–10
83
Jervis to Nelson 10.12.1796; Nicolas II p. 311
84
Jervis to Elliot 10.12.1796; Brenton I pp. 272–4
85
Spencer to Jervis 16.12.1796 Spencer .II p. 78
86
Nelson to Jervis 20.12.1796; Nicolas II pp. 312–15
87
Nelson to Governor of Cartagena 24.12.1796; Nicolas II p. 317
88
Nelson to Jervis 24.12.1796; Nelson to Elliot 24.12.1796; Nelson to De Burgh 29 and 30.12.1796; Nicolas II pp. 317–24
PART TWO
HMS
Captain
driven against the
Sun Nicolas
, used as a bridge to board the
San Josef
beyond
CHAPTER VII
Lying at Porto Ferraio, far from his admiral, or any other source of support, General De Burgh’s refusal to leave presented Nelson with a serious problem. He had no choice but to embark the naval stores and wait for the battered
Minerve
to refit. In communication terms he was closer to London than the fleet: he kept Spencer informed of his proceedings through William Wyndham, the diplomat and spymaster temporarily on the island.
1
Elliot’s return from Naples provided an opportunity to discuss the war with a man of real political ability, someone he admired. While he could not persuade De Burgh to leave, the ex-Viceroy remained convinced that a powerful fleet in the Mediterranean would keep the French out of Italy, as the basis of a successful British policy.
2
Much of his case was built on the advice of his friend the Commodore. Nelson’s hopes for an early peace were dashed by Pitt’s additional financial measures, and the obvious disinclination of the French Directory to end a war that was keeping the regime in power. The only way ahead was for the nation to accept the need for a ‘rigorous prosecution of the war which now only can insure an honourable peace’. It seemed that Naples, the last independent state on the mainland, was doomed.
3
After preparing sufficient transports to embark the entire garrison, which he left under Fremantle’s command, Nelson embarked Elliot
and left Elba at the end of January. Taking advantage of Jervis’s permissive instructions, he elected to return past Toulon and Cartagena, to look for the Combined Fleet.
4
Once again, Nelson had carried out a complex mission requiring independent judgement, with skill and intelligence. He could be certain of a positive response from the admiral – little wonder he left in high spirits.
5
Both Toulon and Cartagena were empty: realising the enemy was at sea, Nelson hastened south to rejoin Jervis in the Straits. He reached Gibraltar on 9 February, recovered his two officers and headed through the Straits, where he was pursued by a Spanish battleship. Passing through their fleet on the night of the 12th, he was fortunate to escape attack, though wholly justified in taking risks to bring vital intelligence to Jervis.
The enemy fleets were meant to concentrate at Brest. The French squadron, under Rear Admiral Pierre Villeneuve, escaped to Brest, but the Spanish were delayed by the poor condition of their ships and two changes of command in six weeks. When Admiral Cordoba finally got his fleet to sea, under enormous political pressure, he was also charged with assisting the siege of Gibraltar and escorting four vital mercury ships to Cadiz. Attempting two tasks on one cruise was always going to be problematic; to set three for a fleet as inexperienced as Cordoba’s was a recipe for indecision and disaster. It was a mistake the British would have been unlikely to make.
Cordoba encountered heavy weather off Cadiz, but the need to wait for the mercury ships prevented him sailing for Brest and avoiding Jervis altogether. Instead he rode out the storm in the Atlantic approaches. Jervis had problems of his own: between Gibraltar and Lisbon two seventy-fours had been lost, two had to go home and a second-rate was damaged. Having taken station off Cape St Vincent on 6 February he gleaned enough information to know the Spanish were still near Cadiz. He was rejoined early on the 13th by Nelson, who had passed through the Spanish fleet the previous night. Lieutenants Culverhouse and Hardy, recently prisoners on board Spanish ships, told Jervis about the condition of the enemy. By the end of the day Jervis knew the enemy’s strength, and that they lay to the south-east, heading for Cadiz. All he had to do to force a battle was to place his fleet in their path. The mood that evening was infectious, and Elliot petitioned to stay and watch; Jervis agreed that his frigate could loiter until after the fighting.
Fortunately, Jervis had recently been reinforced from the Channel fleet. He had fifteen ships of line: six were powerful three-decked ships, eight were standard seventy-fours, and there was a single sixty-four. Cordoba had twenty-three: seven three-deckers, two eighty-fours, the rest seventy-fours. The four mercury transports – big, armed ships – could be mistaken for ships of the line at a distance; but four battleships had been detached, and took no part in the fighting. In all other respects, the forces were very unequal. The Spanish were short of sea-time, seamen, and fighting experience; the British were all experienced and combat-hardened, the five Channel fleet units performing as well as the veterans. Both sides were well aware of the quality gap, and it would play a key part in the battle.
Believing Jervis still had only nine ships, Cordoba decided to push through to Cadiz. The absolute failure of Spanish strategic reconnaissance condemned him to detach his heavy ships to report on sightings just when he needed to form a compact, coherent line of battle. This tactic, the basis for fighting an inconclusive linear action, was his only real hope in the face of a more skilful and resolute opponent. Once he realised the British were more numerous than he had anticipated, Cordoba reversed course to cover his merchant ships. In the process a gap opened between the main body and the escort force.
This was all the encouragement Jervis required. He signalled to form a line of battle in the shortest time on a bearing set by the flagship, and advised the fleet that he meant to pass through the gap in the Spanish fleet. For a man of Nelson’s temperament, either signal would have been a delight; together they confirmed all the hopes he had placed in his admiral. Jervis had abandoned eighteenth-century formalism, and was doing what he thought should have been done on many other occasions. It is hard to believe that Jervis would not have discussed his plans with his most acute subordinate at some stage in the previous fourteen months.
Jervis’s move speeded up the approach to battle, and his fleet demonstrated remarkable seamanship by rapidly forming a fighting line. Cordoba was clearly unsettled by the speed and precision with which the British shifted formation. Had they moved no faster than his own ships, the Spanish would have been able to reunite their line before the fleets came into contact. Instead Troubridge, leading the line in the
Culloden
,
forced the headmost ship of the smaller Spanish force, the three-decker
Principe
de
Asturias
, to sheer off, with two double-shotted broadsides. With the Spanish now divided, Jervis had the fleet tack in succession to engage the main body of the enemy. Having anticipated the order, Troubridge had the answering signal already hoisted and ready to fly before Jervis’s flags appeared. This remarkable concurrence of thinking reflected strong doctrine, excellent communication between admiral and captains, and clearly understood objectives. Nor was Troubridge the only officer to penetrate the admiral’s intentions.
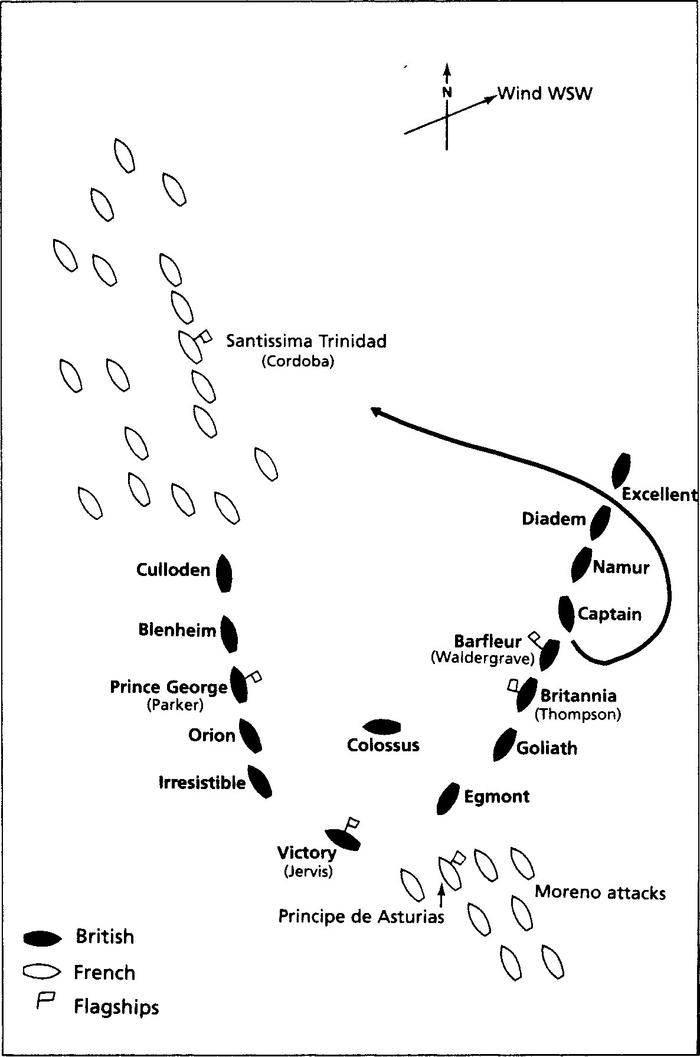
The battle of Cape St Vincent
Brave and determined attempts by the detached force to block Jervis’s move were beaten off, but this caused a gap to open between the five headmost ships led by Troubridge and the rest of the British force. Furthermore the wind had shifted, increasing the distance between the two parts of the fleet. Anxious to keep up the tempo of the attack, and ensure the five leading ships were not left exposed, Jervis planned an attack by his centre divisions to double on the Spanish while the
Britannia
, leading the rear division, would join Troubridge on the opposite side of the Spanish force. Admiral Thompson in the
Britannia
failed to take in the signal, to Jervis’s mounting displeasure. The gap between the five advanced ships and the rest of the fleet was growing with every minute; Jervis’s hastily modified plans had failed.
Throughout the opening phases of the battle, Nelson, on board the
Captain
,
had been watching in admiration as Jervis’s plans unfolded. His station near the rear of the British line gave him a good viewpoint, and as a commodore with a captain to command the ship he had the leisure to observe the big picture. He would have been conscious of Troubridge’s exposed position, and read the signals to
Britannia
that Thompson failed to note. More significantly he had a very good view of Cordoba’s flagship, the massive, unique four-decked
Santissima
Trinidad
, which began to signal furiously. The fleets having passed on opposite courses, the Spanish now overlapped the British rear; Cordoba saw the chance to shift across the rear of the British line to reunite his fleet. When a group of Spanish ships began to move in this direction, Nelson decided to act. Jervis was too far away to see and Thompson had not answered the signal to tack in succession, which had now been overtaken by events. The situation called for action,and he did not hesitate to take it – his courage was born of confidence and a very good knowledge of his Commander in Chief.
He wore ship, rather than tacked – a quicker manoeuvre although
less suitable for a squadron than a ship – then cut back through the British line and took station ahead of Troubridge’s
Culloden
. The two ships quickly turned the Spanish fleet back onto their old course. The
Captain’s
approach had exposed her to Spanish fire, but it was here that Nelson’s recent experience of Spanish gunnery and drill paid dividends. The risk was acceptable, but still costly. Nelson was hit in the side by part of a smashed rigging block, and would have fallen had Miller not caught him. The blow left him with a hernia, which would trouble him whenever he coughed. In the heat of the action, however, it did little to damp his enthusiasm, and as there was no open wound it required no treatment.
The Spanish fleet remained in a state of confusion – more a huddle than a line – throughout the fluid phases of the battle. Cordoba found his flagship under attack, with five other ships in company. Jervis had ordered the rear division into battle, and soon two lines of British ships were chasing the Spanish – one astern the other on the starboard quarter, both closing quickly. Collingwood in the
Excellent
led the main body, her finely honed gun crews shattering the rearmost Spanish ships as she passed on to attack new targets. Jervis ordered him to relieve the
Culloden
and the
Captain
, now closely engaged with several Spanish ships.
Captain
had been disabled by the loss of her wheel and foretopmast. Jervis flew the signal ‘Engage the Enemy More Closely’ – to Nelson’s admiration, although it was hardly necessary. The speed and accuracy of British gunnery was far superior to the Spanish, enabling seventy-fours to master 112-gun three-deckers. After forcing two ships to surrender, Collingwood ran between Nelson and his opponents, pouring in rapid broadsides at pistol shot. The two Spanish ships collided, while
Excellent
set off after Cordoba in the
Santissima
, the ultimate prize.
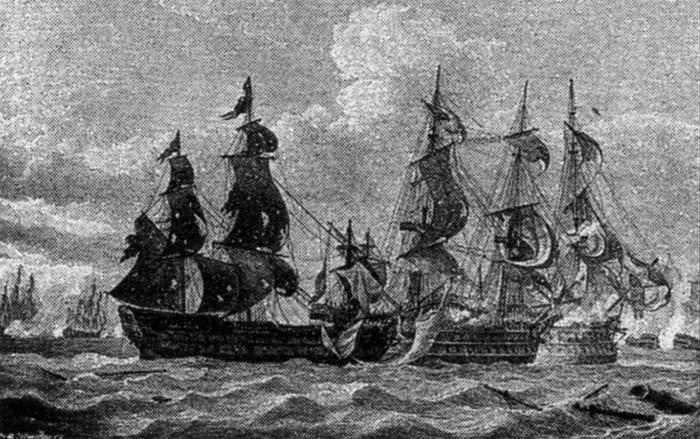
Nelson, Troubridge and Collingwood had broken the back of the Spanish fleet, leaving four ships crippled, the rest fleeing in disorder. The eighty-four-gun
San
Nicolas
and the 112-gun
San
Josef
lay close by the
Captain
,
stunned by Collingwood’s fire, and still locked together. As the
Captain
could take no part in the rest of the battle, which would soon range ahead, Nelson ordered Miller to place her alongside the
San
Nicolas
and prepared to board. He insisted on leading the attack personally, knowing the value of setting an example. Clambering over the cathead, Nelson entered the Spanish captain’s cabin. His supporters quickly burst through onto the quarterdeck,
wounding the commodore as they went. There they joined another group, which Berry had led over the bowsprit and across the spritsail yard. The Spaniards on the upper deck surrendered: with a quarter of the crew killed or wounded they had seen enough. Caught alongside, with a commanding view over the newly taken prize’s upper deck, was the three-decker
San
Josef
. She had suffered heavily: the admiral was dying below deck with both legs shot off, while a fifth of her crew were dead or wounded. Even so her crew opened fire with their muskets. Unable to defend themselves where they stood, the British had only two options. Nelson chose to attack. Summoning fresh men from the
Captain
to guard the hatchways on the
San
Nicolas
, he scrambled up the side of the larger ship, getting a leg up from Berry into the main chains. Once on the Spaniards’ deck, Nelson received her captain’s sword as a token of surrender. He insisted on repeating the ritual with all the officers, passing their swords to William Fearney, one of his barge crew, who stowed them away under his arm like firewood.