Meals in a Jar (3 page)
Authors: Julie Languille
Tags: #Cookbooks; Food & Wine, #Canning & Preserving, #Quick & Easy

Similar to the pouches in which you can now buy some brands of tuna at the grocery store, retort pouches are lightweight, flexible cans that are not easily breakable. Unlike glass jars used for generations for canning, retort pouches can easily withstand an earthquake or even a fall from a pantry shelf without breaking. Retort pouches are great to put in a bug-out bag, an emergency kit with seventy-two hours of survival supplies in case you need to leave your home quickly. Retort pouches are also relatively inexpensive, but they are not reusable; once opened, they must be thrown away.
Retort pouches come in two styles: flat pouches, like the commercially packaged tuna pouches, and gusseted stand-up pouches, which are my preference. Flat pouches must be laid nearly flat to seal, and any liquid has a tendency to come forward, potentially hampering the seal. Gusseted pouches can be sealed in an upright position either using a jaw-style impulse sealer or by holding the pouch up to a vacuum-sealer and manually triggering it to only seal, and thereby not vacuuming the liquid contents up out of the pouch.
It is very important to leave plenty of headspace when canning with retort pouches or the pressure may cause the seals to come open during processing.
Flat retort packages are often used by fishermen to preserve their catch. The packages are heavily touted on the Internet by sellers of very expensive “chamber” style vacuum-sealers. Chamber sealers are built to allow the food and bag to be placed inside a chamber. The air is then vacuumed out of the chamber. Since the pressure both inside and outside of the bag remains equal, the fluid in the bag is not suctioned out of the bag, which could result in a mess and/or a failed seal due to the presence of moisture during the sealing process. Chamber sealers are very expensive, with home models starting in the $700 range and continuing upwards of $3000.
Both cost and convenience factor into my preference for gusseted-style retort packages. I use the vacuum-sealer I already owned to seal my pouches. (Be sure to process a test batch of one or two bags before canning a whole batch of protein to be sure that a) your seals are strong enough for this size bag, and b) you’ve left enough headspace.) If you don’t have a vacuum-sealer, you may be easily able to use an iron. You must be able to hold or place your food about 8 inches below a heatproof surface and then be able to bend the plastic up and over to be ironed closed. You need about a 1/2-inch seam or more.
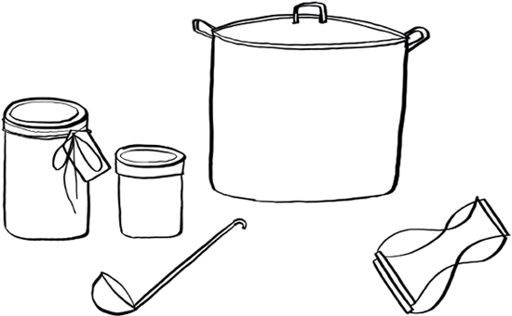
If you are not successful sealing your bags with a vacuum-sealer or iron, or if you prefer an easier solution, jaw-style impulse sealers are available for retort bags for about $150. Simply fill upright bags and close the tops together with your fingers, pressing out as much air as easily possible, and then clamp on the jaws of the sealer. Note: As the gusseted bags are filled, the gusseted portion expands, gains weight, and becomes functional for making the bag stand upright. This part of the operation is easier with two people, one to support the bag until it become self-standing and one to ladle the liquid. Alternatively, you can use an empty, washed-out can, such as a spaghetti sauce can, to hold the bag while filling. Fold the top edge down over the rim of the can to keep it out of the way when filling and use a canning ladle.
Just as with Mylar bags and glass canning jars, it is important to keep the sealing surface clean and dry from food and liquid to ensure a good seal. Use a canning funnel to fill your pouches and if there is some spillage, wipe the area dry with a paper towel before
sealing. If your mixture contains fats or oil, moisten the paper towel with a bit of vinegar before wiping to clean the fat from the area to be sealed.
Pressure Canning Instructions
Pressure canning requires the ability to read and follow directions well. Failure to do so could threaten your family’s health. Please follow all directions carefully and follow current USDA guidelines for proper timing and procedures.
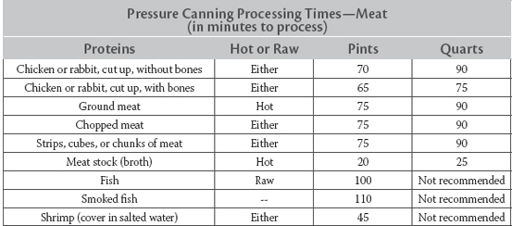
When pressure canning, choose from the allowable sized jars, and determine whether the food can be canned raw or must be hot packed after cooking until two-thirds done. Place the food in sterile jars, leaving the required amount of headspace (headspace is 1 inch for vegetables and all meats except chicken and rabbit, which is 1-1/2 inches). Alternatively, food can be placed in retort pouches and sealed with 1-1/2 inches of headspace. Note: Headspace is especially important if using retort pouches, because too little headspace will cause the bag seams to fail.
Wipe the top rims of the jars clean. Place the lids and rims on and tighten them by hand. Heat a few inches (about 1 gallon) of water in your pressure canner until hot and steaming. Add the jars or retort pouches one at a time on the racks so the jars are not sitting on the bottom of the canner.
Close the canner according to manufacturer’s directions. Heat the canner until it begins to steadily vent steam. Set a timer for ten minutes and wait for the ten minutes to elapse, which will give time for the air to be vented from the canner.
Place the correct weight on top of the canner, wait for it to come up to the prescribed pressure, and begin timing according to the given times for the food you are canning and the size jar you are using.
After the time has elapsed, turn the heat off and allow the canner to cool. Once cool enough to touch, remove the jars or pouches to a towel on the counter and allow to cool completely. Once cooled completely, check the seals by pressing on the lids. Well-sealed lids will not spring back after lightly pressed. Poorly sealed lids will pop down and back up. If properly sealed, the jars may be stored. Refrigerate any unsuccessfully sealed jars and use quickly.
The information in the charts below was current only at the time of writing and current best practices may have subsequently changed. Please follow current USDA recommendations.
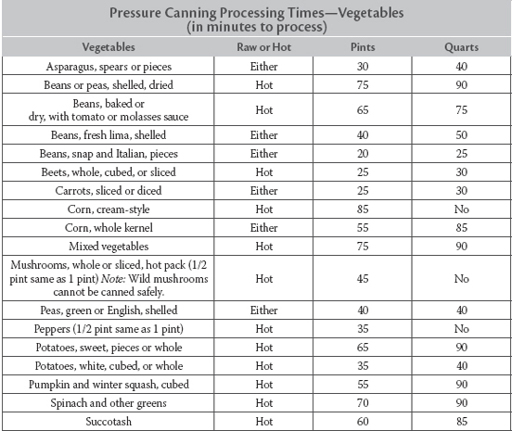
Pressure Canning Steps to Determine Time and Pressure
1 Determine whether to pack raw or if the food must be cooked through and hot.
2 Follow directions for headspace. (Headspace is 1 inch for vegetables and all meats except chicken and rabbit, which is 1-1/2 inches.)
3 Determine processing time.
4 Determine pressure based on elevation for either a dial-gauge or weighted-gauge pressure canner.
a. Dial-Gauge Canner:
| Altitude | Pressure |
Sea level–2000 feet | 11 |
2000–4000 feet | 12 |
4000–6000 feet | 13 |
6000–8000 feet | 14 |
b. Weighted-Gauge Canner: Use 15 pounds for all
Dehydrating Food
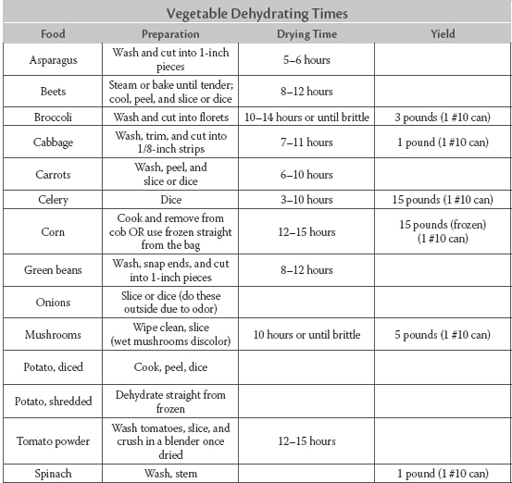
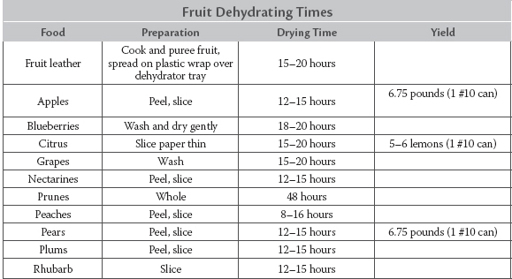
Dehydrating food is really easy and very satisfying. Almost every fruit or vegetable can be dehydrated. Most foods can just be washed, sliced, and dried. Really dense vegetables such as potatoes and sweet potatoes must be peeled and parcooked first. Simply spread out the food over the drying racks and dehydrate for six to twenty-four hours, depending on the food, until completely dry. Some drying times are listed below. For foods not listed, dry until the food is no longer sticky and it breaks rather than just bending when folded.
Ingredients, Equipment, Supplies
A Word about Ingredients
One of the things that sets ready-made meals apart from commercially available emergency foods is they are designed to taste really good. Although they’re made using easily available ingredients, there are some ingredients that give a really big gain in flavor but which you might not find in everyone’s kitchen. These can be easily bought online, or made at home from readily available ingredients.
Bouillon / Soup Base
Chicken, beef, or vegetable bouillon, bouillon cubes, or soup bases may all be used interchangeably in the recipes in this book. One teaspoon of bouillon mixed with 1 cup of water makes 1 cup of stock. Or, 2 teaspoons of bouillon plus 1 cup of water is the equivalent of a condensed or flavorful stock.
Cheese
Cheese is basically preserved milk, and it is relatively safe to eat for a lengthy period of time. There are several options for further preserving cheese by coating it in wax or vacuum-sealing chunks and storing it in a cool place, buying dehydrated cheese commercially, using processed cheese food such as Velveeta or Laughing Cow brands, relying on drier cheese such as Parmesan, or by water bath canning. When a recipe calls for cheese, plan to use your choice of home-canned, vacuum-packed, or processed cheese food.
Although I do not have long-term data available, I have water bath canned cheese and used it up to a year later with very good results. I grate the cheese, melt it, put it in wide-mouth half- or quarter-pint jars and process for thirty minutes. This changes the texture of the cheese, but it can be sliced or grated, tastes good on a cracker, and works well in cooking. I recommend starting with a mild cheese, because it becomes sharper with age. When I intend to use the cheese in Mexican or other spicy dishes, I add red pepper flakes before canning to give it some heat.