Making It: Radical Home Ec for a Post-Consumer World (37 page)
Read Making It: Radical Home Ec for a Post-Consumer World Online
Authors: Kelly Coyne,Erik Knutzen

Aim to keep the contents of the bin always at that magic consistency:
moist as a wrung-out sponge.
In the first few weeks, you might have to use a spray bottle to mist the paper to keep it from drying out. Worm castings hold water, so once they appear, the bin will stay wet on its own. Then your challenge will become keeping it dry enough. It’s important that it stay a damp, airy environment. If it seems to be getting soggy and dense, mix in a few handfuls of dry shredded newspaper to dry it out and fluff it up. If lots of worms are hanging out on the sides or lid of the bin—or trying to wiggle out the airholes—it’s definitely too wet.
Note:
Keeping the lid on the bin keeps out the light and also keeps out flies. However, it holds in a lot of moisture. If you’re having trouble keeping the bin dry enough, you could cut a window out of the lid. Then use duct tape to secure a piece of window screen over the hole. That way, you have both air and protection. If you do this, keep the bin in a dim place for the worms’ sake.
The deeper the contents of the bin, the greater the danger of the bottom portion of the bin turning swampy and anaerobic. To prevent that, don’t let the contents of the bin get too deep. Keep the depth of the contents between 6 and 8 inches and you should be fine. If you have a ton of worms and 6 to 8 inches doesn’t seem enough room, it’s time to start a second bin, give your extra worms to friends who want to start their own bins, or feed some spares to your chickens. You could also distribute a few handfuls in a cool compost pile.
Don’t be afraid to dig around in the bin every so often to make sure all is well. Check regularly to be sure there’s never any standing water in the bottom of the bin. Bad smells will ensue, and worms will die. If all is well, eventually you should see tiny baby worms in the mix, as well as the little lemon-shaped beads that are worm cocoons. These are good signs. Your worms are happy and breeding. As your bin matures, you might find that other critters, decomposers such as mites, pot worms and tiny black beetles, will make it their home as well. This is nothing to worry about. They’re all doing the same work, and the worms don’t mind the company.
Before you go on vacation, feed the worms well and add fresh bedding. They’ll be fine for a couple of weeks.
HARVESTING THE CASTINGS
When the contents of the bin start looking more black than anything else, it’s time to harvest some castings. This will probably happen about 2 months after you start the bin. The simplest way is to stop adding fresh food for a while and let the worms finish up the little scraps and bits dotting the bin. When there’s not much recognizable food in the bin, put a big portion of something delicious, a proven favorite like squash, at one end of the bin. The worms will migrate that direction. Wait a few days, then scoop out the material on the opposite side of the bin and pile it on the bin lid. Do this during the day or under bright lights. Form the pile into a pyramid or cone shape. There will still be worms in the mix, and they’ll dive down to the bottom center of the mound to hide from the light. Then you can harvest the castings from the top and sides of the mound and transfer them to a bucket or bowl. Return the worms hiding at the bottom of the pile to the bin.
Add fresh wet newspaper and soil to the bin, just as you did at the beginning, to rebuild after harvest. Mix this material with the remaining material and start feeding normally again.
Freshly harvested worm castings are very wet. Spread them out on a tray and let them air-dry for a few days, then sift them through a screen or colander. This will catch any remaining food scraps and give the castings a nice granular texture that’s easy to spread. Store them in a bag or covered container.
WORM TEA
One excellent use of castings is in a liquid plant tonic. Put 1 pint of castings in a bucket. Add a gallon of warm water and a spoonful of molasses. Stir this well, and stir it frequently over the course of 24 to 48 hours. Dilute the resulting liquid at the ratio of 1 part tea to 4 parts water and use it to water container plants and fruit trees. You can use it in your vegetable beds, but they should already be well nourished by compost and thus don’t need it as much. It’s best to use all of your worm tea in a week or so.
62>
A Mash Tun

PREPARATION:
2 hours
To make beer from scratch, you need a mash tun. “Mashing” is the process of converting starches in malted grain to sugar that you’ll ferment to make beer. A mash tun is the vessel you’ll “mash” in. You can buy one ready-made, or you can make one.
Our mash tun is nothing more than a repurposed 10-gallon cooler with an improvised valve instead of a spigot and a filter made out of the braiding from a dishwasher water supply hose. Take a trip to the hardware store, spend a few minutes assembling the pieces, and you’ll be ready to brew. To use, you mix hot water and grain in the cooler, let steep for an hour, and then, using the valve, let the fermentable sugars slowly drain through the braided hose and out the valve into your brew pot. The braided hose at the bottom acts just like a tea strainer, keeping the grain in the cooler and letting the “tea” drain out into your brew pot. (See Project 54 to learn how to make beer with a mash tun.)
YOU’LL NEED
- Round 10-gallon cooler
- 9 inches vinyl tubing
A - 24 inches (3/8-inch) copper pipe
B
FOR THE BULKHEAD FITTING:
- 3/8-inch braided stainless steel hose
C
(most commonly sold as part of a dishwasher installation kit) - 2 (½-inch) brass barb to
MIP
adapters
D - 3/8-inch brass T #12
E - 4 (½-inch) hose clamps
F - 3 (5/8-inch) stainless steel washers
G - Washer that came with the cooler
H - 3/8x 1 ½-inch brass nipple
I - O-ring (5/8-inch I.D.)
J - 3/8-inch ball valve
K - 3/8-inch brass barb to
MIP
adapter
L - Teflon tape
TOOLS:
- Tin snips
- Needle-nose pliers

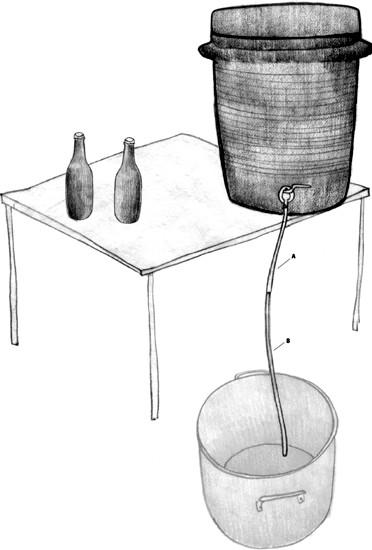
The assembled mash tun, with copper and plastic piping leading to the brew pot
Note:
Instead of the braided dishwasher hose, you can buy a short length of stainless steel screened tubing called a “bazooka screen” at a home brew shop. If you are using a bazooka screen, substitute the brass T and two ½-inch brass barb to
MIP
adapters with a single ¼-inch brass barb to
FIP
adaptor. The rest is the same as above.
PUTTING IT TOGETHER
PREP THE COOLER
The cooler’s insulation makes mashing easy, since it retains heat throughout the mashing period. You’ll want a 10-gallon circular beverage cooler for this project. Look for a cooler on sale at big-box stores, where we’ve found them discounted as much as 50 percent. Remove the spigot that came with the cooler and hold on to the washer, which you’ll be using later. (Keep the spigot so that you can put it back on whenever you want to use the cooler for serving drinks.)
ADAPT THE STAINLESS STEEL HOSE
Remove the plastic lining from the braided stainless steel hose, since you just want to use the braided part for this project. The braided hose will sit at the bottom of the cooler and act as a kind of strainer, preventing bits of grain from draining into your brew pot. To remove the plastic liner the hose comes with, cut off the threaded adaptors on both sides of the hose with tin snips. You’ll need 28 inches of hose, so trim accordingly. Now, grip one end of the plastic liner with a pair of needle-nose pliers and
push
the liner out of the braiding. This takes some patience—take it slow and don’t try to pull it off as this will stretch it. Dispose of the liner.
ASSEMBLE THE BULKHEAD FITTING
Reinsert the washer from the cooler if it isn’t still in place. Put a few winds of Teflon tape on all the threaded fittings. Attach the two ½-inch brass barb to
MIP
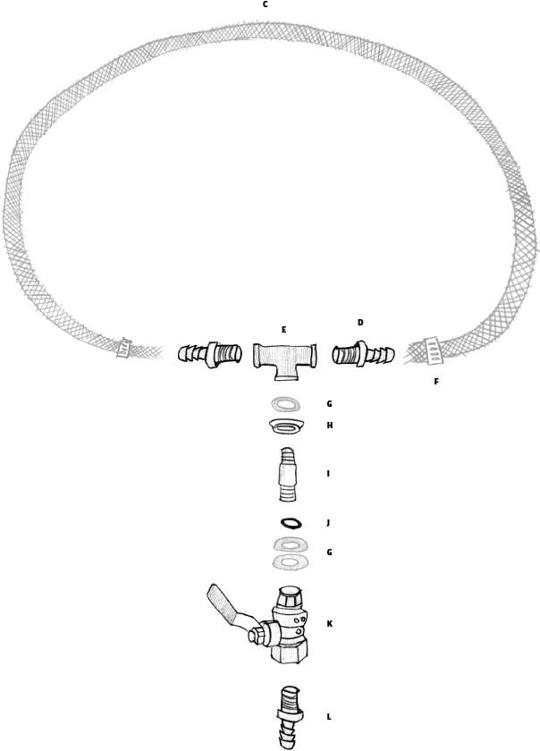
adapters to the 3/8-inch brass T. Using two ½-inch hose clamps, attach the stainless steel braid to the barbs to form a circle as shown in the illustration.
Thread the
3/8
x 1½-inch brass nipple into the T. Put one stainless steel washer on the nipple and stick the nipple through the rubber washer where the spigot used to be.
Put the O-ring on the nipple on the outside of the cooler. Put two stainless steel washers (which act as spacers) on the nipple on the outside of the cooler. Depending on the cooler, you might need to add more washers.
Attach the 3/8-inch brass barb to
MIP
adapter to the ball valve and attach the ball valve to the nipple.

Assembly order of stainless steel braid and bulkhead fitting
ADD THE DRAINAGE PIPE
On the end of the brass barb that sticks out of the ball valve, attach 9 or so inches of food-grade vinyl tubing and connect to a 24-inch piece of 3/8-inch copper pipe. The copper pipe will extend down to the bottom of the brew pot. Use ½-inch hose clamps to make the connections. This arrangement lets you drain off the wort from the cooler directly into your brew pot without splashing it around—it’s important not to aerate wort before you boil it.

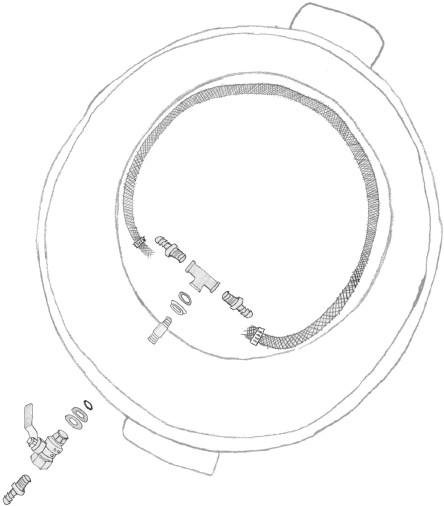
Braid and bulkhead fitting installed in the cooler
