In The Royal Manner (12 page)

5.
Step 3
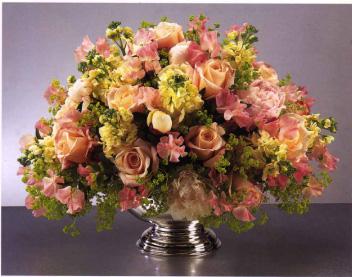
To arrange the greenery, begin by trimming it into short lengths, then push each length through the wire into the Oasis until it is secure. Fill out the whole container with plenty of greenery, keeping the balance on oil sides to give an even, well–rounded framework for your flowers.
Step 4
Distribute the flowers throughout the greenery, making sure that you maintain an even–sided, full arrangement and a well–shaped top to the display. Finally place small sprays of the alchemilla around the other flowers to help ‘soften’ the arrangement.
Step 5
To finish the display, top up the container with water to prevent the Oasis from drying out, and spray the flowers with cold water using a fine plant mister to keep them fresh.
I have chosen to illustrate this party theme as it translates well for both boys and girls. Ugly bugs, spiders and creepy–crawlies for the boys, and pretty butterflies and ladybirds for the girls. It is important to make the food look colourful, attractive and exciting. Bite–sized nibbles are always the most popular, and remember to serve the savoury dishes first as most kids have a very sweet tooth! Also, do remember to avoid foods which have strong flavours. The centrepiece of the table is always the cake, and here I have chosen a ladybird. If possible, turn off the lights in the room when the cake is about to be presented – the candlelight will give a magical glow. And don't forget to tell the child to make a wish as they blow out the candles.
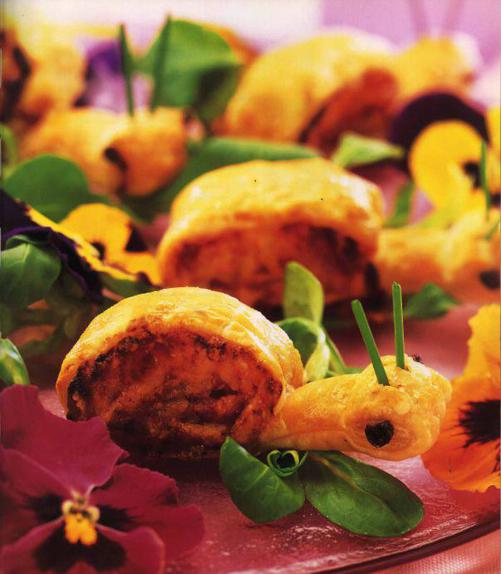
GARDEN SNAILS
Makes: 12
Preparation time: approx. 20 minutes plus cooling
Cooking time: approx, 20 minutes
300g/10oz puff pastry [thawed if bought frozen)
3 tbsp tomato ketchup
100g/4oz grated Cheddar cheese
1 medium egg, beaten
A few fresh chives
A few currants, cut into small pieces
A little cheese spread
Lettuce and edible flowers to serve
Preheat the oven to 200° C/400° F/Gas 6.
1. Roll out the pastry on a lightly floured surface to a 30cm/12in square. Trim the edges to neaten.
2. Spread the ketchup over the square leaving the top 5cm/2in free of filling, then sprinkle grated cheese over the ketchup. Starling at the bottom, roll up the pastry tightly like a Swiss roll, leaving the plain pastry unrolled. Brush the top edge with water and fold over lcm/l in twice – this will be the snail's head.
3. Cut into 12 equal portions and transfer to a baking sheet, sitting them upright. Brush with beaten egg and bake for about 20 minutes until lightly puffed and golden, Leave to cool.
4. Push 2 chives either side of the snail's head to resemble antennae. Spread currant pieces with a little knob of cheese spread and secure to the side of the snail's head to resemble eyes. Arrange the lettuce on a serving plate with the flowers and sit the snails on top to serve.
BUG AND BUTTERFLY SANDWICHES
Makes: 8
Preparation time: 30 minutes
No cooking
24 slices white bread from a ready–sliced loaf
300g tub cheese spread
12 slices lean ham
42 Twiglets or potato chipsticks
14 small cherry tomatoes
2 pitted black olives, cut into rings
4 radishes, trimmed
I small carrot, peeled and cut into 6 sticks l mini cucumber, thinly sliced A few chives
1. Cut off the crusts from the bread and, reserving about 2 tsp cheese spread. cover each slice with the remainder. Lay slices of ham over 12 slices and then sandwich together.
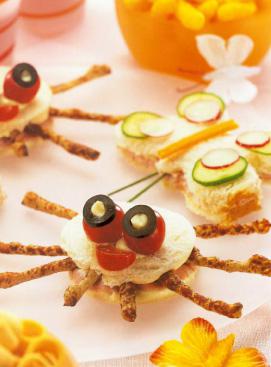
2. To make the Ugly Bugs, stamp out a 10cm/4in round from 6 of the sandwiches using a pastry cutter. Press 6 Twiglets or chipsticks round the sides of the circles to look like legs. Break the other Twiglets or chipsticks in half and set aside.
3. Spread a little of the reserved cheese spread on the bottom of 12 cherry tomatoes and press on to the bread in pairs lo resemble eyes. Top with a small amount of the remaining cheese spread and sit a piece of olive on top. Use the broken Twiglets or chipsticks as antennae. Quarter the remaining tomatoes and arrange as mouths on the bugs.
4. For the butterflies, stamp out a butterfly shape from each of the remaining sandwiches and arrange the sliced vegetables on top to make the patterns of butterfly wings. Arrange 2 chives on each as antennae.
5. Place the sandwiches on a large flat plate to serve.
Cook's note:
fill the sandwiches with any filling you like and butter the bread first if preferred. For a sweet version, fill with chocolate spread and decorate with sweets and mini marshmallows. Cover with clear wrap to prevent the sandwiches from drying before serving.
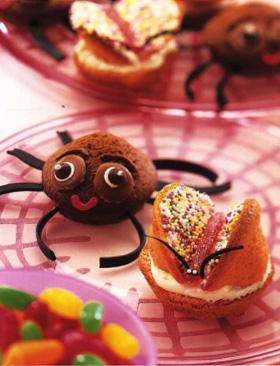
SPIDER AND BUTTERFLY CUPCAKES
Makes: 12
Preparation time: 35 minutes plus cooling.
Cooking time: approx. 20 minutes
100g/4oz caster sugar
100g/4oz butter or margarine, softened
2 medium eggs, beaten
100g/4oz self–raising flour
1 tbsp cocoa powder
A few drops strawberry essence
A few drops pink food colouring
TO DECORATE
3 liquorice Catherine wheels (or suitable length of thin liquorice)
75g/3oz ready–made buttercream
12 chocolate buttons
24 plain chocolate polka dots
Assorted tubes of writing icing
1 strawberry lance (or strawberry liquorice)
2 tbsp Hundreds and Thousands or multicoloured sugar strands
Preheat the oven to 190° C/375° F/Gas 5. Lightly grease and flour 1 2 buns tins.
1. In a mixing bowl beat together the sugar and butter or margarine until creamy and pale. Gradually beat in the eggs with a little of the flour. Sift the remaining flour into the mixture and fold in using a metal spoon.
2. Transfer half the mixture to a small bowl. Sift the cocoa into one bowl and add the essence and colouring to the other. Stir both mixtures. Spoon the chocolate mixture into 6 tins and the pink mixture into the other 6. Smooth over the tops and bake for 15–20 minutes until risen and firm. Remove from the tins and cool on a wire rack.
3. For the spiders, unreel the liquorice and cut into 5cm/2in lengths and set aside 2 pieces for the butterflies. Push 8 pieces into the sides of each of the chocolate cakes. Secure a pair of chocolate buttons on the top of each with a little icing, secure a polka dot on each and dot the middle to resemble eyes. Pipe a smiling mouth on to each.
4. For the butterflies, slice off the top layer of the pink cakes and split in half–these will be the wings. Lightly spread the tops of the cakes with a little icing and lightly coat each wing with same icing. Push a pair of wings on to each cake and sprinkle with a few sugar strands. Cut the strawberry lance into short lengths and lay across the wings for a body. Cut the reserved liquorice into very thin strips and arrange 2 pieces per cake to resemble antennae. Detail the eyes with black writing icing and place 2 of the Hundreds and Thousands on as eyes.
5. Arrange the cakes on a flat plate to serve.
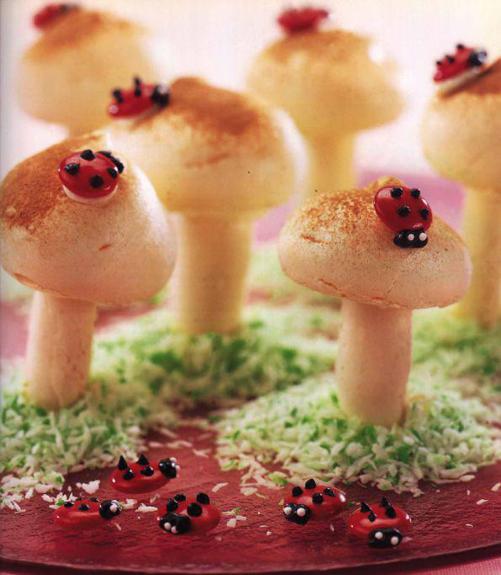
LADYBIRD MERINGUE TOADSTOOLS
Makes: 12
Preparation time: 30 minutes plus cooling
Cooking time: approx. 45 minutes
1 large egg white
65g/2l caster sugar
4 tbsp ready–made buttercream
2 tsp drinking chocolate/cocoa mix
A few red Smarties or M&Ms
A tube each of white and black writing icing 100g/4oz desiccated coconut
Green food colouring
Preheat the oven to 150° C/300° F/Gas
1. Whisk the egg white until very stiff and whisk in half the sugar until stiff and glossy. Using a large metal spoon, fold in the remaining sugar.
2 Place the meringue mixture in a large piping bag fitted with a plain lcm/lin nozzle and pipe 12x4 cm/l lin rounds on to a baking sheet lined with baking parchment – these will be the toadstool tops. On another lined sheet, pipe 12 x 4cm/ll in ‘stalks’. Bake for 35 – 45 minutes or until lightly browned. Leave to cool on the baking sheets and then peel them off the paper.
3. Carefully secure the stalks to the tops with the buttercream. Dust the tops lightly with the drinking chocolate or cocoa mix and secure a red Smartie on each. Decorate each by piping a head, spots and eyes on to each.
4. Secure each meringue to a serving plate with buttercream. Place the coconut in a bowl and colour with green food colouring. Sprinkle the coconut around the base of each mushroom. Make some more Smartie or M&M ladybirds to decorate the plate.
Cook's note:
take care when attaching the stalks to the tops–you may find it easier if you make a small indent in the meringue for the stalks to sit on. You may need to trim the ends of the stalks in order to make them stand up in the buttercream. Alternatively, you can simply arrange the mushrooms on a serving plate on their sides.
