Happy Endings: Finishing the Edges of Your Quilt (12 page)
Read Happy Endings: Finishing the Edges of Your Quilt Online
Authors: Mimi Dietrich
Tags: #Crafts & Hobbies, #Quilts & Quilting

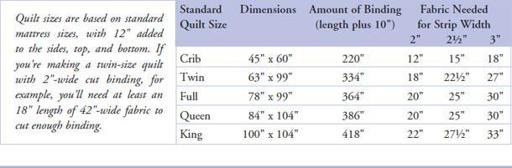
Now you know how to calculate the amount of fabric needed. But for a quick reference, you can put away your calculator and use the following chart as a guide. Fabric amounts are based on 42"-wide fabric.
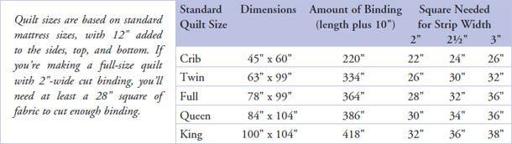
Using a square.
If you don’t have full-width yardage of your binding fabric, you can also use a square to cut strips or continuous straight binding.
1.
To determine the size of the square needed, multiply the length of binding you need by the width of your cut binding to calculate the total number of square inches of fabric needed to make your binding. Example:
For a 45" x 60" crib quilt with 2" binding
Length of binding = 210" plus 10" = 220"
220" x 2" = 440"
2.
Find the square root of the number of square inches needed. (Don’t faint—just enter the number of square inches into your calculator and press the square-root button for the answer!) Round off this number to the next highest
even
number to allow extra for seam allowances.
Square root of 440 = 20.97". Round up to 22". This is the size of the fabric square you will need to cut enough binding. Below you’ll find a quick reference chart for standard-size quilts, just in case you don’t want to do the math.
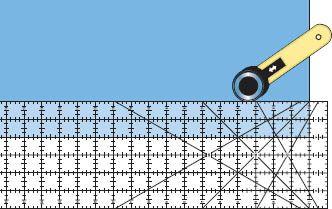
Cutting Binding Strips
Whether you’re making straight-grain or bias binding, the strips are easy to cut with a rotary cutter and ruler. Always prewash your fabric when you are making your own binding to prevent it from shrinking and puckering after it is applied to your quilt.
Straight-Grain Strips
Cutting straight-grain binding strips is as simple as cutting strips for any other part of your patchwork quilt. Simply cut strips straight across the width or length of your fabric, taking care to fold the fabric accurately so that your strips will be straight when the fold is opened up. You can also cut straight-grain binding with the continuous method on
page 35
.
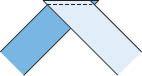
Bias Strips
Bias binding is cut on the diagonal grain of the fabric. Make bias binding by cutting separate diagonal strips of fabric or by using the continuous method described on
page 36
.
1.
Starting in one corner of your fabric next to a selvage edge, use a ruler to make a mark 6" from each side of the corner. Using your rotary ruler, connect these marks and cut off the corner triangle of fabric.
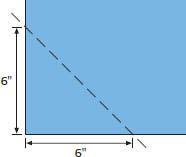
2.
Move the ruler over so that the 2" line is aligned with the first cut. Cut along the edge of the ruler to make your first bias strip. Continue cutting 2"-wide strips this way until you have enough binding strips to go around the edges of your quilt.

Cutting Quick Bias Strips
1.
Fold a fabric square in half diagonally and press. Fold the square a second time and press.
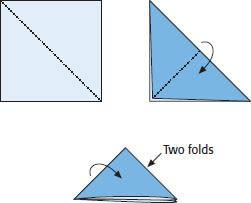
2.
Make a clean cut along the edge with the two folds to remove them. Cut 2"-wide strips parallel to the cut edge.

Sewing Binding Strips Together
Once your binding strips are cut, you’ll need to sew them together into one long strip. The total length of the joined strips should be longer than the distance around your quilt to allow for turning the corners and joining the two ends.
The easiest way to sew the straight-grain strips together is to connect the pieces using straight seams; however, this method creates bulky areas when folded and stitched as binding. To make a binding that will lie flat and smooth even where there are seams, it’s best to sew the strips together with diagonal seams.
Diagonal seams in binding improve the finished look of your project. When the binding is folded over the edge of the quilt, the bulk of the seam is distributed in opposite directions. On bias binding, using a diagonal seam means you’re stitching along the straight of grain, so it prevents the seam from stretching.
Joining Bias Strips
By their very nature, strips you cut on the bias will have ends that are angled at 45° to the length of the strip. (You can also cut straight-grain strips so that their ends are angled for this sewing method.)

1.
Place two binding strips right sides together with the diagonal edges aligned. Slide them so that the ends extend ¼".
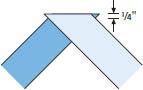
2.
Sew a ¼" seam across the cut edges.