DIY Projects for the Self-Sufficient Homeowner: 25 Ways to Build a Self-Reliant Lifestyle (22 page)
Authors: Betsy Matheson
Tags: #Non-Fiction


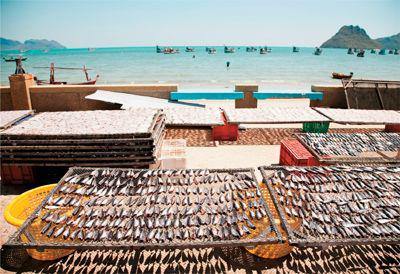
Sun drying in the open air
is a traditional method for preserving fish, tomatoes, and peppers. Although it can be a very useful technique if specific environmental criteria are met (see next page), sun-drying generally is not a practical option for preserving garden produce in your backyard.
 Preservation by Drying
There are many advantages to dehydrating produce from your garden. Most dehydration methods require very little extra energy other than that already provided by the sun. Also, dehydrated foods, if prepared correctly, retain much of their original beauty and nutritional value. And since foods lose so much of their mass during the dehydration process, they do not require much space to store through the winter and can easily be rehydrated to taste delicious months after the harvest.
Dehydration is a food preservation technique that has been used for centuries all around the world. Removing 80 to 90 percent of the moisture in food, it halts the growth of spoilage bacteria and makes long-term storage possible. Warm, dry air moving over the
exposed surface of the food pieces will absorb moisture from the food and carry it away. The higher the temperature of the air, the more moisture it will absorb, and the greater the air movement, the faster the moisture will be carried away.
Temperature matters a lot in food drying—air at a temperature of 82° will carry away twice as much moisture as air at 62°. This process also concentrates natural sugars in the foods. The faster the food is dried, the higher its vitamin content will be and the less its chance of contamination by mold. Extremely high temperatures, however, will cause the outside surface or skin of the food to shrivel too quickly, trapping moisture that may cause spoilage from the inside out. Exposure to sunlight also speeds up the drying process, but can destroy some vitamins in foods.
Often, foods should be treated before drying. Blanching as you would for freezing (see
page 81
) is recommended for just about any vegetable (notable exceptions being onions and mushrooms). Some fruit and vegetables dry best if cut into pieces, whereas others should be left whole. Coating the produce can help preserve the bright color of skins. Many dipping mixtures may be used (consult a recipe book), but lemon juice is probably the most common.
In the following pages, we’ll discuss a few different food dehydration options—both outdoor and indoor, and show you how to build drying trays and an outdoor solar dryer.

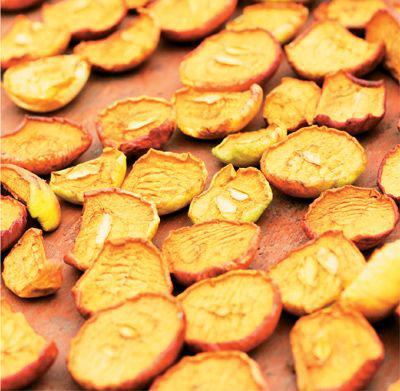
Apples are a favorite fruit
for drying because they retain so much of their flavor. Look for sweet varieties like Fuji. Core them and cut them into 1/8"-thick rings or slices for drying. Peeling is optional. Dip the apples in lemon juice immediately after cutting or peeling to prevent browning.

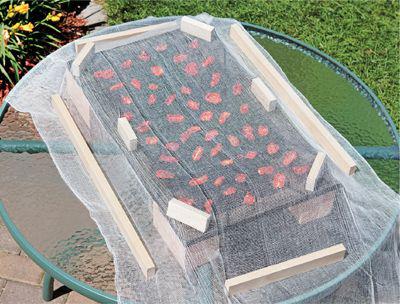
Load food onto
a drying tray and place it in a sunny, warm spot. Place the tray on wood blocks to promote air circulation from all sides. Cover the food with cheesecloth to prevent insects from reaching the food. Prop the cheesecloth above the food with blocks and toothpicks and weigh down all edges with scrap lumber.
 Drying Produce on Trays
If you live in an area with clean air, a dry climate, and consistently sunny weather around harvest-time, you can have some success sun-drying food. The chief ingredients you’ll need are time and the right weather: 85 to 100° and low to moderate humidity for several consecutive days. You’ll also need a place to set your food so it receives good air circulation but is not exposed to pollution from vehicles.
• Use either stainless-steel or a nonmetallic material for your food-drying screens. Metal screen materials could be coated with chemicals that contaminate food.
• Spread your food on the trays in a single layer so the pieces do not touch one another.
• Protect your food from insects with cheesecloth—drape the cloth over wooden blocks to keep it from touching the food, and weigh down all of its edges with scrap lumber so it doesn’t blow away.
• Place your trays on top of blocks at least six inches tall to promote air circulation on all sides.
Drying food outdoors will likely take at least two to three days, and perhaps longer. At dusk each day, bring the trays indoors. Cool nights can restore moisture, which not only slows down the drying process, it can also cause mold to grow. Better yet, if you have an indoor drying method—such as a food dehydrator or one of the other methods on
page 90
—it’s a good idea to keep the drying process going at night if you can. The food will dry much faster and this lessens the chance of mold growth.
 Solar Dryer
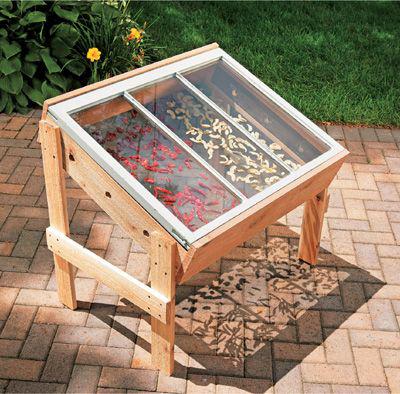
A solar dryer is a drying tool that makes it possible to air-dry produce even when conditions are less than ideal. This dryer is easy to make, lightweight, and is space efficient. The dryer makes a great addition to your self-sufficient home, allowing you to use your outdoor space for more than gardening. The dryer, which is made of cedar or pine, utilizes a salvaged window for a cover. But you will have to adjust the dimensions given here for the size window that you find. The key to successful solar drying is to check the dryer frequently to make sure that it stays in the sun. If the air becomes cool and damp, the food will become a haven for bacteria. In a sunny area, your produce will dry in a couple days. Add a thermometer to the inside of your dryer box, and check on the temperature frequently—it should stay between 95 and 145°F. You may choose to dry any number of different vegetables and fruits in the dryer, such as:
• Tomatoes
• Peppers
• Apples
• Squash
• Bananas

An old glass window sash
gets new life as the heat–trapping cover of this solar dryer.
Building a Solar Dryer

