Celebrity Sudoku (25 page)
Authors: Kaye Morgan

So now you know all the shapes that go into making symmetrical sudoku. So what’s the big difference? They solve the same as non-symmetrical puzzles, don’t they?
Well, yes . . . and not exactly.
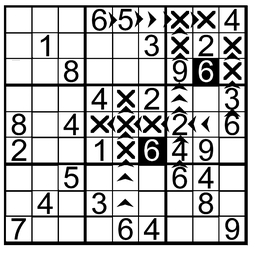
Let’s try to solve this puzzle below, created in 90-degree symmetry.
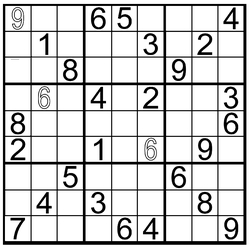
It’s a nice-looking example of its type, although you might well ask, “What’s the deal with those hollow numbers?”
Well, they’re the dirty little secret of symmetrical sudoku. Those three clues aren’t necessary for solving the puzzle. They’re only in the grid to complete the design.
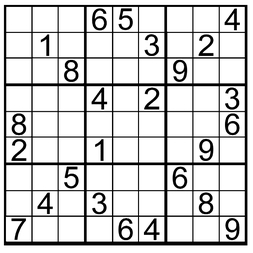
Here’s the proof—we’re going to solve the puzzle without those nonessential clues.
We’ll start with the simplest of the Twelve Steps to Sudoku Mastery: the search for hidden singles. A quick scan through the three subgrids stretching across the center of the puzzle quickly puts us on the track. Moving from left to right, there’s a 2 on the first space in row six, which prohibits placing that number in the two open spaces at the bottom of the box at the far right, the only subgrid of the three lacking a 2. Moving right along, a 2 in space six of row four keeps any 2s out of the empty spaces in the top of our target box.
That leaves only two spaces available, and one of those falls into the forbidden zone projected down column eight from the 2 in the second space. Left with only one possible space, we place a 2 in it and move on.
Down in the basement, there’s a similar situation going on in the bottom three subgrids. With a 4 in row eight, space two, and another in row nine, space six, four of the possible empty places in the lower right-hand box go right out the window. And the 4 in the top space of column nine puts the proverbial kibosh on one of the two remaining spaces, forcing us to stick a 4 in the final opening.
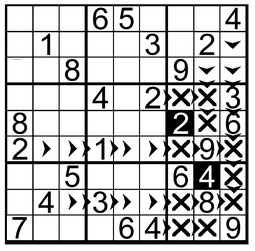
With twenty-five clues and two spaces filled in, that leaves fifty-four spaces to go. And we can find another hidden single from the 4 we just placed. It stretches out a line of forbidden spaces into the box above, putting “do not enter” signs on two of the available spaces. Our old friend at the top of column nine prohibits placing a 4 in another space, while the lucky 4 in space four of row four eliminates two more possible spaces. That forces the placement of a 4 in space seven of row six.
Looking to the left from
that
newly placed 4, we quickly see that it prohibits any repetition of 4s in two spaces in the left-center box. The 4 in row four, space four, eliminates three spaces along the top of the subgrid. And from down in the bottom of column two, the 4 in space eight locks the door on another space right in the middle of the subgrid. There ain’t no choice to it—the only place a 4 will fit in those nine spaces is at row five, space three.
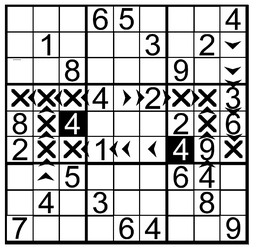
Let’s continue to track hidden singles in the center tier of subgrids. This center square has six blank spaces, but it takes only two clues to eliminate five of them. Working left from the 6 at the end of row five eliminates three possibilities. And the prohibited zone extending up from the 6 at the bottom of column five scratches three spaces—one of them shared with the previously eliminated set. Five down, and only one space left—the one in the sixth place of the sixth row. What a surprise that it gets a 6.
Working back along row five from the clue at the end of row five helped us to zoom in on one hidden single. Working up from that 6 along column nine eliminates two squares for another possibility in the upper right-hand subgrid. Another 6 in space seven, column seven, does in two more spaces in the square. That leaves two possibilities to place a 6—and the 6 already existing in row one (at space four) denies the possibility in one of them. So the only space that can take a 6 lies three down in column eight, as shown.
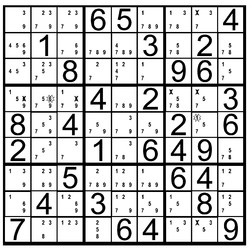
That does it for scanning for hidden singles—at least for the time being. The next easiest step would be to search for naked singles—picking a likely space and asking, “Could a 1 go here? A 2?” and so on. Usually, this time-intensive technique is reserved for rows or columns that are almost filled in. We have one like that—column eight, with five known inhabitants. Let’s save that time and invest it instead in working out all the possible candidates in the fifty remaining blank spaces. That gives us the above.
And what do you know, if we look carefully along column eight we do indeed find a naked single. Space five represents the only 1 in all of row five. Let’s cover up its nakedness with a star and zoom along to space four on column two. There are only two spaces filled in along this column, but if you check, you’ll find that space four holds the only 6 in the column. That 6, by the way, along with the one in column six, fills in two of the clues we discarded as nonessential from the original version of the puzzle.
Let’s move on.
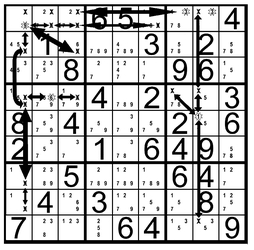
The next step up in the hierarchy of solving techniques is to check the interactions between boxes and rows or columns. I think this is easier to show in action than to try to describe. If we look along the top tier of subgrids, we see that there’s a 3 in the central box (row two, space six) that prohibits any other 3s in that box and all along the second row. In the top-left box, there are five possible places where a 3 could go—three of them in the top row and two of them in row three. Off in the top right-hand box, there are only two possible sites for a 3 to go, both of them in the first row. In this case, row three has two clues already, and the remaining blank space has a 3 in the clue space directly below it, eliminating it as a contender. The interaction of the puzzle mechanics in the box and row means that in the upper right-hand box, a 3 can only appear in the first row—as shown by the starred possibilities. This means that jumping back along the row, we can eliminate the candidates in the first three spaces. A 3 can’t possibly go there because it’s either in space seven or eight.
So each 3 in each box gets an
X
through it. And guess what? That leaves only one other candidate in the first space of the puzzle. We can put a star around the 9 in space one and run along the first row and the first column, eliminating a 9 from contention in every space. We also eliminate a 9 in space three in row two, because it’s in the same subgrid as the 9 we’ve just uncovered. (And if you haven’t noticed, we’ve just added the last of the nonessential clues we eliminated at the start of this exercise.)
By the way, we should also clean up after those naked singles we discovered. Sticking the 6 in space two of row four doesn’t have too many consequences—the only places to eliminate a 6 as a candidate are the two neighboring spaces in the row. The 1 we found in the fifth space in column eight has more repercussions. It eliminates two possible candidates in the middle-right subgrid along row four at spaces seven and eight. The placement of a 1 in space five of column eight eliminates a candidate at space nine, right down at the bottom of column eight. And zooming up to the top, the elimination of the candidate for 1 in the first space of column eight does away with a candidate up there.

Other books
Absent Friends by S. J. Rozan
He's So Bad by Z.L. Arkadie
The Secret of the Old Clock by Carolyn Keene
The Tar-aiym Krang by Alan Dean Foster
They Were Divided by Miklos Banffy
The Duchess Who Wouldn't Sit Down by Jesse Browner
Luscious by Usen, Amanda
Flower of Scotland 2 by William Meikle
Dead to the Last Drop by Cleo Coyle
Entangled (Evolve Series Novella 2.5) by S.E.Hall