Canning and Preserving For Dummies (23 page)
Read Canning and Preserving For Dummies Online
Authors: Amelia Jeanroy

 Over time, the rubber gasket may stretch out of shape or begin to rot and deteriorate (indicated by cracking or splitting). If your gasket is in this condition, don’t use your pressure canner until you’ve replaced the gasket. A gasket in poor condition may prevent the canner from reaching the pressure required to superheat the food and kill microorganisms.
 After each use, carefully remove the gasket from the cover. Thoroughly wash the gasket in hot, soapy water and dry it well. After the gasket is completely dry, put it back on the cover so that your pressure canner is always ready for use. Some manufacturers suggest lightly coating the gasket with cooking oil, but check your owner’s manual before doing this.
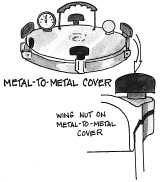
Metal-to-metal cover with wing nuts
A metal-to-metal cover (see Figure 9-3) doesn’t require a gasket to create a tight seal; instead, this pressure canner uses wing nuts. To secure a cover with wing nuts, tighten two wing nuts on opposite sides of the canner at the same time by hand (don’t use a tool and don’t tighten one side at a time). Repeat this process for the remaining wing nuts.
 Never tighten one nut at a time because uneven results will occur. If your wing nuts aren’t tightened properly, as soon as the pressure starts to rise, water leaks out. You then have to carefully remove the canner from the heat and wait for the pressure to subside before untightening and retightening all over again.
Figure 9-3:
A metal-to-metal cover with wing nuts.

Every year, check for nicks and dents in the rim of both the lid and the canner itself. These imperfections will prevent the canner from making a seal.
Gauges
Gauges
are located on the top of the pressure canner cover and regulate pressure within the canner. Two types of gauges are available: a weighted gauge and a dial gauge (see Figure 9-4). A dial gauge indicates the pressure of the canner, while a weighted gauge indicates and regulates the pressure of the contents. If you’re a beginner, go with the weighted gauge.
Figure 9-4:
The two types of gauges available on pressure canners: A dial gauge and a weighted gauge.

Weighted gauge
A
weighted gauge
is simple and accurate. It’s sometimes referred to as an
automatic pressure control
or a
pressure regulator weight.
This gauge allows you to cook without looking: The weighted gauge automatically controls the pressure by jiggling as the canner reaches the correct pressure. When the pressure in the canner is too high, the weighted gauge jiggles faster, and may hiss, as it releases excess steam from the canner.
A weighted gauge has a preset control that needs no service or testing to ensure an accurate pressure measurement. The pressure settings are indicated by three numbers marked on the gauge (refer to Figure 9-4): 5, 10, and 15. The numbers represent the pounds per square inch (psi) of pressure created by the trapped steam from the boiling water in the pressure canner.
 The most common pressure used in pressure canning is 10 pounds, but never guess — always refer to your recipe.
Dial or steam pressure gauge
A
dial
or
steam pressure gauge
(refer to Figure 9-4)
is a numbered instrument that indicates the pressure in the canner. You have to watch dial gauges carefully to be sure they don’t rise too high, and you have to turn the heat up or down to keep the pressure in the right area.
Unlike the weighted gauge that requires no service, you must check this control for accuracy each season or at least once every year of use. To obtain service, refer to your owner’s manual for service locations, check with the store where you purchased the canner, or contact your local cooperative extension services (see Chapter 22).
 If your annual service shows that your dial gauge is off by 5 or more pounds, replace the gauge. An inaccurate reading may not produce the temperature required to kill all microorganisms. You can have your canner checked for a nominal fee, if not free, at your local hardware store or county extension office.
Vent tube, pipe vent, or petcock
Whatever the name of this feature —
vent tube, pipe vent,
or
petcock
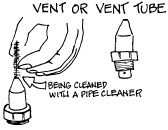
— the function is the same (see Figure 9-5). These terms refer to an opening in the pressure-canner cover for emitting steam. Sometimes the weighted gauge sits on the vent tube.
Figure 9-5:
A vent tube.

 To work properly, the vent tube opening cannot be obstructed with food or other matter. Obstructions restrict the optimum pressure and temperature required for your recipe. To check the vent for obstructions, hold it up to the light. If the vent appears to be clogged, insert a piece of wire (or other item suggested in your owner’s manual) into the tube. Rinse the vent with hot water. Repeat the procedure if you still see an obstruction.
Overpressure plug
An
overpressure
plug
(see Figure 9-6) releases (pops up) if too much pressure exists in your pressure canner due to a blocked vent tube. The overpressure plug is a safety feature that’s solely for your protection. If you follow the instruction manual for your pressure-canner operation, chances are this plug will never be used.
