Bread Matters (16 page)
Authors: Andrew Whitley

It is possible to make an adequate loaf in less than four hours. If you go as low as two hours, you are effectively making what bakers call a no-time dough – one in which the dough is given no time at all to ferment in bulk. Commercial white and brown bread have been made this way for four decades, but the process depends on the use of additives and, anyway, to help reproduce that insipid flavourlessness and cotton-wool texture is not the purpose of this book.
If the rising time is reduced to an hour and proof takes only 45 minutes, around three hours is the minimum time required to bake a traditional yeasted loaf. The process can be speeded up a little by adjusting the initial water temperature to make the dough warmer. It can also be slowed down by reducing the dough temperature.
A better ‘no-time’ dough?
The ‘Grant Loaf’ was invented in the 1940s by the redoubtable nutritionist and campaigner for unadulterated food, Doris Grant
3
. I was brought up on it. It was made with wholemeal flour, water, yeast, salt and a little Barbados sugar, honey or molasses. The secret was no kneading: you just mixed all the ingredients into a very wet dough, slurped it into a baking tin, let it rise and baked it. It was so easy that, as Doris Grant reported in ever so slightly patronising tones, ‘even husbands can make it without difficulty, and a surprising number of them do…’ Actually, it was so quick (perhaps because the sugar supercharged the yeast activity and because a wet dough ferments faster than a dry one) that it often caught my mother out. Proving on top of the Aga didn’t help, of course: given half a chance, the dough would erupt over the top of the tin. For much of my childhood, I thought that all loaves were mushroom-topped.
To some extent the wet no-time dough works because of autolysis, the partial development of gluten that is achieved simply by wetting it. This a good way to make bread if you are in a hurry and like the damp, slightly cakey texture that results. But there is little chance for flavour to develop during such a quick fermentation.
Slower is better
There are advantages to extending the breadmaking process beyond the basic four hours or so. These include additional flavour, improved texture, moisture retention (hence better keeping quality) and digestibility, not to mention compatibility with a busy life. How much can a straight dough be slowed down?
In the illustration above, the dough starts life at 27°C and the whole process takes four hours. If we make a dough at 22°C, it will take twice as long for the same amount of yeast to complete a given amount of fermentation, which means that the whole process would take around seven hours, assuming that the time taken for mixing, moulding and baking remained the same. The revised water temperature calculation (assuming that the flour is still at 20°C) looks like this: 2 × 22 = 44 – 20 = 24°C. Water at this temperature doesn’t feel cold – indeed some people might describe it as lukewarm – but it more or less doubles the time that it takes to bake bread. So, a thermometer is a good investment, particularly for those first attempts at breadmaking before your hands have learned the feel of a well-tempered dough.
The other way of extending fermentation time in a straight dough is by reducing the amount of yeast. It is difficult to give precise guidance because much depends on the vigour of the yeast and the temperature of the dough as it goes through the stages. But, very roughly, halving the yeast quantity will double the fermentation time. It is worth experimenting a bit, perhaps with small reductions of yeast at first, to establish the effect under your conditions. Try to use some constant measure of activity. For instance, note how much vertical rise there is for a constant amount of dough in the same container for various lengths of time.
Although a straight dough is normally begun and ended on the same day, there is no reason why, with suitable adjustments of yeast and temperature, it should not be fermented over a considerably longer period. Two examples follow.
Overnight first rise
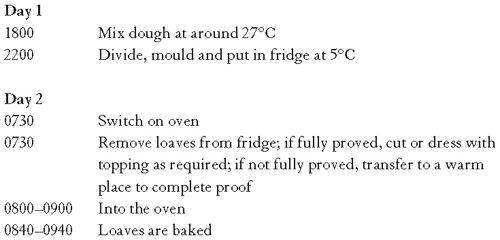
This might suit someone who wants to give their bread a good, long rise for reasons of flavour and nutritional quality but who cannot start the process until late in the evening. A possible schedule could work like this:
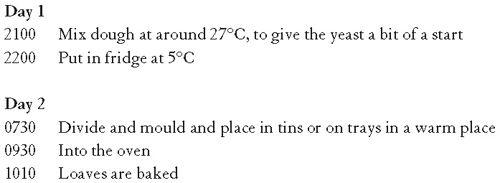
The proof time of around two hours is an approximation. The dough will be cold as it comes out of the fridge so it will take quite a while to get going, but provided it is in a reasonably warm place, two hours is quite possible.
The advantage of this system is that you have fresh bread, not first thing in the morning but certainly a good deal sooner than you would from a standing start.
Overnight proof
The same idea can be used to get bread ready for baking even earlier in the morning. In this example, there is still a reasonable bulk fermentation of four hours at ambient temperature. But there is a greater risk. If your dough is too lively, or your fridge not powerful enough, the loaves may over-prove before morning. If this happens, try reducing the yeast quantity a bit and make the initial dough cooler.
Overnight sponge and dough
As mentioned above, an overnight sponge is a way of starting a dough with a small amount of yeast and allowing time for it to reproduce, and for lactic acid bacteria to develop flavour and nutritionally beneficial qualities in the dough.
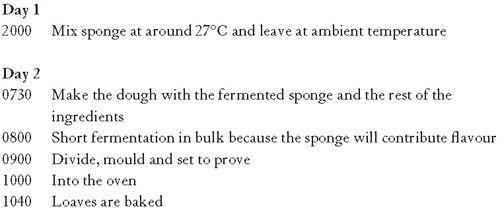
Daytime sponge and dough
This timetable enables the working person to get the benefits of the sponge-and-dough system and produce a loaf within a day.

There are, of course, many possible variations on the timetables outlined here. The point is, however, that all it takes is a little advance planning to be able to make good bread slowly and in complete harmony with a busy life.
I will deal with the timing of sourdoughs and leavens in Chapter 7. But now it is time to turn theory into practice with some recipes for typical breads. Just as I hope that you will experiment with timing in order to fit baking into your everyday life, I urge you to approach the recipes as exemplars of baking methods and styles, to be adapted to your own special purposes once you have grasped the principles involved.
What to do when things go wrong
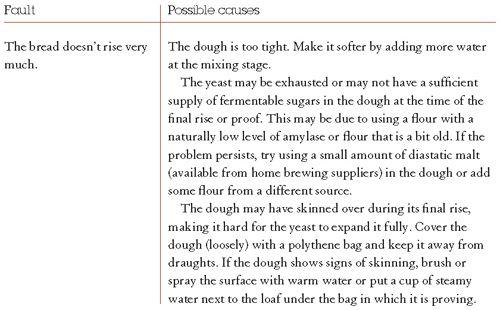
Although baking bread is, in essence, a fairly simple process, there are enough variables to make it likely that things will not always turn out the same.
A loaf that looks a bit odd is not necessarily a failure. It may not look quite like a shop loaf (how could it, without all those additives?) but it is very probably still edible. And the best thing about mistakes is that they are better teachers than instant success.
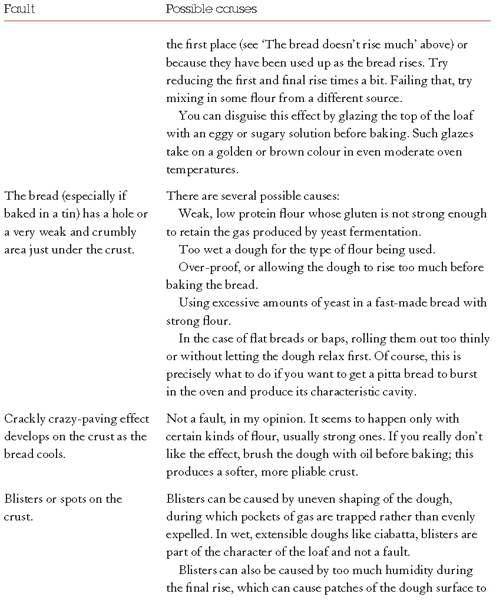
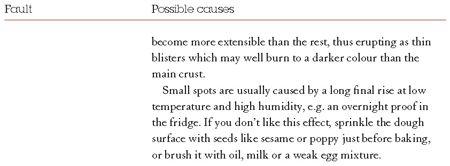
So, if things go wrong, don’t worry. Remember what you did and check the symptoms of your distress against the following list of common faults. Then have another go.
