Bread Machines For Dummies (17 page)
Read Bread Machines For Dummies Online
Authors: Glenna Vance,Tom Lacalamita

Figure 8-6: |  |
Figure 8-7: | 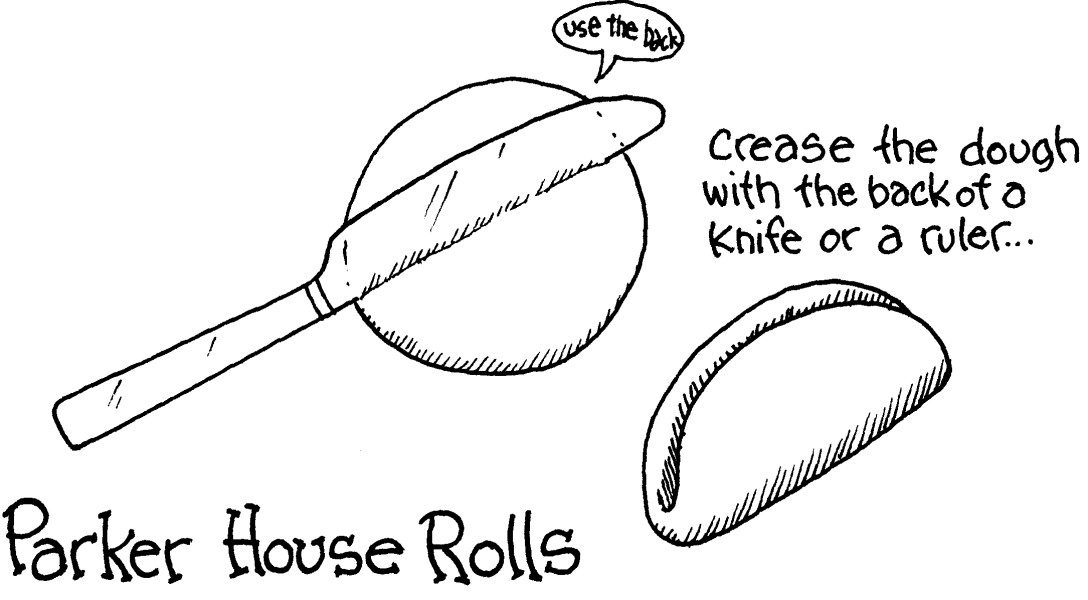 |
Figure 8-8: |  |
The Omni Parker House at 60 School Street in Boston, Massachusetts is the longest continuously operating hotel in America. The original house was built in 1704 and by 1808 the mansion was turned into lodgings. Harvey Parker purchased the property in 1833 and turned it into a first-class restaurant. Parker imported a French chef and a German baker in order to maintain a standard of excellence. In 1854 Parker built a hotel adjacent to the restaurant. Those who evaluated it on opening day said it was the grandest building in the city of Boston.
The reputation and influence of the Parker House, especially on culinary matters, spread beyond its walls. Parker House rolls, created by the German baker, as well as his Boston cream pie, have become staples of American cuisine.
The Rest of the Story
In This Chapter
![]() Rising 'til ripe
Rising 'til ripe
![]() Retarding 'til ready
Retarding 'til ready
![]() Baking 'til browned
Baking 'til browned
![]() Storing 'til stale
Storing 'til stale
![]() Using 'til gone
Using 'til gone
I
n Chapter 8, we talk about using the Dough cycle on your bread machine to make the dough and how to shape the dough in various ways to prepare it for rising and baking. This chapter shows you what to do with the dough after you've formed it the way you like.
There are so many stories about the favorite spots where people rise their dough: under blankets in their beds, on top of their hot-water heater, near a sunny window, beside or on the top of a radiator. And the list goes on. The truth is that yeast will be activated (and rise the dough) just fine if the dough sets right on your kitchen counter. You only need a place that's free from a cool draft.
If you want to hurry it along, you can boil water in your microwave and then set the pan in the microwave. The warm steam will encourage the yeast to work faster. Yeast flourishes in a warm, moist environment. But, if the temperature gets too high, the yeast gets sluggish â just like we do. Also, the dough will develop a yeasty or sour taste if the temperature is too high while it rises.
Knowing when to put your breads, rolls, or coffeecakes in the oven is critical. Dough can rise too much and get too light, so that when you put it in the oven, it may actually fall. It's called
overproofing.
The gluten network overstretches, and when the heat of the oven hits the dough, the honeycomb cells collapse.
It's easy to tell when the dough is ready to go into the oven to bake. Use this simple test: With one finger, gently make an indentation on the side of the loaf or roll. If the dough remains indented, it's ripe for baking. Pop it in the preheated oven immediately. Putting dough into the oven when it is ready will assure you a beautiful
oven spring
â that last great rise that happens when the dough is put into the heat of the oven.
Preliminary planning eases preparation. You can make dough in your bread machine and keep it refrigerated for up to three days. Tom says, “It's like putting your dough down for a nap.” With a bread machine, it's simple to make several batches of dough ahead of time. This is a great way to get ready for special occasions. Or let's say you'd planned to make rolls but you're being called away from the task. Put your dough down for a nap and use it later.
Use the Dough cycle on your machine. After the dough is kneaded, hold the Stop/Clear button down to clear the program. (You do not need to have the machine complete the cycle, as the dough will continue to rise in the refrigerator but at a slower pace.) The machine will probably beep to let you know that you've cleared the program and 0:00 may appear on the digital readout.
.jpg)
Don't unplug the bread machine in order to stop the cycle. Use the Stop/Clear button first, and then unplug the machine. This will keep your computer chip in good working order.
Remove the dough and place it in a container that has enough space for the dough to expand and can also be tightly covered. Tom uses self-sealing plastic bags. He forms the dough into a disk shape about an inch thick and places it in the bag. In the disk shape the dough chills at an even rate. A ball will take longer to chill to the center.
Chilling dough slows down the activity of yeast but it does not stop the activity. If you're napping the dough in the refrigerator, check on it after an hour or so. It will have risen, and you'll have to punch it down to remove all the gas bubbles. Punch it down again a couple of hours later. Once the dough is completely cooled, it only needs to be punched down every 24 hours.
If you don't punch down the dough in the first few hours, it may develop a sour taste and an unpleasant odor. If you have to leave and cannot attend to the dough, we suggest you do a fast 10- or 15-minute chill in the freezer to hinder the yeast activity before putting the dough in the refrigerator.
We do not recommend that refrigerator doughs be kept more than three days. Fermentation continues in the refrigerator, and it's possible that undesirable flavors could develop over a period of time longer than three days. Opening and closing the refrigerator door many times a day also helps the dough grow funky. Another reason to use refrigerated dough within three days is that it loses its ability to rise as it gets older.
For easier handling, shape the dough when it's cold, right out of the refrigerator. At this stage, the dough can be rolled as thin or as thick as you desire and shaped as you desire, without the springy quality of freshly mixed and kneaded dough.
Don't forget that it takes longer for cold dough to rise. Use the ripeness test described earlier in the chapter to determine when the dough has risen adequately.
Here's another plan-ahead tip. You can refrigerate dough after it's been shaped. Glenna does this when she's planning a dinner party or when she's having overnight guests who rave about fresh-baked breakfast rolls.
To use the shape-then-refrigerate method, remove the dough from the bread machine and shape it into whatever you're planning to make. Place the bread in or on the appropriate baking pan. Coat some plastic wrap with cooking spray and use it to cover the unbaked item. Place the dough in the freezer for approximately 10 to 15 minutes, for a quick chill. This hinders the yeast development so that you don't need to punch the dough down. Then move the dough to the refrigerator. You can keep the shaped dough refrigerated for up to 24 hours. To bake the dough, remove it from the refrigerator and loosen the plastic wrap. Keep the dough lightly covered while it rises. Test the dough with the ripe test to determine when it's ready to be baked.
Organization is your middle name. You like to prepare breads or rolls even further ahead of time than a mere 24 hours â so freeze them.
For individual rolls such as dinner rolls, shape them, place them on a baking sheet or in muffin cups, and freeze them. As soon as they are completely frozen, you transfer them to self-sealing freezer bags. Press out as much air as possible before completely sealing the bag.
Be sure to use freezer weight bags. Other bags are more porous and not thick enough to protect the dough from freezer burn.
Loaves of bread can also be frozen after shaping. After the bread is in a pan, grease the top of the loaf well, and either wrap the pan in freezer-weight aluminum foil or place it in a large, self-sealing bag (pressing out as much air as possible). Freeze for two weeks at the maximum.
To thaw the bread, unwrap the frozen dough, but cover lightly to prevent drying. As the dough thaws and comes to room temperature, it will gradually rise. Be sure to test the dough with the ripe test so that you'll know when to put it in the oven.
Did you ever decide to have a great pizza party, only to change your mind when you realized how much work you'd have to do? Make the dough early, and freeze it in inch-thick disks. On the day of the party, take out the dough and let it thaw. If it thaws too soon and you're not quite ready for it, keep it cold in the refrigerator. This makes preparing pizza a snap. Roll out the dough, use ready-made pizza sauce and your favorite toppings, and bake. Enjoy your pizza and your party.
You don't have to limit freezing unformed dough to pizza crust; you can do this with any dough. After it's completed the Dough/Manual cycle, remove the dough and pat it into a disk shape with a thickness of about an inch. Place it in a self-sealing freezer bag. Pop it in the freezer. It's that simple.
For an even thaw, place the frozen dough in the refrigerator overnight. In the morning, partially unwrap (by opening the freezer bag) and place the dough on the kitchen counter to continue to bring the temperature up. It will take a couple of hours for the dough to return to room temperature. You can shape the dough while it's cool. Be sure to use the ripe test so you will know when it is ready to bake.