Read SM 101: A Realistic Introduction Online
Authors: Jay Wiseman
SM 101: A Realistic Introduction (21 page)

Some players like the rope magicians use in their acts. This pure cotton “magician’s rope” is soft, flexible, holds knots well, and is an excellent rope for general bondage use. It’s more expensive than standard clothesline but less expensive than tubular webbing. It’s also somewhat hard to find. Try a magician’s supply house.
Marine supply stores, and stores that stock supplies for rock climbers, often have a wide array of ropes in numerous widths, colors, strengths and degrees of stretchability. Some of these ropes are excellent for bondage. One advantage is that they’re usually clearly labeled as to strength and stretch. I suggest that you try buying a small amount of several kinds, experiment, then come back and buy larger amounts of the kinds you like.
Note: Rope can often be bought in bulk at a substantial discount, and SM folks sometimes pool their money to do just that. I once watched a sweet-faced woman walk into a magician’s supply house and buy 300 yards of magician’s rope - their entire stock. When the surprised clerk asked her if she had a big show that night, she smiled prettily and replied, “something like that.”
Safety warning: Ordinary clothesline, magician’s rope, and similar materials work well for ordinary bondage but may be a poor choice for bondage that might have to bear the submissive’s weight. These materials stretch, and may break, under heavy loads. Be sure you know the “breaking strength” of any rope you use for such bondage. Tubular webbing, yachting rope, and similar materials are often good choices. A game hoist is also a possibility.
If you don’t know a rope’s breaking strength, don’t use it for weight-bearing bondage, period.
I want to be helplessly bound at your feet.
Washing the rope.
After you buy your rope, wash it with fabric softener. Wash and dry the entire rope
before
you cut it into the desired lengths. It should come out soft and flexible. Repeat the washing and drying if it doesn’t.
Note: This refers only to cotton rope, not to rope made with a wire core, plastic fibers, and so forth.
Short lengths of rope can jam washing machines. They also often form a tangled mess while being washed. For these reasons, many SM folks use a “lingerie bag,” or put the ropes into a pillowcase and knot it, when washing such short lengths.
Securing the ends.
With time and use, the strands of cotton clothesline, magician’s rope, and similar material will unravel, sometimes more than an inch. Such unraveled ends look ugly (and may subtly signal sloppiness on the dominant’s part). Therefore, the ends of each rope should be treated to prevent this. Most people do so by simply placing small stitches with a thread and needle near the end of the rope. This is called whip-stitching.
Whip-stitching the rope’s ends (along with cutting it, washing it, and marking its midpoint) can be an appropriate task for the submissive. They can be given the long, uncut rope and ordered to return it cut, stitched, washed, and marked. This assignment is particularly delicious if the submissive knows the ropes thus prepared are for use on them.
The ends of nylon rope, tubular webbing, and similar materials often cannot be secured by whip-stitching. Applying heat melts the ends together. This works well, but may leave an end with rough or sharp edges - a safety hazard. File off any rough or sharp places.
Marking the ends.
Determining a rope’s length can be difficult, especially if there’s not much light (common during SM play). One way to deal with this is to “color-code” the ends. For example, the ends of a six-foot length might be whip-stitched with blue thread, the ends of a 12-foot length with red thread, and so forth.
Alternatively, a laundry marking pen can be used to draw circles around the rope at both ends. One circle for a six-foot length, two for a 12-foot, and so forth.
A third way is to color-code the ropes by length. All blue ropes would be six feet, all yellow ropes twelve feet, and so forth. (Cotton ropes can easily be dyed.) Again, remember that much SM play takes place under low light, so make sure the color difference is apparent under these conditions.
Put your hands behind your back!
Marking the midpoint.
Much, perhaps most, bondage starts at the middle of the rope instead of the ends. The middle must therefore be located, and it’s both awkward and time-consuming to grab a piece of rope, match the ends, and find its midpoint. This is particularly annoying if you must do it several times during a session.
You can solve this problem by placing a visible mark at the rope’s midpoint. This mark can be a piece of thread whip-stitched into the rope or a ring made by a laundry marker. Anything will work, provided its color sharply contrasts the rope’s color. Remember, much SM play takes place under low-light conditions, so good contrast helps.
One hint: Cotton rope shrinks when washed, particularly the first time. Therefore place the midpoint mark
after
washing the rope. Otherwise, it may be slightly off-center.
Lengths.
Many people like to cut their rope into six-foot lengths. Shorter lengths, unless intended for a special purpose such as genital bondage, are often inconvenient. Other useful lengths tend to come in multiples of six feet, such as 12 feet, 18 feet, and 24 feet. The longest length in everyday use is about 24 feet.
Buy a 100-foot rope for your basic bondage kit. Wash it with fabric softener, then cut it into four 12-foot lengths and eight 6-foot lengths. (Include the extra two feet in your cuts for “rounding off” purposes.) Whip-stitch the ends, then use thread or a laundry marker to mark each length’s midpoint and ends. This project only takes about one evening, and you will probably use these ropes often during the rest of your bondage days. (Remember that preparing the rope that will be used on them is an excellent task to assign a submissive.)
I learned how to do bondage by tying up my slaves and ordering them to try to escape. I’d see how they got loose, and tie to prevent that next time.
Some people use longer lengths of rope, 50 feet, 100 feet, or more, to apply elaborate bondage - sometimes called body harnesses. This type ofbondage takes considerable time to apply. (Some people like that. They enjoy the process of tying someone, or of being tied, and want it to last.) It also takes considerable practice to get right. In addition, if part of the harness is applied improperly, the dominant may have to be loosen or remove almost all of it to make the needed adjustments. For these reasons, I suggest you use several short lengths instead of one long length for routine play.
Storing rope.
Uncoiled ropes dropped into a toy bag look careless, are difficult to use and, again, signal a sloppy player. Rope can be stored in many ways. One simple way is to match up the two ends and fold the rope in halfback upon itself. Fold those halves, and continue the process until the rope is about 12 to 18 inches long. Finish by knotting the folds in an overhand knot. A six-foot length will probably take two folds. 12,18, and 24 foot lengths will take three.
stitched, marked & stored rope
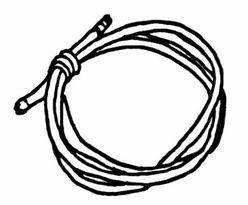
Another way to store a rope is to coil it around your hand, then run the free end back inside the coil. Finish by knotting in an overhand knot.
Knots
One common misconception about bondage is that it involves fancy knots. This is not so. True, some dominants “into” knots learn many (I once learned more than 30), but you can quite effectively bind your submissive with only a few easy-to-learn knots.
One point: A bondage knot doesn’t need to be fancy or pulled tight to work. What it does need to be is
inaccessible.
Any knot (or non-locked buckle or snap) a submissive can reach with their fingers, toes, or teeth will eventually be worked loose.
By the way, your handy dictionary and/or encyclopedia probably illustrates several knots, and you may have an old scout manual somewhere around the house.
Let’s look at a few knots.
square knot
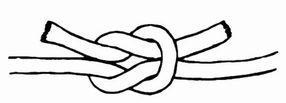
The square knot.
The square knot is easy to learn, reasonably secure, and looks nice. The classic description of this knot is, “the more you pull on it, the tighter it gets.” This could make it a
terrible
bondage knot. You may need to release a submissive quickly. A “frozen” square knot could lead to disaster. Another unique aspect of the square knot that can sometimes cause problems is that it is possible to “capsize” a square knot by grabbing one of the free ends and pulling sharply upwards. This converts the square knot into a slip knot that can be pulled loose fairly easily. (For this reason, many rescue squads specifically ban the use of the square knot.)
That’s the thing I like about rope: One size fits all.
The square knot may cause serious problems. You need not avoid it altogether, but think twice before using it. Make certain you have a “plan B” for loosening ropes tied with one - such as a pair of paramedic scissors.
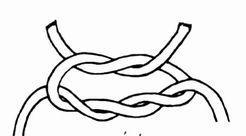
The surgeon’s knot.
The surgeon’s knot is a good first choice. It’s easy to learn and less likely than a square knot to jam. It also maintains the tension on the binding ropes during the knotting process. I like and recommend this knot.
surgeon’s knot
The bow.
The ordinary bow’s combination of security and quickness of release makes it an excellent bondage knot. (Keep the ends away from the submissive.) Also, some submissives find being bound with bows a bit humiliating, and that’s not necessarily a bad thing. (Don’t tie a “granny bow.”)
You also might tie a “half-bow” by making a loop with only one of the strands.
Also, a “surgical bow,” combining the good points of both a surgeon’s knot and a bow, works well.
running loop
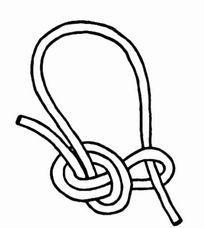
The running loop.
The running loop is a good way to start a tie that uses a single long length of rope. To tie this loop, fold the end of a rope back against the rest so the two strands lay side-by-side for about six inches. Treat these parallel strands as one rope and tie them together in an overhand knot. To complete the knot, run the other end through the loop or, if the rope is very long, start about a foot away from the loop and push some rope through, then pull on the pushed-through part until the knot “flips over” and you have your loop.
