Read Pie and Pastry Bible Online
Authors: Rose Levy Beranbaum
Pie and Pastry Bible (171 page)

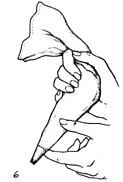
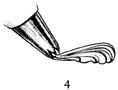
TO HOLD BAG
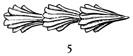
Place the twisted part of the bag in the V between your thumb and forefinger. Lock your thumb over your forefinger to keep the icing in the lower part of the bag. (Figure 04) Press your remaining fingers against the side of the bag so that when you squeeze out the icing, you squeeze from the side while your thumb presses from the top. (Figure 05)
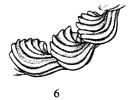
Steady the front end of the bag with the fingers of the other hand to support the weight of the bag and to establish the direction of the tip. (Figure 06)
POSITION OF THE BAG
The position in which the bag is held must be precise to produce a specific design. Position refers both to the
angle
of the bag relative to the work surface and the
direction
in which it points. The two basic angles at which the bag is positioned are: 90 degrees (perpendicular) and 45 degrees (halfway between vertical and horizontal).
When decorating, one hand is used to squeeze the bag and the other to help establish and steady the angle. If stars come out asymmetrical, chances are the bag is not being held at a 9O-degree angle to the decorating surface.
DIRECTION OF THE BAG
This refers to the direction the end of the bag, farthest from the tip, is pointing. It is most easily described by using the position of numbers on a clock face. To better visualize this, try holding the bag at an angle to the surface and, keeping the tip in place, make a circle with the back end of the bag by rolling your wrist. Imagine that the circle is a clock face.
DIRECTION OF MOVEMENT WHEN PIPING
A right-handed person should always decorate from left to right; a left-handed person from right to left, except when writing.
PRESSURE CONTROL
The size and uniformity of icing decorations are determined by the amount and type of pressure exerted on the bag. Some decorations require a steady, even pressure, while others require a gradual tapering off as each
is finished. The more rhythmic and controlled the pressure, the more exact the decoration.
It is also particularly important to release all the pressure before lifting off the tube to prevent little “tails” of icing from forming. Try wiggling your fingers slightly to be sure they are not inadvertently exerting pressure before lifting off the tube.
PIPED BORDERS AND SIDE DECORATIONS
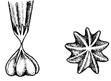
STAR OR KISS
This is the easiest of all piped decorations and a great way to practice piping. If a round tube is used, the stars become kisses (as for the Chocolate Bisou, page 193). If piping with meringue, place the stars close enough together so that the points interlock and fill in all gaps.
Tube
A star tube or round tube.
Position of Bag
90-degree upright angle, tube ¼ inch above surface.
Method
Squeeze the bag firmly without moving it until the star or kiss is as wide as you desire. Push the tube down slightly and stop squeezing. Slowly and precisely lift the tube straight up and away.
Note:
You can change the size of the star or kiss by increasing the length of time you squeeze or by the amount of pressure. If piping stars, however, if too much icing is squeezed, the lines will start to waver.
Two of the most common problems in piping show up when piping stars and kisses: continuing to squeeze while lifting off the tube, and not holding the tube upright for a symmetrical decoration.
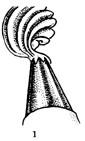
ROSETTE
Rosettes are often used as continuous borders or, when piped with a large tube and widely spaced, as a decorative demarcation for portion size.

Tube
A star tube.
Position of Bag
90-degree upright angle, tube ¼ inch above surface.
Method
As you squeeze out the icing, move the tube in a tight arc from the 9:00 position around to the 6:00 position. (Figure 01) Release the pressure, but do not lift the tube until you have followed the circular motion all the way around to the 9:00 position at which you started. (Figure 02) This will give the rosette a wraparound look.
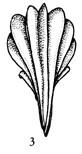
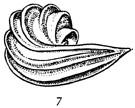
SHELL AND SHELL BORDER
This is the most graceful of all piped decorations. When piped in a large size, it is also the most opulent.
Tube
A star tube.
Position of Bag
45- to 90-degree angle with end of bag at 6:00, tube slightly above surface. (I prefer the flatter, wider shell you get from the higher angle.)
Method
Squeeze firmly, allowing the icing to fan out generously as you lift up the tube slightly. (Figure 03) (Do not move the tube forward; the force of the icing will push the shell slightly forward on its own.) Gradually relax the pressure as you lower the tube to the surface. This gradual tapering off forms a graceful tail. Stop the pressure and pull away the tube without lifting it off the surface to draw the tail to a point. (Figure 04) To make a second shell for a border, line up the tube at the top of the first shell’s tail. The slight forward thrust of the icing will just cover the tail of the preceding shell. When viewed from the side, the shells should be gently rounded, not humped. If they are humped, you are lifting the tube too high above the work surface. (Figure 05)
SIDEWAYS SHELL AND BORDER
For an interesting variation, the sideways shell border produces shells that angle appealingly in one direction.
