Read Pie and Pastry Bible Online
Authors: Rose Levy Beranbaum
Pie and Pastry Bible (125 page)

Use the cutter or template and a sharp knife tip to cut out the 4½-inch pastries. Discard the scraps. Press firmly around the border from the top only so as not to compress the layers of pastry at the edges. Using a small sharp blade, make ¼-inch-long vertical slashes about ¼ inch deep
*
at even intervals into the border of the dough. Brush the top of each galette with the egg glaze, being careful not to allow it to drip onto the sides (and thus sealing them closed). Freeze them for 20 minutes.
Brush the galettes again with egg glaze. Using the tip of a sharp knife, starting at the center of each galette and continuing to the slash marks, make curved lines in the top of the dough, going about 1/16 inch deep, or one third of the way through.
*
Cut small steam vents into 3 of these lines, completely piercing the upper layer of the dough. Cover the galettes with inverted bowls or cake pans and allow to rest, refrigerated, for 2 hours. Then place them, still covered, in the freezer for at least 4 hours, preferably overnight. (At this point, they can stay frozen for up to 3 months.)
Preheat the oven to 400°F. at least 20 minutes before baking. Set an oven rack at the lowest level and place a baking stone or cookie sheet on it before preheating.
Place the galettes about 1 inch apart on the cookie sheet or sheet pan. Bake for 20 minutes, then lower the heat to 375°F. and continue baking for 25 minutes. (If the pastry is browning too fast, cover it loosely with foil.) Turn off the oven and leave the galettes in it (uncovered), with the door slightly propped open with a wooden spoon, for 5 minutes. The galettes are most delicious when served slightly warm.
STORE
Room temperature, up to 3 days. As with all puff pastry, these are best eaten the same day they are baked, although they will still taste good the following 2 days. Do not refrigerate, as the pastry will toughen to cardboard.
POINTERS FOR SUCCESS
 See page 450.
CLASSIC NAPOLEON
S
ay the word
pastry,
and for many people a Napoleon is what comes to mind. A classic Napoleon is made up of layers of puff pastry filled with pastry cream and topped with a layer of chocolate-decorated shiny poured fondant. In addition to classic Napoleons, I offer recipes for several different Napoleons.
Jeff Tomcheck, whom I met when he was chef at the Old Angler’s Inn in Potomac, uses the more delicate and crisp fillo instead of puff pastry and a fabulous chocolate mousse filling in his Napoleon of Chocolate Mousse. As a variation to this filling, I also adore the airy, creamy bittersweet chocolate eggless mousse of Bill Yosses, pastry chef at Bouley Restaurant and Bakery in New York City.
Two fruit variations are Strawberry Chiboust Napoleon and Marionberry and Passion Cream, or Raspberry and Lemon Cream, Napoleon. Yet another delicious and fun variation comes from Patrick Lemblé, pastry chef of the Four Seasons Restaurant in New York City: Bite-Size Peanut Butter Napoleons, which are filled with peanut butter pastry cream.
The most outrageously different variation comes from my friend and fellow cookbook author Faith Willinger, who lives in Tuscany. She reported to me that at Ristorante Antonello Colonna, in Florence, they make a casual Napoleon by breaking up the puff pastry into bits and tossing it with the pastry cream. They call it
millefoglie con panna e crema chantilly.
I call it La Smithereen.
| OVEN TEMPERATURE: 400°F • BAKING TIME: 30 MINUTES, OR 29 MINUTES PLUS 15 MINUTES IN THE TURNED-OFF OVEN SERVES: 8 | |||
|---|---|---|---|
| INGREDlENTS | MEASURE | WEIGHT | |
| VOLUME | OUNCES | GRAMS | |
| Quick Puff Pastry (page 420) or Classic Puff Pastry (page 417), made with only 4 turns | | 1¼ pounds | 567 grams |
| Chocolate Drizzle Glaze bittersweet chocolate, chopped |  of a 3-ounce bar of a 3-ounce bar | 1 ounce | 28 grams |
| heavy cream, cold | 2 tablespoons | 1 ounce | 29 grams |
| 1 recipe Poured Fondant (page 581) | 1¾ cups | • | • |
| 1 recipe Pastry Cream (pages 560) | 2½ cups | 22.75 ounces | 650 grams |
EQUIPMENT
Two inverted half-size sheet pans or large baking sheets, lined with parchment, and a reclosable quart-size freezer bag
Make the dough (page 417 or 420).
If using quick puff pastry, divide the pastry dough in half and keep the second piece chilled while you work with the first one. Roll the dough into a 1/16-inch-thick rectangle about 16 inches by 10 inches. If using classic puff pastry, you will probably only be able to roll it inch thick. Make only one 16- by 10-inch sheet. (On baking, it will rise to about ¾ inch; you can cut it into 2 layers after baking.) Transfer the dough to the back of an inverted sheet pan or cookie sheet. As the dough shrinks slightly when moved, roll it again to the correct size. Cover it with plastic wrap and freeze it for at least 30 minutes or until very firm. If using quick puff pastry, repeat with the second piece of dough.
Preheat the oven to 400°F. at least 20 minutes before baking. Set an oven rack at the middle level before preheating.
Using a ruler and sharp knife, trim the edges of the pastry so they are even. With a fork, prick the dough all over so that it will rise evenly. If using classic puff pastry, place a second sheet pan or cookie sheet directly on top of the pastry. Place the pastry in the oven and, if using quick puff pastry, bake for 30 minutes or until puffed and golden. For classic puff pastry, remove the second pan after 20 minutes; open the oven door and bake for another 5 minutes with the oven door propped open with a wooden spoon, then turn off the oven, leaving the door propped open, and leave the pastry for 15 minutes to dry the center layers. Remove the sheet pan(s) to a wire rack to cool. (If not using right away, store the pastry airtight at room temperature up to 24 hours.)
CUT THE PASTRY
Using a serrated knife, trim the pastry to even the edges. With quick puff pastry, each rectangle will be about 14 inches by 10 inches, or a little larger. Cut each one lengthwise in half, to make 4 rectangles about 14 inches by 5 inches. For classic puff pastry, cut the rectangle horizontally into 2 layers, then cut each layer lengthwise in half.
MAKE THE CHOCOLATE DRIZZLE GLAZE
In a small microwave-proof bowl, or the top of a double boiler set over hot, not simmering, water (do not allow the water to touch the bottom of the upper container), melt the chocolate, stirring often (if using a microwave, stir every 15 seconds). Remove it from the heat.
Pour the cream on top of the chocolate and stir until smooth. It should form soft peaks when a spoon is dipped into it and lifted out. If it is too thick, add a little more heavy cream. Pour the glaze into a reclosable quart-size freezer bag and close it securely. Set it aside briefly while you glaze the pastry with the fondant.
DECORATE THE TOP PASTRY LAYER
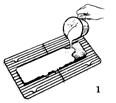
Place 1 pastry rectangle on a rack set over a sheet pan to catch the excess fondant. Pour the fondant over the pastry to coat it evenly (Figure 1). Before the fondant starts to set and crust, pipe the chocolate: Cut off a very small corner from the bag. Pipe lines of chocolate spaced about 1 inch apart across the pastry (Figure 2). With the back of a knife, create a chevron pattern by drawing the blade three times down the length of the surface of the fondant, alternating directions and spacing the lines evenly (start with the center line). (Figure 3)
ASSEMBLE THE NAPOLEON
Sandwich each pastry layer with a generous ¾ cup of pastry cream. Use an offset spatula to spread it evenly. Set the glazed pastry on top of the third layer of pastry cream. Refrigerate for a minimum of 1 hour and a maximum of 3 hours before cutting.
