Read Pie and Pastry Bible Online
Authors: Rose Levy Beranbaum
Pie and Pastry Bible (115 page)

To attach one piece of puff pastry to another, use an egg wash made from one egg yolk lightly beaten with one teaspoon water. This acts as glue, so it is important that it be applied carefully and not allowed to drip onto the sides, sealing them shut.
Never
pinch the edges together. Only press lightly from the top. The same egg wash can be used as a glaze. It should be applied just before baking. A second coat can be applied after a minute.
SCRAPS
Puff pastry trimmings will not puff quite as high as the original dough but will still be amazingly flaky. They will distort less if they are laid on top of each other as much as possible in the same direction as the original sheet. Dust them lightly with flour or cover them with plastic wrap and roll over them so that they adhere to each other. Do a “turn” before wrapping and refrigerating (or freezing) them to relax and firm before reuse.
BAKING SHEETS
Avoid nonstick and black-bottomed baking sheets when baking puff pastry. When used in gas nonconvection ovens, the nonstick surface does not provide the necessary traction to enable the puff pastry to keep its shape as it rises, and the black-bottomed baking sheets cause the bottoms of the pastries to brown too quickly. A heavy baking sheet lined with parchment or brushed with water is best. Pastries should be placed about 1 inch apart.
STORAGE
Puff pastry can be kept frozen for up to 1 year in a good freezer (one that maintains close to 0°F.). It can also be refrozen twice after its initial freezing without any significant loss in rising ability. This is particularly useful for make-ahead hors d’oeuvres—the frozen dough can be rolled, stuffed, shaped, and refrozen until shortly before serving time. In fact, puff pastry bakes best from the frozen state,
because the contrast from very cold to very hot gives it an added shock, or boost, on its way up! It also tends to bake more evenly and with less shrinkage.
Once the pastry is defrosted, it should not remain in the refrigerator for more than 2 days. If you cannot use it before then, it is better to refreeze it.
DEFROSTING
Frozen puff pastry will defrost in 4 hours to overnight in the refrigerator or 1 to 2 hours at room temperature. It should still be cool but malleable enough to roll smoothly. Do not roll it if it is still stiff, partly frozen, or too hard.
To defrost only part of a piece of frozen pastry, use a serrated knife and make a ¼-inch-deep cut across the dough, marking the size you want. Then strike the pastry sharply on the edge of a tabletop or counter, along the underneath side of the cut, and the piece will break off cleanly. If the defrosted pastry is very sticky, dust it well with flour and brush off the excess before rolling.
BAKING
Convection ovens are marvelous for puff pastry, enabling them to rise to their fullest height and evenly browning them with no excess browning of the base. In a conventional oven, it is best to place the pastry in the upper third of the oven to avoid overbrowning the bottom. I like to start the baking at 425° to 450°F. for the first 10 minutes and then finish baking at 350°F. to ensure that the inside gets baked. In a convection oven, however, I usually bake at 400°F. for the entire time. Some convection oven manufacturers recommend 375°F. for their pastry, especially if it is a thick piece, so that the top does not overbrown before the center is fully baked.
Underbaked puff pastry is unappealingly doughy; overbaked pastry is dry. One way to tell if the center of the pastry is baked is to use the tip of a sharp knife to dig out a little piece. You can also
hear
when the pastry is not yet cooked through, because as long as there is water still remaining in the crust, you can hear it bubbling. When the water boils, at 212°F., it will evaporate, so using an instant-read thermometer is an excellent test. For large pastry cases, if there is still a little doughy pastry remaining in the center when the rest is baked, it is best to dig it out and discard it.
SERVING
Puff pastry cuts best with a serrated knife.
MAKING A VOL-AU-VENT
A vol-au-vent is a large patty shell. Its name is French for “fly in the wind.” Roll 1¼ pounds of puff pastry into a square a little larger than 12 inches. It will be about ¼ inch thick. Transfer it to a parchment-lined baking sheet (or brush the baking sheet with water) at this point because, once it is cut, it will be very difficult to transfer it
without deforming it and even the slightest irregularity becomes magnified after baking.
1
2
3
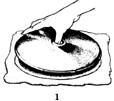
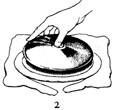
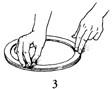
Using a lid, cake pan, or similar guide, cut a 12-inch circle. (Figure 1) Reserve the cutaway edges for another use. To form the rim, cut a ¾-inch ring from the edge of the circle. (Figure 2) Brush a ¾-inch band of egg wash around the border of the circle. Cut through the ring to open it and place it on top of the egg-washed border so that the edges of the strip and circle are even. Cut off the excess from the ends of the ring so that they overlap only slightly and attach the overlap with egg wash. (Figure 3) Press gently all along the top of the ring. With a sharp knife, make a shallow cut all around the inside of the ring to form a lid. Cut a diagonal lattice design into it by cutting evenly spaced lines first in one direction and then the other all around. With the back of a knife, held at a slight angle against the side of the pastry, score vertical marks all around the outside. Cover it with plastic wrap and chill it for at least 1 hour. Before baking, apply an egg wash glaze, if desired, or brush the pastry lightly with cold water. (The water will create steam, which also helps it to rise.)
MAKING BOUCHÉES
These individual patty shells are the perfect-size little pastry cases for individual sweet or savory fillings. Roll 1¼ pounds of puff pastry into a square a little larger than 12 inches. It will be about ¼ inch thick. (It can even be a little larger and only 3/16 inch thick.) With a 4-inch fluted or plain round cutter, cut 8 circles. Using a 3½-inch round cutter, cut out the centers of 4 of these circles. Using egg wash to make them adhere, place the resulting rims on the remaining 4 circles. (Use the cut centers as covers, if desired.) Prick the centers up to the rims (and prick the covers if using) to prevent shrinkage. Transfer them to a parchment-lined baking sheet, using a wide spatula and being careful not to alter their shape. To ensure that they hold their shape, you can transfer the rolled sheet of dough to a parchment-lined baking sheet before cutting them and cover and chill the dough before cutting and shaping them.
BAKING VOL-AU-VENTS AND BOUCHÉES
In a convection oven preheated to 400°F., vol-au-vents take about 20 to 30 minutes, bouchées about 15 minutes. In a conventional oven, bake at a preheated 450°F. for 10 minutes, then reduce the temperature to 350°F. and bake bouchées for 10 to 15
minutes more, vol-au-vents 15 to 20 minutes more, or until they are golden brown. To make beautifully even vol-au-vents, check them after 4 minutes of baking (8 minutes if baked from the frozen state). They will just be beginning to puff up—no dramatic rise will have taken place yet, but you will be able to see which part (or parts) is rising higher than the rest. Using a small sharp knife, insert it quickly about half an inch into the edge of the rim where it meets the center—not the rim itself—in front of the higher part. This will release the steam and cause the higher part to level off. The pastry will continue to rise evenly. (Do this as quickly as possible so that heat from the oven does not escape.)
4
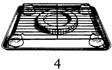
Another technique used to make a perfectly even vol-au-vent is to suspend a rack about 2 inches over the vol-au-vent, using Pyrex cups or other 2-inch-high supports (Figure 4). If one side of the vol-au-vent rises faster than the rest, it hits the rack and levels out instead of continuing to rise and toppling over. 4
The bouchées can be shaped ahead and frozen. If the shells are brushed with apricot or chocolate glaze, they can be filled with pastry cream several hours in advance, as the glaze keeps them from getting soggy.
GALETTES, TARTS, AND TARTLETS
For a small flat galette, roll the pastry inch thick and cut it into a 5½-inch round. (You will need about 2.25 ounces/64 grams of dough.) It will shrink about ½ inch during baking.
Puff pastry makes a fabulous tart shell, not only because of its delicious flavor and flaky texture but also because of its dramatically irregular shape. For tarts and tartlets, roll the pastry 1/16 to 1/8 inch thick; the smaller the tart, the thinner the pastry should be. Lift it slightly and allow it to fall back on the counter so that it will shrink before cutting. Measure the inside of the pan with a tape measure, starting at one top edge and going down the side, across the bottom, and up the other side. Cut the pastry ¼ to ½ inch larger than this measure for tartlets, 1 inch larger for tarts. The dough should come at least ¼ inch above the sides of the pan. It will rise during baking. After shaping, cover the tart or tartlet shells with plastic wrap and refrigerate for at least 1 hour to relax the dough. Freeze them, if desired (but refrigerate for 1 hour first).
FAVORITE SIZES FOR TARTLETS
