Low & Slow: Master the Art of Barbecue in 5 Easy Lessons (14 page)
Read Low & Slow: Master the Art of Barbecue in 5 Easy Lessons Online
Authors: Colleen Rush,Gary Wiviott

BOOK: Low & Slow: Master the Art of Barbecue in 5 Easy Lessons
9.24Mb size Format: txt, pdf, ePub
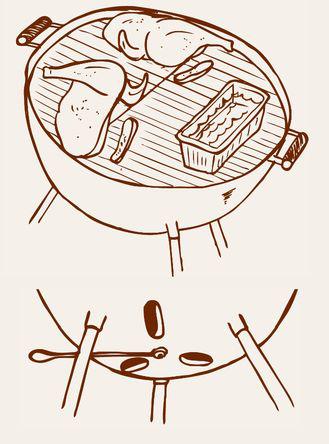
KETTLEPLACE THE CHICKEN HALVES
on the grate, with the breast-side close to the edge of the grate without touching the side of the cooker. The breast should not face the water pan and bank of charcoal. Use your tongs to nudge the thigh/leg portion higher on the breast. Place the oven thermometer on the grate between the chickens.Set the lid on the cooker with the top vent positioned directly above the chicken. Open the top and bottom vents.20 MINUTES INTO THE COOKClose the bottom vent by one-third.Pour the chimney starter one-third full with charcoal and light it (see Starting Your Chimney, page 28). After 5 minutes, when the charcoal in the chimney is fully lit, remove the cooker lid, slide the water pan aside, and open the top grate. Pour the fresh lit charcoal on the pile. Place 1 wood chunk on the fire and use your tongs to clean up and bank the pile.Check the level in the water pan. If it is less than three-quarters full, add water.When the fresh charcoal and wood chunk are engaged and no longer billowing smoke (about 10 minutes), put the lid on the cooker.1 HOUR INTO THE COOKRemove the cooker lid. For informational purposes, check the temperature on the oven thermometer. (See Addendum to the no-peeking policy, page 84.) Puncture the thickest part of the chicken breast with the tip of a sharp knife. If the juice running out of the chicken is clear, it’s done.If the juice is pinkish or cloudy, the chicken isn’t done yet. Did you use bigger chickens? Is it really cold outside? These are things that can lengthen the cook time. If the chicken isn’t done, squirt the skin with cooking spray or olive oil so it doesn’t stick to the grate; then flip the chicken over so it is skin-side down. Check the chicken every 10 minutes; it’s ready when the juices run clear. Or, if you insist on using a digital meat thermometer, the meat is done when the breast reads 155°F and the thigh reads 165°F. Again, for informational purposes, check the temperature on the oven thermometer when the chicken is done.
OKAY, YOU CAUGHT ME. I’VE TOLD YOU
many times how unnecessary it is to obsess about exact temperatures and vent positions, and now I am telling you to close the vents—by one-third, no less—and to check the temperature on an oven thermometer.
many times how unnecessary it is to obsess about exact temperatures and vent positions, and now I am telling you to close the vents—by one-third, no less—and to check the temperature on an oven thermometer.
What gives? This vent/temperature business has absolutely nothing to do with the chicken and everything to do with building your knowledge of and confidence in your cooker. You’re checking to see how much the temperature changes when you slightly close the vents and comparing that temperature with the temperature readings through the end of the cook. There shouldn’t be too much fluctuation in the temperature from beginning to end, and this thermometer check is a good, visual reminder of how steady your cooker temperature is if you build a clean-burning fire and resist the temptation to open the lid seventeen times. Not that it matters (chicken isn’t particularly sensitive to heat fluctuations), but the temperature should be in the neighborhood of 250°F to 275°F. If it is higher than 300°F, check the water pan. A low water level can cause the temperature in the cooker to spike. For other troubleshooting tips, see Stop, or I’ll Kick Your Ash (page 42).
CHARCOAL TESTI’VE SAID MORE THAN ONCE THAT YOU’RE
using far more charcoal than you actually need for these first two cooks. Before you start crying about the wasted $1.50 in charcoal, here’s some extra credit work for you. After you take the chicken off the cooker, leave the oven thermometer on the grate and make a mental note of the temperature. When you finish eating dinner, check the temperature again. And if you really want to be a barbecue wanker, wait half an hour or so and check the temperature again, and again, until you get bored with it. The point? To show you that long after the dishes are done, your cooker is still cookin’. You will see exactly how long the cooker you’re using—whether it’s a WSM, kettle, or offset—maintains the proper low and slow temperature range. Kettle users will find that the temperature won’t hold steady for as long because they’re using less charcoal and a smaller cooker. This lesson will come in handy when you start to panic about whether you have enough charcoal to smoke a few racks of ribs for four hours.
CRISPY SMOKED CHICKENusing far more charcoal than you actually need for these first two cooks. Before you start crying about the wasted $1.50 in charcoal, here’s some extra credit work for you. After you take the chicken off the cooker, leave the oven thermometer on the grate and make a mental note of the temperature. When you finish eating dinner, check the temperature again. And if you really want to be a barbecue wanker, wait half an hour or so and check the temperature again, and again, until you get bored with it. The point? To show you that long after the dishes are done, your cooker is still cookin’. You will see exactly how long the cooker you’re using—whether it’s a WSM, kettle, or offset—maintains the proper low and slow temperature range. Kettle users will find that the temperature won’t hold steady for as long because they’re using less charcoal and a smaller cooker. This lesson will come in handy when you start to panic about whether you have enough charcoal to smoke a few racks of ribs for four hours.
BECAUSE THE IDEAL BARBECUE
temperature is lower than those for other styles of cooking, the big trade-off with properly smoked chicken is that the skin typically does not crisp. And, as we all know, crispy skin is one of the three great wonders of poultry. (The other two wonders? Crispy skin and crispy skin.) Air-drying the chicken after brining or marinating helps, but it’s no guarantee. Instead, there are other, relatively simple post-cook solutions to the problem of rubbery skin.
temperature is lower than those for other styles of cooking, the big trade-off with properly smoked chicken is that the skin typically does not crisp. And, as we all know, crispy skin is one of the three great wonders of poultry. (The other two wonders? Crispy skin and crispy skin.) Air-drying the chicken after brining or marinating helps, but it’s no guarantee. Instead, there are other, relatively simple post-cook solutions to the problem of rubbery skin.
If you have a blowtorch handy, blast the flame about five inches from the chicken skin until the skin turns brown and crisp. Or set the fully cooked chickens, skin-side up, under a broiler for three to four minutes. If you’re using a kettle, flip the chicken skin-side down over the pile of hot charcoal and cook until the skin crisps, three to five minutes. If you’re using a WSM, remove the center ring and set the grate over the charcoal bowl. Flip the chicken skin-side down. Use caution and don’t walk away: the chicken will be very close to the coals, and the skin will crisp instantly—in less than one minute.
SWIM CAPCHICKEN
The brainchild of the Right Reverend Rock McNealy from the great state of Colorado, this technique also achieves the crispy-skinned chicken that’s so elusive in low and slow barbecue. The chicken halves are smoked skin-side down for the first part of the cook. The skin acts as a “swim cap” for the pooling juices, which help crisp the skin when the chicken is flipped. Follow all of the directions for Lesson #2, with these adjustments.
WSM
AND
OFFSET 2 HOURS BEFORE DINNERPlace the chicken halves skin-side down on the grate, as instructed for the WSM (page 32) and the offset (page 34).1 HOUR INTO THE COOKOpen the lid. Using tongs, flip the chicken skin-side up. Squirt the skin with cooking spray or brush with olive oil.
KETTLE 2 HOURS BEFORE DINNERPlace the chicken halves skin-side down on the grate, with the breast-side close to the edge of the grate without touching the side.30 MINUTES INTO THE COOKOpen the lid. Using tongs, flip the chicken skin-side up. Squirt the skin with cooking spray or brush with olive oil.
THINK OF BRINING AS A WAY TO INCREASE
your margin for error in low and slow. If something goes slightly wrong in a cook—a vent is blocked or the water pan runs too low—chicken that has been brined is less likely to suffer the consequences. The chicken will not dry out because brined meat is plumped full of water through a process called osmosis. Here’s how it works: All meat contains saltwater, but not as much as the brine you soak it in. Osmosis happens when the meat “corrects” this imbalance. Meat will absorb a saltwater solution until the concentration of salt and water in the brine is the same as the concentration in the meat. When meat absorbs the brine, the salt in the brine unwinds the strands of protein in the meat. This reaction traps water from the brine inside the meat. This is how brines turn a lean piece of chicken juicy and tender and keep meat from drying out if the temperature spikes or drops in your cooker.
your margin for error in low and slow. If something goes slightly wrong in a cook—a vent is blocked or the water pan runs too low—chicken that has been brined is less likely to suffer the consequences. The chicken will not dry out because brined meat is plumped full of water through a process called osmosis. Here’s how it works: All meat contains saltwater, but not as much as the brine you soak it in. Osmosis happens when the meat “corrects” this imbalance. Meat will absorb a saltwater solution until the concentration of salt and water in the brine is the same as the concentration in the meat. When meat absorbs the brine, the salt in the brine unwinds the strands of protein in the meat. This reaction traps water from the brine inside the meat. This is how brines turn a lean piece of chicken juicy and tender and keep meat from drying out if the temperature spikes or drops in your cooker.
When you add herbs, spices, or even sugar to brine, the seasonings are pulled into the cell structure of the meat and trapped inside along with the saltwater. Unlike marinades, which mostly coat the outer surface of the meat with flavor, brines actually help the flavor penetrate the meat.
If you’ve brined meat before, you may notice that the salt-to-water ratio for the Basic Brine is not as strong as some other recipes. This recipe calls for one-third cup of salt to about ten cups (or slightly more than one half gallon) of water, give or take a few ounces depending on the weight of the chicken when you fill the bags. Chicken halves require more solution to soak in and a longer time to soak than smaller chicken pieces like legs or thighs.
This modified brine is also another example of how this program is built to compensate for any mistakes you might make along the way: the weaker brine is more forgiving and allows for a longer brining time. If your cooking schedule is thrown off by weather or any of life’s other little curve balls, a window of six to twelve hours of brining time allows for plenty of leeway without risking overbrining the chicken. It’s just my way of making sure your first few low and slow dinners are a success. This is also why I’m so adamant about not straying from the instructions.
Once you complete the first Lesson #2 cook with the basic brine, experiment with these recipes to see how brining can create subtle changes in the flavor of the chicken.
BUTTERMILK BRINEThis is one of my all-time favorite brines. The buttermilk lends a subtle undercurrent of tanginess to the chicken, and makes the meat extremely tender and juicy. Although I doubt there will be any, the leftovers of this brined chicken are superb in many of the chicken recipes in chapter 9. The WSM and offset recipe makes enough brine for four chicken halves and the kettle recipe for two chicken halves.
WSM AND OFFSET½ gallon buttermilk
1 cup warm water
⅔ cup Morton kosher salt
½ cup brown sugar
¼ cup Old Bay Seasoning (optional)
KETTLE4 cups buttermilk
½ cup warm water
⅓ cup Morton kosher salt
¼ cup brown sugar
2 tablespoons Old Bay Seasoning (optional)
In a large bowl, whisk all of the ingredients together until the salt and sugar are dissolved.
For the WSM or offset, divide four chicken halves between two one-gallon zip-top bags. Divide the brine between the bags.
For the kettle, place two chicken halves in one one-gallon zip-top bag and pour all the brine into the bag.
Set the bags in the sink and fill with cold water to within 1 inch of the zipper (8 to 10 cups of water, depending on the water displacement from the weight of the chicken). Press the air out of the bags and seal. Place the bags in a large bowl or on a rimmed baking sheet to catch drips. Allow the chicken to brine for 6 to 12 hours in the refrigerator, turning the bag once or twice to redistribute the brine.
BOURBON AND HONEY BRINEBourbon and barbecue go together like prom night and prophylactics. The natural affinity between the smoky flavor of the meat and the sweet smokiness of the liquor comes through in a subtle way in this brine. The WSM and offset recipe makes enough brine for four chicken halves and the kettle recipe for two chicken halves.
WSM
AND OFFSET1 cup warm water
½ cup bourbon whiskey
⅔ cup Morton kosher salt
½ cup honey
1 tablespoon grated lemon rind
1 teaspoon freshly ground black pepper
KETTLE½ cup warm water
½ cup bourbon whiskey
⅓ cup Morton kosher salt
¼ cup honey
½ tablespoon grated lemon rind
½ teaspoon freshly ground black pepper
In a large bowl, whisk all of the ingredients together until the salt and honey are dissolved.
For the WSM or offset, divide four chicken halves between two one-gallon zip-top bags. Divide the brine between the bags.
Other books
Reckless Radiance by Kate Roth
Waiting to Die ~ A Zombie Novel by Cochran, Richard M.
Slapping Leather by Holt, Desiree
Trueno Rojo by John Varley
A Little Too Hot by Lisa Desrochers
The Sons of Destiny (The Reluctant Hero Trilogy Book 3) by Summer Lee
Faithfully Yours by Jo Ann Ferguson
Because the Rain by Daniel Buckman
The Sparks Fly Upward by Diana Norman