Read iOS Programming: The Big Nerd Ranch Guide, 3/e (Big Nerd Ranch Guides) Online
Authors: Aaron Hillegass,Joe Conway
Tags: #COM051370, #Big Nerd Ranch Guides, #iPhone / iPad Programming
iOS Programming: The Big Nerd Ranch Guide, 3/e (Big Nerd Ranch Guides) (47 page)

When the keyboard appears on the screen in the item detail view, it obscures
DetailViewController
’s
imageView
. This is annoying when you’re trying to see an image, so you’re going to implement the delegate method
textFieldShouldReturn:
to have the text field resign its first responder status to dismiss the keyboard when the return key is tapped. (This is why you hooked up the
delegate
outlets earlier.) But first, in
DetailViewController.h
, have
DetailViewController
conform to the
UITextFieldDelegate
protocol.
UITextFieldDelegate
>
In
DetailViewController.m
, implement
textFieldShouldReturn:
.
{
[textField resignFirstResponder];
return YES;
}
It would be stylish to also dismiss the keyboard if the user taps anywhere else on
DetailViewController
’s
view
. We can dismiss the keyboard by sending the
view
the message
endEditing:
, which will cause the text field (as a subview of the
view
) to resign as first responder. Now let’s figure out how to get the view to send a message when tapped.
We have seen how classes like
UIButton
can send an action message to a target when tapped. Buttons inherit this target-action behavior from their superclass,
UIControl
. You’re going to change the
view
of
DetailViewController
from an instance of
UIView
to an instance of
UIControl
so that it can handle touch events.
In
DetailViewController.xib
, select the main
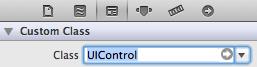
View
object. Open the identity inspector and change the
view
’s class to
UIControl
(
Figure 12.12
).
Figure 12.12 Changing the class of DetailViewController’s view
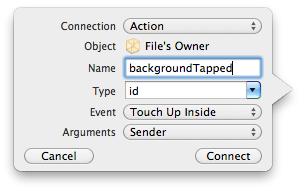
Then, open
DetailViewController.h
in the assistant editor. Control-drag from the
view
(now a
UIControl
) to the method declaration area of
DetailViewController
. When the pop-up window appears, select
Action
from the
Connection
pop-up menu. Notice that the interface of this pop-up window is slightly different than one you saw when creating and connecting the
UIBarButtonItem
. A
UIBarButtonItem
is a simplified version of
UIControl
– it only sends its target an action message when it is tapped. A
UIControl
, on the other hand, can send action messages in response to a variety of events.
Therefore, you must choose the appropriate event type to trigger the action message being sent. In this case, you want the action message to be sent when the user taps on the view. Configure this pop-up window to appear as it does in
Figure 12.13
and click
Connect
.
Figure 12.13 Configuring a UIControl action
This will create a stub method in
DetailViewController.m
. Enter the following code into that method.
{
[[self view] endEditing:YES];
}
Build and run your application and test both ways of dismissing the keyboard.
UIImagePickerController
has a built-in interface for editing an image once it has been selected. Allow the user to edit the image and use the edited image instead of the original image in
DetailViewController
.
Add a button that clears the image for an item.
A
UIImagePickerController
has a
cameraOverlayView
property. Make it so that presenting the
UIImagePickerController
shows a crosshair in the middle of the image capture area.
Once you understand how to use
UIImagePickerController
to take pictures, making the transition to recording video is trivial. Recall that an image picker controller has a
sourceType
property that determines whether an image comes from the camera, photo library, or saved photos album. Image picker controllers also have a
mediaTypes
property, which is an array of strings that contains identifiers for what types of media can be selected from the three source types.
There are two types of media a
UIImagePickerController
can select: still images and video. By default, the
mediaTypes
array only contains the constant string
kUTTypeImage
. Thus, if you do not change the
mediaTypes
property of an image picker controller, the camera will only allow the user to take still photos, and the photo library and saved photos album will only display images.
Adding the ability to record video or choose a video from the disk is as simple as adding the constant string
kUTTypeMovie
to the
mediaTypes
array. However, not all devices support video through the
UIImagePickerController
. Just like the class method
isSourceTypeAvailable:
allows you to determine if the device has a camera, the
availableMediaTypesForSourceType:
method checks to see if that camera can capture video. To set up an image picker controller that can record video or take still images, you would write the following code:
NSArray *availableTypes = [UIImagePickerController
availableMediaTypesForSourceType:UIImagePickerControllerSourceTypeCamera];
[ipc setMediaTypes:availableTypes];
[ipc setSourceType:UIImagePickerControllerSourceTypeCamera];
[ipc setDelegate:self];
Now when this image picker controller interface is presented to the user, there will be a switch that allows them to choose between the still image camera or the video recorder. If the user chooses to record a video, you need to handle that in the
UIImagePickerController
delegate method
imagePickerController:didFinishPickingMediaWithInfo:
.
When dealing with still images, the
info
dictionary that is passed as an argument contains the full image as a
UIImage
object. However, there is no
“
UIVideo
”
class. (Loading an entire video into memory at once would be tough to do with iOS device memory constraints.) Therefore, recorded video is written to disk in a temporary directory. When the user finalizes the video recording,
imagePickerController:didFinishPickingMediaWithInfo:
is sent to the image picker controller’s delegate, and the path of the video on the disk is in the
info
dictionary. You can get the path like so:
didFinishPickingMediaWithInfo:(NSDictionary *)info
{
NSURL *mediaURL = [info objectForKey:UIImagePickerControllerMediaURL];
}
We will talk about the filesystem in
Chapter 14
, but what you should know now is that the temporary directory is not a safe place to store the video. It needs to be moved to another location.
didFinishPickingMediaWithInfo:(NSDictionary *)info
{
NSURL *mediaURL = [info objectForKey:UIImagePickerControllerMediaURL];
if (mediaURL) {
// Make sure this device supports videos in its photo album
if (UIVideoAtPathIsCompatibleWithSavedPhotosAlbum([mediaURL path])) {
// Save the video to the photos album
UISaveVideoAtPathToSavedPhotosAlbum([mediaURL path], nil, nil, nil);
// Remove the video from the temporary directory it was saved at
[[NSFileManager defaultManager] removeItemAtPath:[mediaURL path]
error:nil];
}
}
}
That is really all there is to it. There is just one situation that requires some additional information: suppose you want to restrict the user to choosing
only
videos. Restricting the user to images is simple (leave
mediaTypes
as the default). Allowing the user to choose between images and videos is just as simple (pass the return value from
availableMediaTypesForSourceType:
). However, to allow video only, you have to jump through a few hoops. First, you must make sure the device supports video, and then you must set the
mediaTypes
property to an array containing the identifier for video only.
availableMediaTypesForSourceType:UIImagePickerControllerSourceTypeCamera];
if ([availableTypes containsObject:(NSString *)kUTTypeMovie])
[ipc setMediaTypes:[NSArray arrayWithObject:(NSString *)kUTTypeMovie]];
Wondering why
kUTTypeMovie
is cast to an
NSString
? This constant is declared as:
If you build this code, it will fail, and the compiler will complain that it has never heard of
kUTTypeMovie
. Oddly enough, both
kUTTypeMovie
and
kUTTypeImage
are declared and defined in another framework – MobileCoreServices. You have to explicitly add this framework and import its header file into your project to use these two constants.
