DIY Projects for the Self-Sufficient Homeowner: 25 Ways to Build a Self-Reliant Lifestyle (15 page)
Authors: Betsy Matheson
Tags: #Non-Fiction

8 Move the cold frame
to the site. Clear and level the ground where it will set. Some gardeners like to excavate the site slightly—see discussion on
page 49
.

Add weeks to your garden’s growing season by starting seeds
indoors, then transplanting them to the garden after the danger of frost is past. Seedlings are available for purchase at the garden center in the spring, of course, but starting your own at home presents a number of advantages:
Seedlings need
a lot of water, sunlight, and warmth in their infancy. A kitchen window or greenhouse is an ideal growing environment for propagating plants.
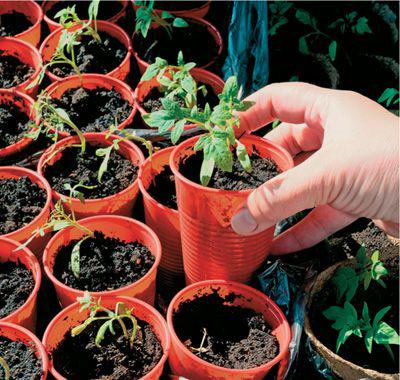
Using colored cups
as starter containers has the advantage of letting you color-code your plants so you can avoid any confusion. Beginning gardeners often have trouble distinguishing one pot from another when they are still seedlings. Here, the red cups clearly communicate “tomato.”
• Buying seeds is less expensive than buying seedlings.
• You can cull out all but the strongest seedlings, which will hopefully result in stronger plants and a more bountiful crop.
• Garden centers sell seeds for a diverse and varied array of plants, but seedlings for only the most common species. Seed catalogs introduce an entirely new selection as well.
• You can be certain that unwanted pesticides have not been used on the plants in your garden, even in their infancy.
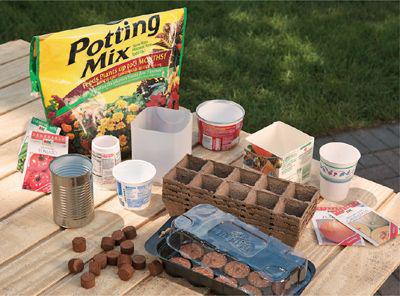
Start your seeds eight to ten weeks before you plan to transplant them into your garden. To get started, you’ll need a few small containers, a suitable growing medium, and a bright spot for the seedlings to grow—either a sunny window that receives at least six hours of bright sunlight per day, a greenhouse, or a planting table in your home that’s
illuminated by artificial grow lights. If you’re planning to raise your seedlings by artificial light, position one or two fluorescent lighting fixtures fitted with 40-watt, full-spectrum bulbs about six inches above the seedlings. Leave fluorescent lights on for 12 to 16 hours a day—many gardeners find it helpful to connect the fixture to a timer to ensure their plants receive adequate light each day.

A 4-ft.,
two-bulb fluorescent light fixture that can be raised or lowered over a table is really all you need to start your vegetable plants indoors.
Growing Mediums
If you plan to use your own garden soil or compost, prepare your seedling containers in the fall, before the ground gets too cold and wet.
Almost any small container can be used to grow seedlings. Just make sure the container you use is clean and hasn’t had contact with any chemical that could be poisonous to plants. Also, remember to cut a drainage hole in the bottom of your container before filling it with soil. Drainage is very important to ensure that your plants are well ventilated. Excessively moist soil can result in mold or other diseases, as well. Good options for seedling containers include:
• Peat pots or pellets
• Fiber cubes
• Used plastic jugs
• Cans (any size)
• Used plastic tubs (i.e., sour cream,
• cottage cheese, or margarine containers)
• Used yogurt cups
• Egg cartons
• Small paper cups
 Starting Seedlings
1. Planting:
Sow three to four seeds in each container according to the instructions on the seed packet—as a general rule, large seeds should be buried and small seeds can be sprinkled on top of the soil. Label the container with the type of plant and the date your seeds were planted.
2. Germination:
Water the seeds whenever the containers look dry. Until the seeds sprout, keep seedlings in a dark, warm space. Cover germinating seeds with plastic bags or plastic wrap. Open the plastic for a few hours every few days to let the soil breathe, then re-close.
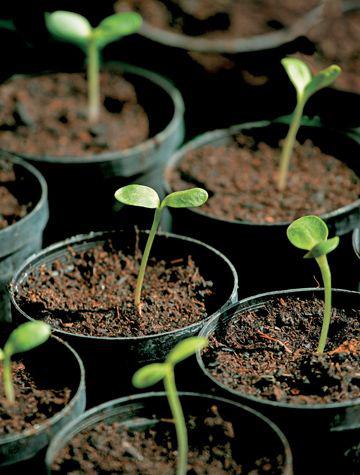
3. Sprouts:
When the seeds sprout, remove plastic covering and move them into direct light. Seedlings need lots of light to grow. Keep the soil medium moist but not soggy. Remember, multiple light waterings are better for seedlings than the occasional soaking.
4. Culling:
When the true leaves appear (see illustration), cut off all but the strongest seedling in each container at soil level. Do not pull up the unwanted seedlings, as this may damage the roots of the seedling you’re cultivating. You may also choose to fertilize every week or so as your seedlings grow.

The four stages
in the growth of a seedling are illustrated above. Note that seed leaves and true leaves serve different purposes and will look different. When a plant has 4 to 8 true leaves, it is ready for transplanting.
Hardening Off and TransplantingWhen your seedlings have four to eight true leaves, they should be hardened off, then transplanted to the garden. Hardening off is the process of gradually introducing the plant to outdoor conditions so it is not shocked when you move it outside permanently. About two weeks before planting, place your seedlings outdoors for an hour the first day, and then gradually increase the time until your seedlings spend the whole day outside. Protect seedlings from wind and do not expose them to the midday sun for the first few days. Stop fertilizing seedlings during the last week. A cold frame is a great environment for hardening off seedlings. Seedlings can stay in a cold frame for two to three weeks, gradually getting used to the cooler air and chilly nights before they go out into the garden. Open the lid of the cold frame a little bit more each day.